Situations such as system file corruption and unexplained or erratic system behavior require you to repair or reinstall your Windows installation by running Setup.exe from a mounted Windows ISO or DVD/USB flash drive. However, it’s always possible that the current Windows installation’s build or the Service Pack level is higher than that of the ISO or your setup media.
In order to repair Windows, you must first make sure that the version and build number of the source is higher than that of your current installation of Windows. But how to keep the installation media updated?

Contents
What is Slipstreaming and Why Should I do it
Monthly Cumulative Updates released for Windows 10 bump the build number which means your Windows 10 ISO becomes outdated after a Cumulative Update gets released. You can integrate the Cumulative Update and other required updates, and build an updated ISO containing the latest version and build of Windows.
The process of integrating Windows update packages into the Windows Setup disk is known as slipstreaming.
In some cases, system file corruption can be repaired by running the System File Checker and if necessary, the DISM command. If the Windows Component Store is corrupted, you’ll need to run DISM mentioning the source WIM file. That’s another reason to have an updated Windows 10 setup source always ready.
Slipstreaming is also useful if you want to freshly install the latest build of windows on other computers. The benefit is that that you don’t have to install an older version or build first, and then install the required updates via Windows Update manually (which may require multiple reboots, and prove to be counterproductive).
How to Slipstream Updates into your Windows 10 Setup Media
Let’s see how to slipstream Windows update packages to create an updated Windows 10 install media or ISO. Technical support folks do this every now and then after a Cumulative Update or a Service Pack or Roll-up package is released. The integration process may take even an hour or so, depending upon the number of updates you’re adding.
Method 1: Using NTLite
NTLite is an excellent third-party freeware solution for Windows integration and customization. This tool can integrate updates, drivers, automate Windows and application setup, speed up the Windows deployment process, and create a custom ISO.
- Mount the Windows 10 ISO you’ve downloaded to a drive letter. Then copy the contents of the mounted drive to a folder — e.g.,
D:\W10-20H2-Setup.Or, if you have the Windows Setup USB disk (instead of ISO) and want to update it, insert that setup disk instead. - Download NTLite and install it.
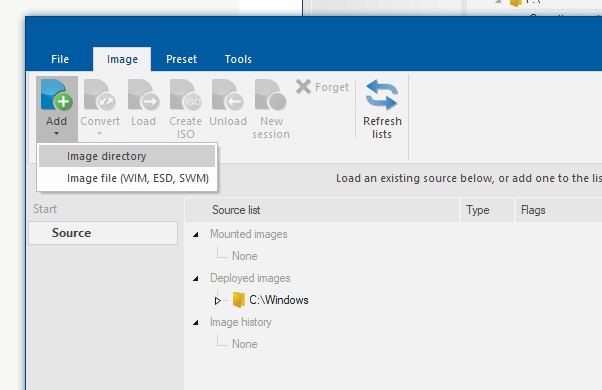
- Start NTLite. In the NTLite window, click Add → Image directory
- Select the folder that contains the
install.wimimage you want to customize – e.g.,D:\W10-20H2-Setup\SourcesNote: If the ISO/USB setup disk/mounted folder containsinstall.esdinstead ofinstall.wim, you’ll need to first convert the ESD file into WIM in order to service it. - The Windows 10 ISO, downloaded from Microsoft, contains several Windows 10 editions in it. Select the edition of Windows 10 you want to customize (slipstream).
- Right-click on the chosen edition and click Load. In this example, I selected Windows 10 Pro which has the image index
6in this ISO file.Side note: If you’re using the NTLite method to integrate updates, you don’t need to know the index number. Whereas for DISM and DISM GUI methods, you must find the index number or the edition you’re going to service. The index number assigned for an edition may vary for each ISO. The index number of each edition can be determined using DISM command-line.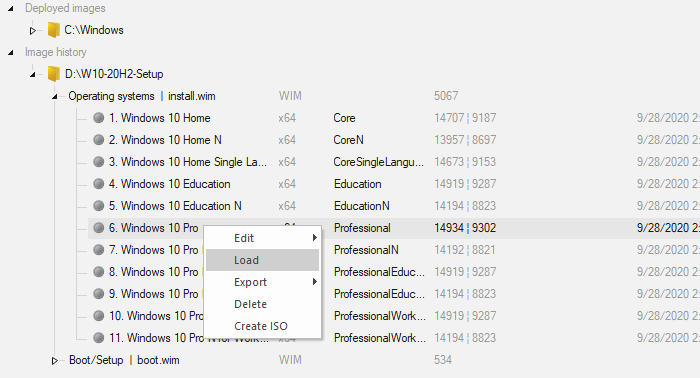
- Click the Updates tab on the left.
- Click on the Add button and select Latest online updates.
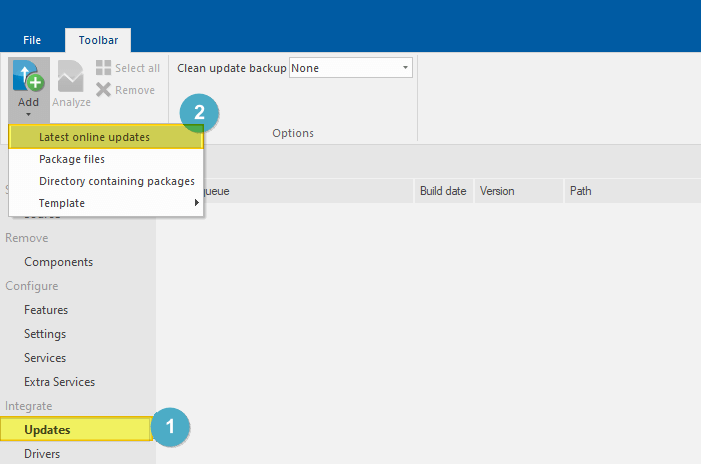
- NTLite will list all the available Windows Updates for the current ISO build. NTLite would download these updates only from Microsoft’s servers.
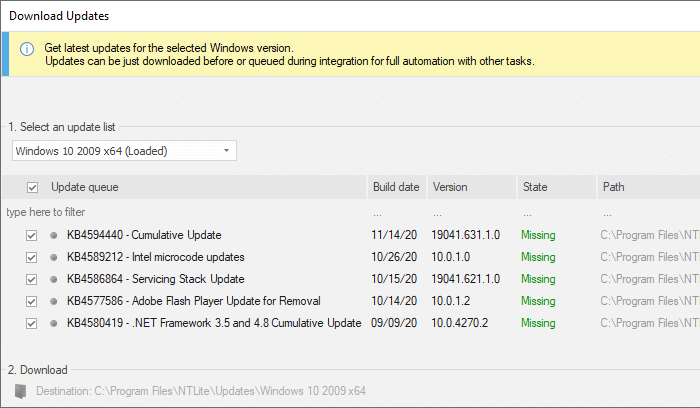
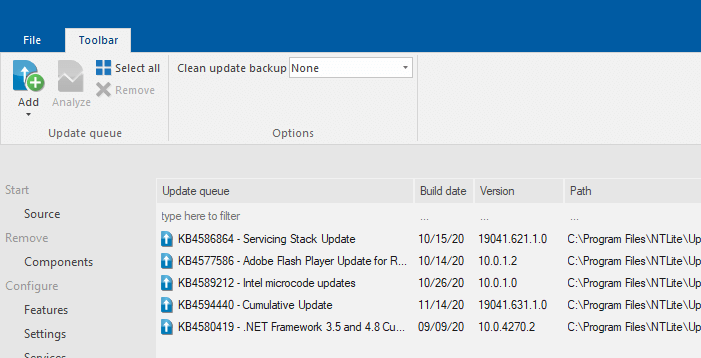
- Select all the available updates from the list and click Enqueue.
The Windows Update .msu files are now added to the update queue.
Optional: Want to manually download the updates?
Unlike the other methods, you don’t need to manually download the .msu packages from the Microsoft Update Catalog. NTLite does it all automatically. But, in case you want to download them manually:
Visit the Microsoft Update Catalog and download all the .MSU update packages available for version 20H2 (which is the version on the ISO) for your OS bitness (x86 vs x64).
Alternatively, you may use a third-party tool called WSUS Offline Updater to download the MSU packages pertaining to your computer. Be sure to download the servicing stack update as well.
In case you already have downloaded the update packages locally, you can tell NTLite to use them. Follow these steps:
- Select the option Directory containing packages in that case.
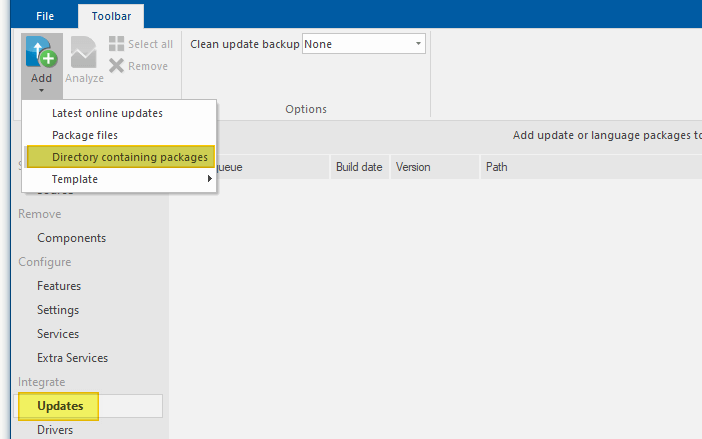
- Browse to select the
D:\Updatesfolder where the downloaded .msu package(s) is stored. Every .msu package in that folder will be added to the queue.
- Select the option Directory containing packages in that case.
- Once you add the updates to the update queue, click on the Apply button.
- In the next dialog, you’ll see the following options:
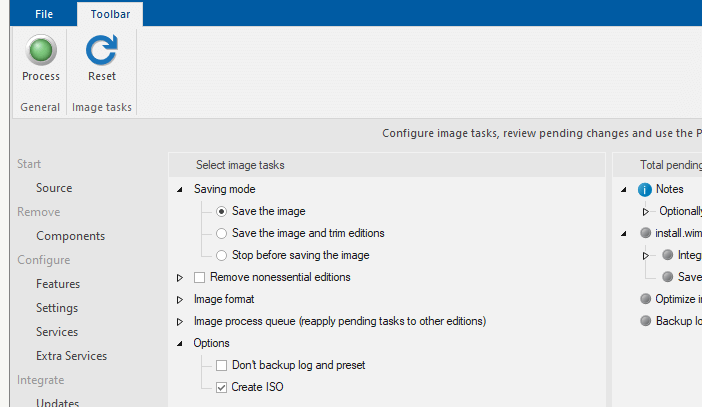
Options:
- Save the image – Just saves the changes to the loaded edition, keeps the other ones.
- Save the image and trim editions – Saves the changes and deletes other editions on the image, this can save a lot of space on the actual image if you don’t need other editions.
- Stop before saving the image – Applies the changes to the mount directory only, changes will not be saved to the actual image until you unload and tick save changes, or reapply in another session. This is useful when doing multiple sessions to not need to wait for saving and remounting each time.
- Remove non-essential editions – Provides the ability to manually select which editions to remove. You can also manually remove editions on the Source page directly by right-clicking it and choosing Delete.
- Image format – When saving an image, choose the format. The formats available are: WIM, ESD (high compression, but read-only), and Spanned, split (SWM).
- Image process queue – With this option, selected current tasks can be multiplied to the other editions on the loaded image, not needing to manually do so for each edition.
(For example, you can select to integrate a driver to install.wim and also to boot.wim, or the same updates for Home and Pro edition, in one session.) - Create ISO option automates ISO creation at the end of the process. By ticking the checkbox you will be asked for a file destination.
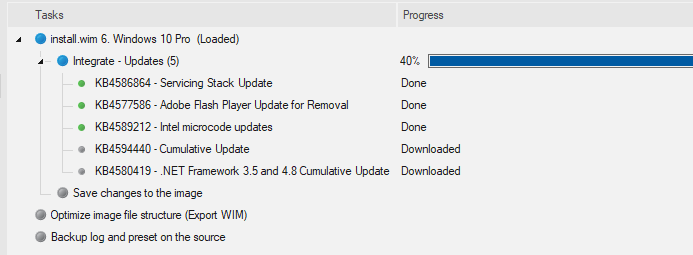
- Click on the Process button to complete the integration process. NTLite would now suggest that you disable the real-time antivirus protection to speed up the file copy process.
Build numbers comparison:

Method 2: Using DISM GUI tool
- Download the latest Windows 10 ISO from Microsoft website. This example uses the Windows 10 Fall Creators Update version 1709 Build 16299.15.
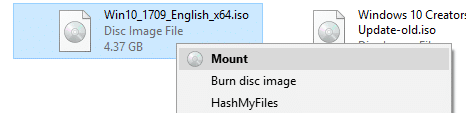
- Right-click on the ISO and click Mount, to mount the ISO to a drive letter.
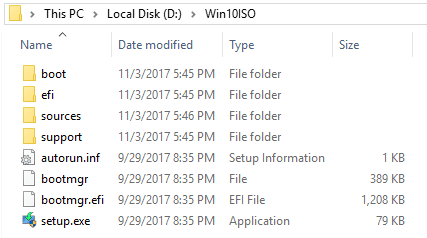
- Copy the contents of the ISO to a folder. Let’s say,
D:\Win10ISO
 Skip steps 1-3 if you already have a bootable Windows (v1709) Setup USB flash drive. You can use that instead of the ISO.
 - Next, get the Windows Update .msu or .cab packages by visiting the Microsoft Update Catalog. In the Microsoft Updates Catalog, use “windows 10 version 1709 x64” (since I’m using Windows 10 64-bit) or a similar phrase to find updates available for the Fall Creators Update v1709 64-bit Windows version. If you’re using 32-bit Windows, then use the
x86keyword instead ofx64.
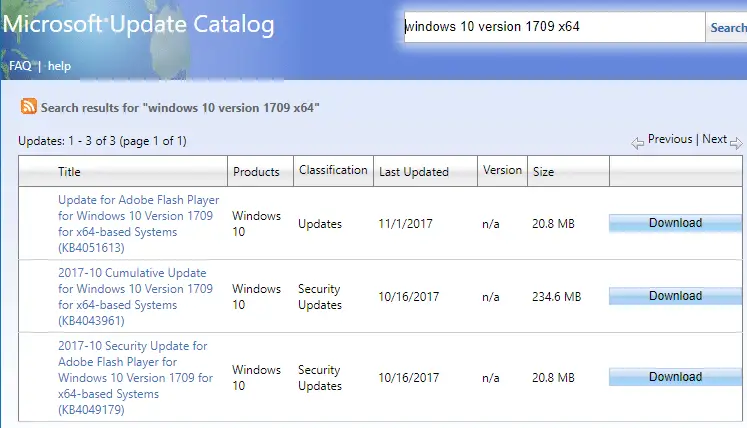
There are three updates available: KB4043961 which is the Cumulative Update (Build 16299.19), KB4051613 which is the Adobe Update, and KB4049179 which is a Security Update for Adobe.- windows10.0-kb4043961-x64_5fb7d7bf32e79ea9debe8fb51af2a0c2e296e935.msu
- windows10.0-kb4049179-x64_47eff21486eab4ef646976186735a532f9b4a93f.msu
- windows10.0-kb4051613-x64_b2b1d0c13c89c6da1505178557b2150588a0358e.msu
- Download all the three updates to a folder. Let’s say the folder is
D:\v1709 Updates

- Download DISM GUI tool from CodePlex, and run the program elevated (Run as Administrator).
- Create a folder where you’re going to mount the install.wim file. Let’s say,
D:\Mounted-WIM - In the DISM GUI tool, mention the path to install.wim. In this example, the path would be
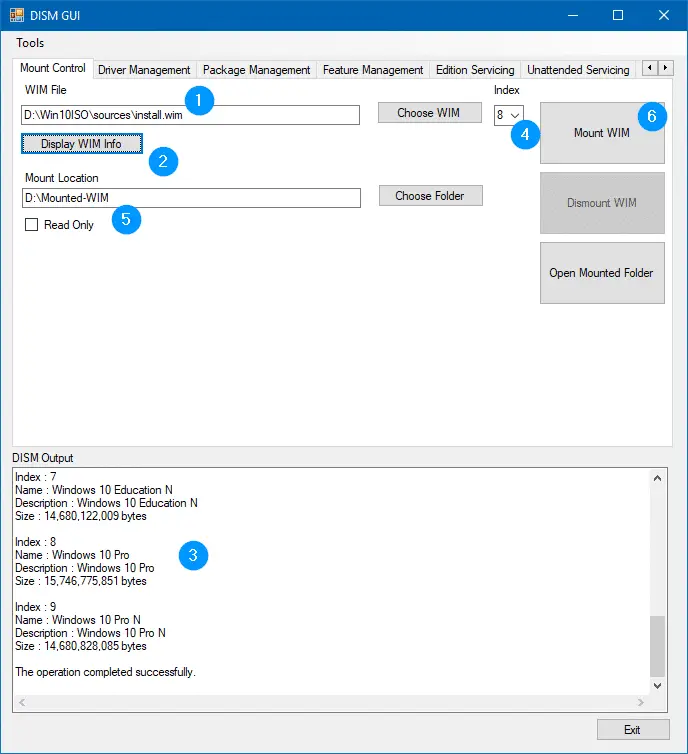
D:\Win10ISO\sources\install.wim
 Note: In the sources folder, if the file
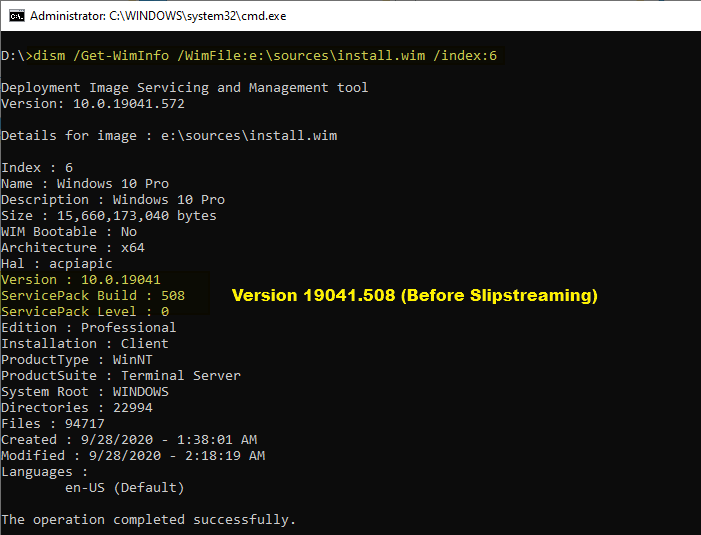
install.esdexists instead ofinstall.wim, first, you’ll need to convert the ESD file to WIM format in order to service the image. Full instructions on that are available in the article How to Convert ESD to WIM Using DISM in Windows 10 - Click the Display WIM Info button to view the indexes in the WIM file. In this example, we’ll choose Index: 8 (Windows 10 Pro, in this case) and service the image.
- Select 8 in the Index drop-down box
- In the Mount location, type in D:\Mounted-WIM
- Click the Mount WIM button
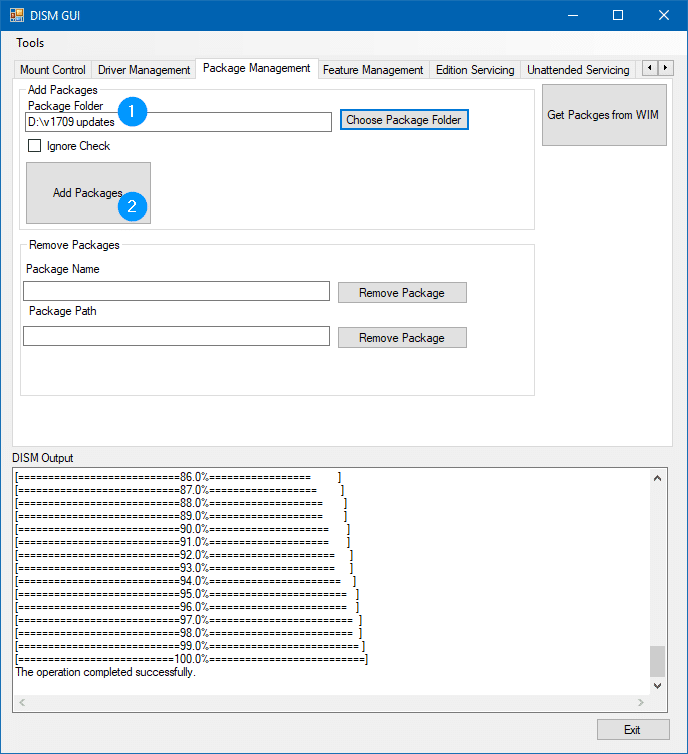
- Now that the WIM is mounted on to the specified folder. Click on the Package Management tab in DISM GUI.
- Type in or browse to locate the packages folder. In this example, the Windows Update packages are stored under D:\v1709 Updates
- Click on the Add Packages button.
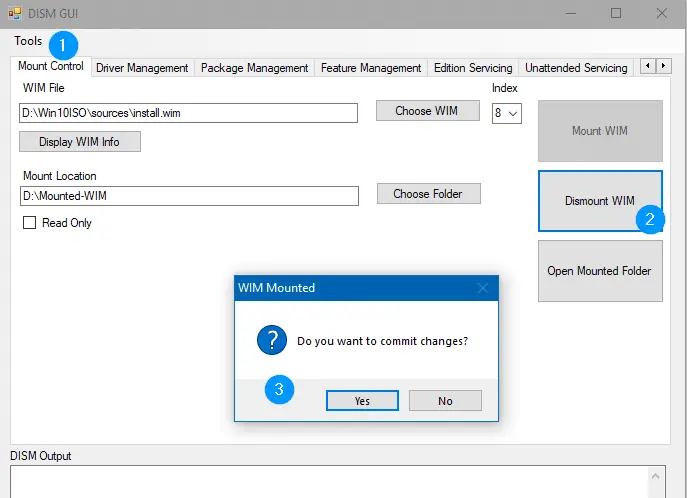
- Go back to the Mount Control tab, and click Dismount WIM.
- Click Yes when you’re asked to commit changes made to the WIM. Now, every available Windows Update package (*.msu and *.cab) in that folder will be integrated into the install.wim image.
- After step 9 is complete, delete the D:\Mounted-WIM and D:\v1709 Updates folders manually.
That’s it! You’ve now updated your Windows 10 setup source or USB installation media. You can run Setup.exe now if you plan to do a repair installation or in-place upgrade of Windows. Or, if you’re wanting to run DISM mentioning the setup source path to fix any corruption in the system, you can mention the path of the updated install.wim.
Method 3: Using DISM console tool
The built-in DISM.exe console utility is the backend for “DISM GUI”. Here is the list of DISM commands the DISM GUI tool (in Method 2) ran in the background.
Getting the WIM file Info and Viewing the Indexes
To get the WIM file info and its indexes, this is the command used:
dism.exe /Get-WimInfo /wimFile:"D:\Win10ISO\sources\install.wim"
Mounting the WIM file
The Mount Wim button runs this tool to mount the install.wim image (index: 8) to the specified folder.
dism.exe /Mount-WIM /WimFile:"D:\Win10ISO\sources\install.wim" /index:8 /MountDir:"D:\Mounted-WIM"
Adding Windows Update Packages to the mounted WIM file
The Add Packages button in DISM GUI runs this command:
dism.exe /image:"D:\Mounted-WIM" /Add-Package /PackagePath:"D:\v1709 updates"
Dismount the WIM file and Commit Changes
To unmount the WIM file and to apply the changes (package addition or removal), this is the command used:
dism.exe /Unmount-wim /mountdir:"D:\Mounted-WIM" /commit
Create an ISO file from the Updated Setup Source folder
Optionally, you can rebuild a new ISO from the contents of D:\Win10ISO folder using the Oscdimg console utility from Windows ADK.
If you using the NTLite method, you can integrate updates and create an updated ISO in one go.
(Last reviewed on January 6, 2022)
One small request: If you liked this post, please share this?
One "tiny" share from you would seriously help a lot with the growth of this blog. Some great suggestions:- Pin it!
- Share it to your favorite blog + Facebook, Reddit
- Tweet it!
Awesome article, thanks a ton !!!
need more info on DISM GUI tool. I could not get the tool to work. I used PowerISO
what if I like to slipstream Windows 10 updates onto multiple indexes (aka. more than 1 index)? how do I do this on setup media that contains more than one edition of Windows 10?
@EP: “Image process queue” option in NTLite may be what you need.
Great write up!
Any update to this regarding the install.esd which seems standard on the install media now instead of the install.wim?
Looks like Volume ISO’s have the install.wim still however the media creation tool seems to use the multi-version install.esd in place of the install.wim.
The .esd needs to be converted into .wim first. NTLite can do that, too. Check out How to Convert an ESD file to WIM in Windows 10: https://www.winhelponline.com/blog/convert-esd-to-wim-dism-windows-10/
Hi
Teorically, this works on Windows 2016?
how to add applications?
How to put back the files into the ISO?
@Allen: NTLite has a checkbox option named “Create ISO” as in the above screenshot.
Perfect Bro, thanks.
Can you add a tutorial about adding Microsoft Visual C++ runtime, Windows ADK,…etc to iso Windows