This article explains how to uninstall and reinstall Windows Sandbox in Windows 10 and 11.
Windows Sandbox provides a lightweight desktop environment to safely run applications in isolation. Software installed inside the Windows Sandbox environment remains “sandboxed” and runs separately from the host machine.
A sandbox is temporary. All the software, files, and the state are deleted when it’s closed.
Windows Sandbox – Prerequisites
- ARM64 (for Windows 11, version 22H2 and later) or AMD64 architecture
- Virtualization capabilities enabled in BIOS
- At least 4 GB of RAM (8 GB recommended)
- At least 1 GB of free disk space (SSD recommended)
- At least two CPU cores (four cores with hyper-threading recommended)
(Windows Sandbox is unavailable on the Windows 10/11 Home edition. However, copying the required package files from a Pro system enables Windows Sandbox on Windows 10/11 Home Edition. But this is not an officially supported method.)
Installing Windows Sandbox
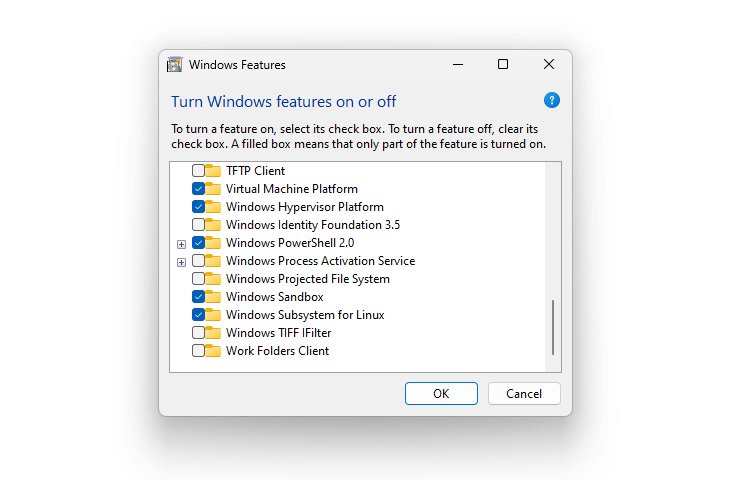
Using the “Windows Features” dialog
Right-click Start, and click Run. Type OptionalFeatures.exe and click OK.
In the Windows Features dialog, enable “Windows Sandbox” and click OK.
Important: In some cases, the entry may be already enabled, but Windows Sandbox (WindowsSandbox.exe) may be nowhere to be found on your computer. In that case, uncheck the Windows Sandbox entry and reboot. After rebooting, reenable the Windows Sandbox entry, and reboot if prompted.
Using DISM to install Windows Sandbox
From the admin Command Prompt, run the following commands to uninstall and reinstall Windows Sandbox:
(It will be effective to uninstall the feature and then reinstall it. This clears any remnant files and registry entries.)
dism /online /Disable-Feature /FeatureName:"Containers-DisposableClientVM"
Restart Windows,
And then run the following command to install Windows Sandbox:
dism /online /Enable-Feature /FeatureName:"Containers-DisposableClientVM" -All
Using PowerShell to install Windows Sandbox
From the admin PowerShell window, run the following commands to uninstall and reinstall Windows Sandbox:
Disable-WindowsOptionalFeature -FeatureName "Containers-DisposableClientVM" -Online
Enable-WindowsOptionalFeature -FeatureName "Containers-DisposableClientVM" -All -Online
Check the status of the Windows Sandbox feature
To know if the Windows Sandbox feature is installed, you may run the following command:
dism /online /get-featureinfo /featurename:Containers-DisposableClientVM
Sample output:
Version: 10.0.19041.844
Image Version: 10.0.19045.3086
Feature Information:
Feature Name : Containers-DisposableClientVM
Display Name : Windows Sandbox
Description : Enables the dependencies required to run Windows Sandbox scenarios.
Restart Required : Possible
State : Enabled
Custom Properties:
(No custom properties found)
The operation completed successfully.
I hope that helps!
One small request: If you liked this post, please share this?
One "tiny" share from you would seriously help a lot with the growth of this blog. Some great suggestions:- Pin it!
- Share it to your favorite blog + Facebook, Reddit
- Tweet it!
This process on Windows 11 ioT Enterprise bricked my OS, rendering completely inoperable. Had to do a full re-install