There are situations where you need a specific Windows system file from the install.wim image present in a Windows 10/11 setup disk or ISO. In the case of missing system files, the DISM & SFC procedure will automatically restore them. Alternatively, you can restore missing Windows system files (of any version) from the WinBindex.
In some circumstances, extracting from install.wim in Windows ISO/DVD is the only option possible. Let’s say you want to repair or restore the Windows Recovery Environment on a computer. For that, you’ll need the WinRE.wim image present inside the install.wim or install.esd in a Windows 10 or 11 ISO.
(For a piece of brief information about ESD & WIM formats, go to the end of this article.)
There are at least two ways to extract files from the Windows 10 or 11 setup disk or ISO.
Contents
Extract individual files from Windows 10/11 ISO (install.wim)
In this example, let’s see how to extract a file named WinRE.wim from the Windows 10 Setup disk or ISO.
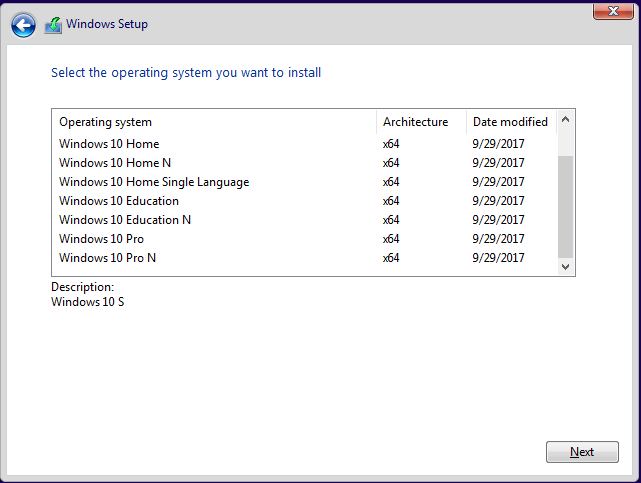
Before proceeding, remember that the Microsoft-supplied ISO files have multiple Windows editions whose images are combined into a single ISO.
Each Windows 10 version/image is referenced by an index number. Before we can extract the files, we’ll need to find out the number of editions available in the ISO and their indexes. Both methods listed below will take care of this step.
Method 1: Using 7-Zip to extract files from Install.wim
- Download and install 7-Zip from
http://7-zip.org/ - Insert your Windows 10 DVD and browse to the
Sourcesfolder inside the DVD. If you have a Windows 10 ISO, double-click the ISO to mount the ISO to a drive letter.In multi-arch DVDs, make sure you access the correct “Sources” folder matching your computer’s bitness (x86 or x64). The paths are “X:\x86\Sources” & “X:\x64\Sources” for 32-bit and 64-bit versions, respectively.Note: The Mount feature is built-in in Windows 8, 8.1, and Windows 10. In Windows 7 and earlier, you need to use a third-party tool such as WinCDEmu, or WinISO to mount ISO to a drive letter. - In the Sources folder, right-click
install.wimorinstall.esd, click 7-Zip, and click Open archive.Note: If install.wim is not there, open install.esd. See also ESD vs WIM.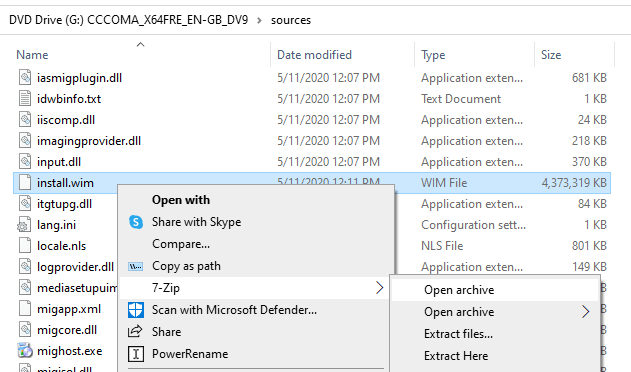
- Each index you inside the
install.wimorinstall.esdrepresents a Windows Edition.
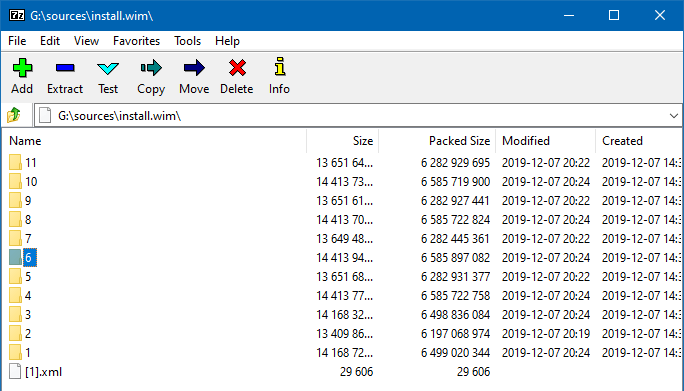 Find the index number of the edition you want. To do that, double-click to open the
[1].xmlfile. You can see the list of indexes and the corresponding Windows edition. For example, here are the details about the Windows 10 Professional Edition (index #6) image.-<IMAGE INDEX="6"> <DIRCOUNT>20479</DIRCOUNT> <FILECOUNT>89140</FILECOUNT> <TOTALBYTES>14413947833</TOTALBYTES> <HARDLINKBYTES>5930108924</HARDLINKBYTES> -<CREATIONTIME> <HIGHPART>0x01D62758</HIGHPART> <LOWPART>0x0BE4BCB2</LOWPART> </CREATIONTIME> -<LASTMODIFICATIONTIME> <HIGHPART>0x01D6275C</HIGHPART> <LOWPART>0xE8134B3E</LOWPART> </LASTMODIFICATIONTIME> <WIMBOOT>0</WIMBOOT> -<WINDOWS> <ARCH>9</ARCH> <PRODUCTNAME>Microsoft® Windows® Operating System</PRODUCTNAME> <EDITIONID>Professional</EDITIONID> <INSTALLATIONTYPE>Client</INSTALLATIONTYPE> -<SERVICINGDATA> <GDRDUREVISION>0</GDRDUREVISION> <PKEYCONFIGVERSION>10.0.19041.1;2016-01-01T00:00:00Z</PKEYCONFIGVERSION> <IMAGESTATE>IMAGE_STATE_GENERALIZE_RESEAL_TO_OOBE</IMAGESTATE> </SERVICINGDATA> <PRODUCTTYPE>WinNT</PRODUCTTYPE> <PRODUCTSUITE>Terminal Server</PRODUCTSUITE> -<LANGUAGES> <LANGUAGE>en-GB</LANGUAGE> <FALLBACK LANGUAGE="en-GB">en-US</FALLBACK> <DEFAULT>en-GB</DEFAULT> </LANGUAGES> -<VERSION> <MAJOR>10</MAJOR> <MINOR>0</MINOR> <BUILD>19041</BUILD> <SPBUILD>264</SPBUILD> <SPLEVEL>0</SPLEVEL> <BRANCH>vb_release</BRANCH> </VERSION> <SYSTEMROOT>WINDOWS</SYSTEMROOT> </WINDOWS> <NAME>Windows 10 Pro</NAME> <DESCRIPTION>Windows 10 Pro</DESCRIPTION> <FLAGS>Professional</FLAGS> <DISPLAYNAME>Windows 10 Pro</DISPLAYNAME> <DISPLAYDESCRIPTION>Windows 10 Pro</DISPLAYDESCRIPTION> </IMAGE>
To summarize the XML file’s contents, here is the list of indexes found inside theinstall.wimorinstall.esdand the corresponding editions.1 - Windows 10 Home 2 - Windows 10 Home N 3 - Windows 10 Home Single Language 4 - Windows 10 Education 5 - Windows 10 Education N 6 - Windows 10 Pro 7 - Windows 10 Pro N 8 - Windows 10 Pro Education 9 - Windows 10 Pro Education N 10 - Windows 10 Pro for Workstations 11 - Windows 10 Pro N for Workstations
Note: You can see the list of indexes and the corresponding editions using DISM. This is explained in Method 2 of this article.
As a side note, I’ve found that the WinRE.wim (Windows Recovery Environment image) file size is precisely the same in every Windows 10 Edition. However, the best practice would be to get a copy only from the specific index folder in the install.wim.
The ISOs downloaded from the Microsoft site contain multiple Windows images combined into a single .wim file. If you have a custom ISO or DVD (e.g., distributed by your organization) with a single Windows image (Pro, Home, Education Edition, etc.), there will be only one index numbered folder. - Double-click the appropriate index number folder in 7-Zip. For instance, if you’re looking to extract files for Windows 10 Pro, double-click the folder named “
6“. - Browse to the
"Sources\install.wim\[index]\Windows\System32\Recovery\"and copyWinre.wimto the Desktop.
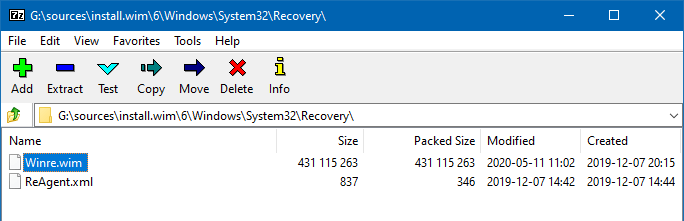
- Close 7-Zip.
- Unmount the ISO or eject the Setup DVD from the drive.
Using the above method, you can extract any file from the install.wim or install.esd.
![]() 7-Zip also supports the ESD format. That means you don’t have to convert the install.esd to install.wim to extract its contents.
7-Zip also supports the ESD format. That means you don’t have to convert the install.esd to install.wim to extract its contents.
Method 2: Using DISM to mount Install.wim and extract the contents
DISM (Deployment Image Servicing and Management tool) tool is to service online and offline Windows images. To mount the install.wim file and extract its contents, follow these steps:
Note: If you have install.esd instead of install.wim, you’ll need to convert the ESD to WIM format before you can mount it using DISM.
- Insert your Windows 10 DVD and browse to the
Sourcesfolder inside the DVD. If you have a Windows 10 ISO, double-click the ISO to mount the ISO to a drive letter. - Open an elevated Command Prompt window.
- Find the list of indexes and the corresponding editions found in the
install.wim, by running the following command:dism /get-wiminfo /wimfile:"G:\sources\install.wim"
… where
G:\is the drive letter of the mounted ISO or Windows Setup DVD.Windows ISOs downloaded from Microsoft are multi-exition ISOs. For example, here’s the list of editions found inside the Windows 10 ISO from Microsoft:
Index : 1
Name : Windows 10 Home
Description : Windows 10 Home
Size : 14,168,728,218 bytes

Index : 2
Name : Windows 10 Home N
Description : Windows 10 Home N
Size : 13,409,860,497 bytes

Index : 3
Name : Windows 10 Home Single Language
Description : Windows 10 Home Single Language
Size : 14,168,323,899 bytes

Index : 4
Name : Windows 10 Education
Description : Windows 10 Education
Size : 14,413,769,870 bytes

Index : 5
Name : Windows 10 Education N
Description : Windows 10 Education N
Size : 13,651,680,505 bytes

Index : 6
Name : Windows 10 Pro
Description : Windows 10 Pro
Size : 14,413,947,833 bytes

Index : 7
Name : Windows 10 Pro N
Description : Windows 10 Pro N
Size : 13,649,482,925 bytes

Index : 8
Name : Windows 10 Pro Education
Description : Windows 10 Pro Education
Size : 14,413,708,288 bytes

Index : 9
Name : Windows 10 Pro Education N
Description : Windows 10 Pro Education N
Size : 13,651,618,023 bytes

Index : 10
Name : Windows 10 Pro for Workstations
Description : Windows 10 Pro for Workstations
Size : 14,413,739,079 bytes

Index : 11
Name : Windows 10 Pro N for Workstations
Description : Windows 10 Pro N for Workstations
Size : 13,651,649,264 bytes
- Now, let’s mount the image
#6(Windows 10 Pro) to a folder using the following commands:md C:\WinMount dism /mount-wim /wimfile:"G:\sources\install.wim" /index:6 /mountdir:"C:\WinMount" /ReadOnly
The 2nd command line takes a few minutes to complete. It extracts/maps the
install.wim(the specified index #) to the mentioned folder so that you can access its contents using File Explorer.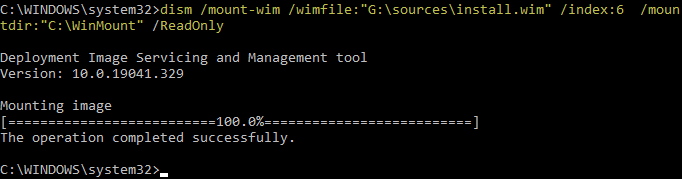
If you skip the
/ReadOnlyparameter accidentally, the following error would pop up:Error: 0xc1510111 You do not have permissions to mount and modify this image. Verify that you have Read/Write permissions or mount the image using the /ReadOnly option. Note that you cannot commit changes to an image with read-only permissions.
- Open the
C:\WinMountfolder and copy the required files from it. TheWinRE.wim(the file we want to extract) would exist under the following path:C:\WinMount\Windows\System32\Recovery
- Once you have copied the required file(s), unmount the image. To do so, run the following command line:
dism /unmount-wim /mountdir:C:\WinMount /discard
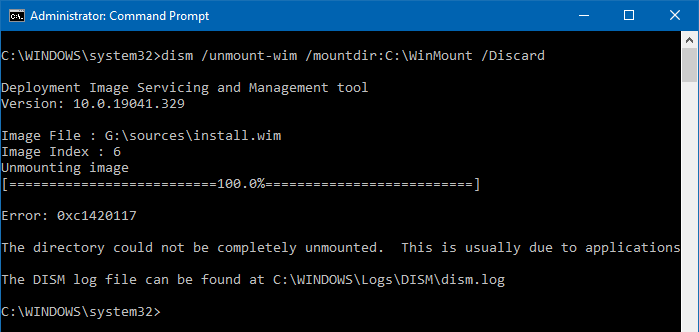
When I ran the Unmount command above, the following error was displayed in the console:
Error: 0xc1420117

The directory could not be completely unmounted. This is usually due to applications that still have files open within the mount directory. Close these files and unmount again to complete the unmount process.
However, since the entire directory was already empty, all I had to do was delete the
WinMountfolder manually. I didn’t have to run the DISM unmount command-line again.
Gigabytes of data are written to or removed from the file system when you mount and unmount the Windows image. Unlike Method 1, each DISM command-line would take a few minutes to complete.
Using 7-Zip or any third-party archiver (as discussed in Method 1) is the fastest method to view and extract the contents of a Windows image file (*.wim).
Install.esd vs Install.wim
Some Windows ISOs have install.esd instead of install.wim. ESD is a highly compressed format whose file size is around 80% compared to the WIM image.

However, the ESD image format is read-only and thus has drawbacks. For instance, it can’t be deployed using a WDS server. So you need to convert the ESD file to a WIM file to service the image or to deploy it.
7-Zip can handle ESD as well as WIM. Whereas DISM would throw the following error when you try to mount an ESD file (install.esd).
[DISM] Error: 11

An attempt was made to load a program with an incorrect format.
So, if you plan to use DISM to view or extract from the image, you must first convert the ESD file into WIM format using DISM, nLite, or any other utility. This is discussed in the article How to Convert ESD to WIM Using DISM or NTLite in Windows 10.
Extract a specific Windows edition (.wim or .esd) from a Multi-edition ISO
Sometimes, you may want to extract the install.wim or install.esd image of a particular Windows edition from a multi-edition Windows 10 ISO. In the earlier section of the article, we saw how to mount the specific WIM file and extract individual files from it. This procedure differs slightly, wherein we extract the specific install.wim or install.esd image individually from the multi-edition ISO/WIM/ESD to a file.
The previous sections in this article were about extracting individual files from a specific Windows 10 image. This method talks about extracting a specific Windows version image itself from the multi-edition ISO.
Method 1: Using DISM to extract a specific Windows image from a Multi-image ISO
- Mount the Windows 10 ISO file by double-clicking on it. Let’s say the mounted drive letter is
G:\and the install.wim or install.esd is located underG:\Sources\ - After you determine the index number (using “Method 1” or “Method 2” of this article) of the Windows edition you want to extract, use the following command line syntax to extract the specific install.wim or install.esd to a folder.
Dism /Export-Image /SourceImageFile:"multi-edition-wim-file" /SourceIndex:# /DestinationImageFile:"destination_file_name"
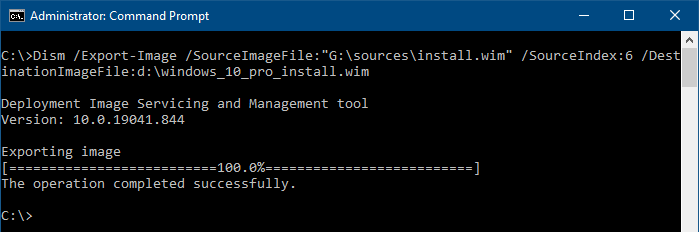
Example: To extract the Windows 10 Professional image (install.wim or install.esd corresponding to Index #6) from the multi-edition ISO, run this command:
Dism /Export-Image /SourceImageFile:"G:\sources\install.wim" /SourceIndex:6 /DestinationImageFile:d:\windows_10_pro_install.wim

Dism /Export-Image /SourceImageFile:"G:\sources\install.esd" /SourceIndex:6 /DestinationImageFile:d:\windows_10_pro_install.esd
Method 2: Using NTLite (freeware) to extract a specific Windows image from ISO
NTLite is an excellent freeware that helps you service Windows images easily without the need to type any commands.
- Download NTLite and run it.
- Mount the Windows 10 ISO to a drive letter and note down the path for install.wim or install.esd
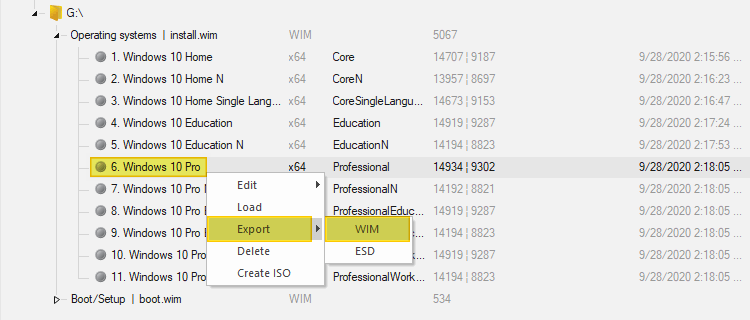
- Open the install.wim file in NTLite. NTLite populates the list of Windows editions present inside the loaded WIM file.
- Right-click on the specific edition of Windows image you want to export, click Export, and select WIM.
As a side note, here are some other NTLite-related articles you’d like to read.
That’s it. The above procedure extracts the specific Windows version image (install.wim or install.esd) from the multiple editions ISO to the specific folder.
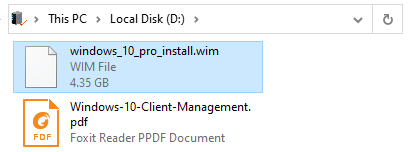
(As a side note, if you run the dism /get-wiminfo command on this individual WIM file, there will be only one index. The Windows 10 Pro image file size was 4.35 GB, but the multi-edition install.wim file size is 4.94 GB. The file sizes mentioned are applicable for Windows 10 x64 20H2 ISO.)
One small request: If you liked this post, please share this?
One "tiny" share from you would seriously help a lot with the growth of this blog. Some great suggestions:- Pin it!
- Share it to your favorite blog + Facebook, Reddit
- Tweet it!
You get error 87 when running with the DISM command of the article. I’ve investigated and I realized some arguments are missing at the end of the command, the right ones are below:
Dism /Export-Image /SourceImageFile:”G:\sources\install.wim” /SourceIndex:6 /DestinationImageFile:d:\windows_10_pro_install.wim /Compress:max /CheckIntegrity
Dism /Export-Image /SourceImageFile:”G:\sources\install.esd” /SourceIndex:6 /DestinationImageFile:d:\windows_10_pro_install.esd /Compress:max /CheckIntegrity
I am trying to extract winre.wim from the install.wim file. When using 7Zip to open install.wim I do not get a few numbered folders and an xml file as shown in this tutorial. It shows about 1 million+ of files and folders that completely freezes 7Zip, making it impossible to find or do anything. As a side note, I have another computer were the recovery environment works but I cant for the life of me find the winre.wim file. Any ideas how to fix these issues?
Great! I was one completely day fighting with this problem until I found your solution. It worked for me. Thanks so much for your article.
Very informative and clear.
Thank you.
i just tried the DISM method with install.esd on 24h2 and it worked without conversion!