This article explains in detail how to change the name of your user profile folder in Windows.
In some cases, it’s necessary to manually rename the user profile folder because Windows truncates the user profile folder name to a certain number of characters when creating the user account. For instance, when you create a user account connected to a Microsoft account in Windows 10, the first 5 characters of your live account ID will be used for your user profile folder name. For instance, if sramesh_2001[@outlook.com] is your Microsoft account ID, the user profile folder would be named “srame“.
This issue doesn’t occur if you create a local user account first and then switch to Microsoft account. If you’d like to have a custom name for your user account folder, create a local account with your preferred name. Once you log in and your profile is initialized, you may switch to Microsoft Account (MSA). The user account folder will retain the same name.
Likewise, on some systems, the user profile folder may have the full name with space in between (“Users\John Smith” instead of “Users\JohnSmith“), and may you want to remove the space. If you have an existing user account with the profile folder name truncated to five characters or it contains a space, this article tells you how to rename the user profile folder as desired.
Contents
- Step 1: Stop OneDrive Sync/Backup
- Step 2: Rename the User Profile folder
- Step 3: Reset the Windows Search index
- Step 4: Update the registry paths (system)
- Step 5: Update the registry paths (user)
- Step 6: Update the INI files (for legacy programs)
Checklist
- Read the Caveats section below before proceeding.
- Get a decent registry find and replace utility — e.g., Registry Finder from Sergey Filippov.
- Backup your entire system drive with a good image-based backup tool — e.g., Macrium Reflect Free.
Before proceeding, it’s advisable to take a complete image of your Operating System drive, as a safety precaution.
![]() Note: Until you complete the entire procedure till Step 6, do not log in to the primary account (whose profile folder you want to rename). Except “Step 1”, every operation has to be carried out from a secondary admin account only. If you’ve configured Windows to automatically log in to your primary account, disable auto-login before proceeding.
Note: Until you complete the entire procedure till Step 6, do not log in to the primary account (whose profile folder you want to rename). Except “Step 1”, every operation has to be carried out from a secondary admin account only. If you’ve configured Windows to automatically log in to your primary account, disable auto-login before proceeding.
Rename User Profile Folder in Windows 10/11
To rename your user profile folder in Windows, follow these steps:
Step 1: Stop OneDrive Sync/Backup of your Personal Folders
If you’re using OneDrive, open OneDrive Settings and click the Manage Backup button. Turn off backup/synchronization of your personal folders: Desktop, Documents, and Pictures. For more information, check out this article.
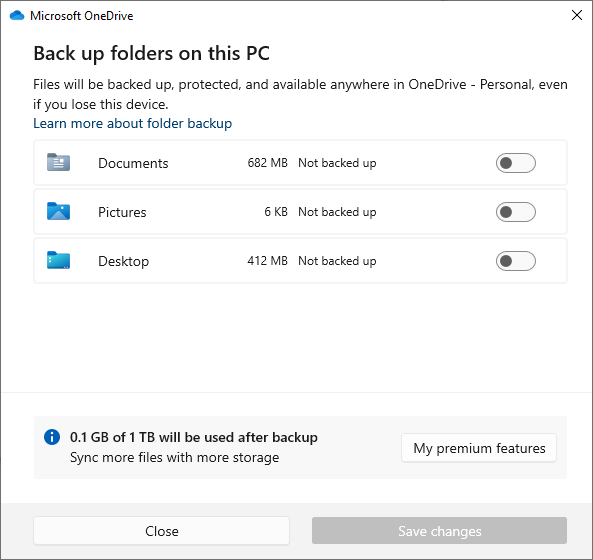
In the OneDrive settings, go to the Account tab, and select Unlink this PC.
After you complete all the steps in this article, you can re-link and re-enable OneDrive backup if you want.
Similarly, if you’re using any other sync client (e.g., Google Drive, DropBox, etc.), turn off the synchronization of your shell folders in the respective app. You can turn on sync later.
Step 2: Rename the User Profile Folder
- Create a second administrator account, which can be a local user account.
- Log off from your primary account, and log in to the secondary admin account.
- Start
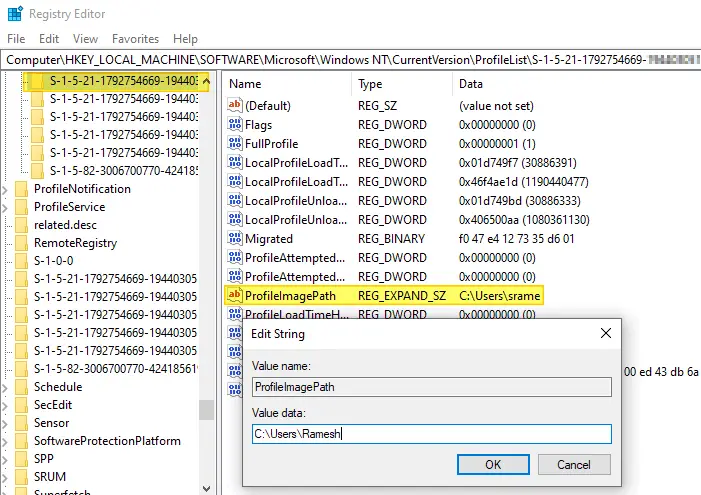
regedit.exeand navigate to:HKEY_LOCAL_MACHINE\SOFTWARE\Microsoft\Windows NT\CurrentVersion\ProfileList
- Each subkey represents the SID of user accounts, including the built-in accounts in the system. Select the SID of your primary account for which you want to rename the profile folder. You can identify it by looking at the ProfileImagePath value in the right pane.
 To get the SID of all the user accounts on the computer, run this command:
 wmic useraccount list full. Here’s a sample output.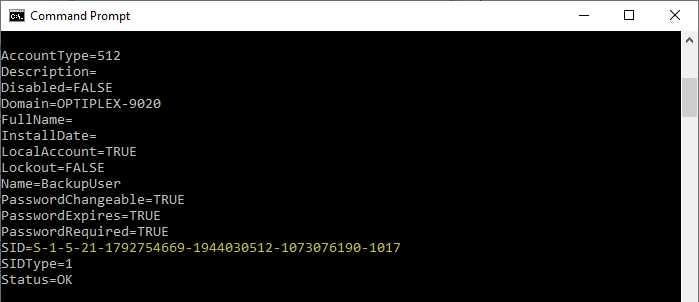
Alternately, you can find the SID of the user account (which is currently logged in) by running the command “
whoami /user“. So, to get the SID of the primary user account (whose profile folder you want to rename), run thewhoamicommand from that user account. - In the appropriate subkey, update the
ProfileImagePathvalue data accordingly, from the old user account to the new:Example: C:\Users\srame to C:\Users\Ramesh
- Exit the Registry Editor.
- Restart Windows. This is to avoid “File In Use” error when renaming the profile folder
- Log back in (again to the second administrator account.)
- Launch File Explorer and rename the profile folder. The folder name should exactly be the same as you typed in step 6 above.
 If you still receive the “File In Use” error when renaming the profile folder, boot into the Windows Recovery Environment and rename the folder via the Command Prompt. For more information, see the section “Accessing the Recovery Environment” in this article.
This renames your user profile folder.
Step 3: Reset and Rebuild Windows Search Index
The Windows Search index would still have thousands of entries pointing to the old profile folder path. You’ll need to reset and rebuild the Search Index completely by setting the SetupCompletedSuccessfully registry value to 0.
- Start the Registry Editor
regedit.exeand go to:HKEY_LOCAL_MACHINE\SOFTWARE\Microsoft\Windows Search
- Change the registry value
SetupCompletedSuccessfullydata from1to0
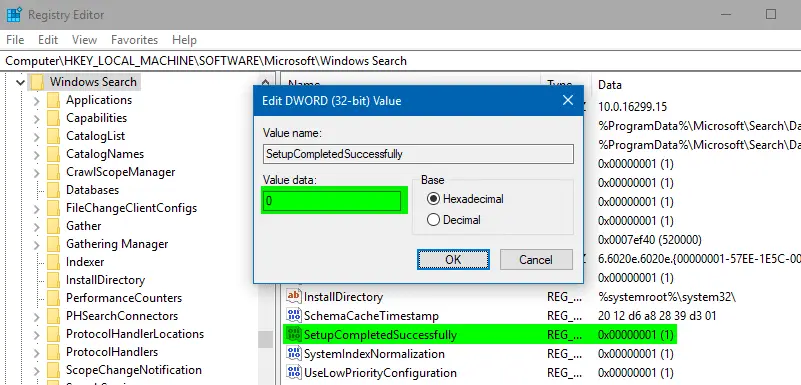
The above registry change SetupCompletedSuccessfully = 0 causes Windows Search to clear custom indexed locations, add default locations, and rebuild the index from scratch. - Exit the Registry Editor.
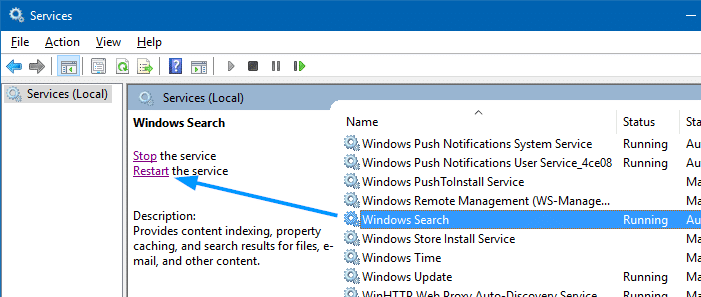
- Open the Services MMC (
services.msc) - Restart the Windows Search service.
Full instructions are available in the article Reset and Rebuild Search Index Completely in Windows. Especially see section How to Manually Reset Windows Search and Rebuild the Index in that article.
Resetting search will clear all indexed locations, and Windows Search starts rebuilding the index automatically. If you have any custom folder locations to add to the index, add it manually by launching Control Panel → Indexing Options.
Step 4: Update the Registry Paths (system-wide)
Although you’ll be able to log in to the profile and use it, just renaming the ProfileImagePath value is not enough. There could be hundreds of registry values pointing to the old user profile folder, and the numbers can vary depending upon the programs installed on the system.
For example, the Cortana search stores the index database location in the registry, and failing to update the path breaks the search feature in the Start menu and the Settings app.
You can do a registry search using software like Nirsoft’s RegScanner or Registry Finder, and you’ll be surprised to see the number of registry locations (not including the trivial most-recent-used history locations) you have to update.
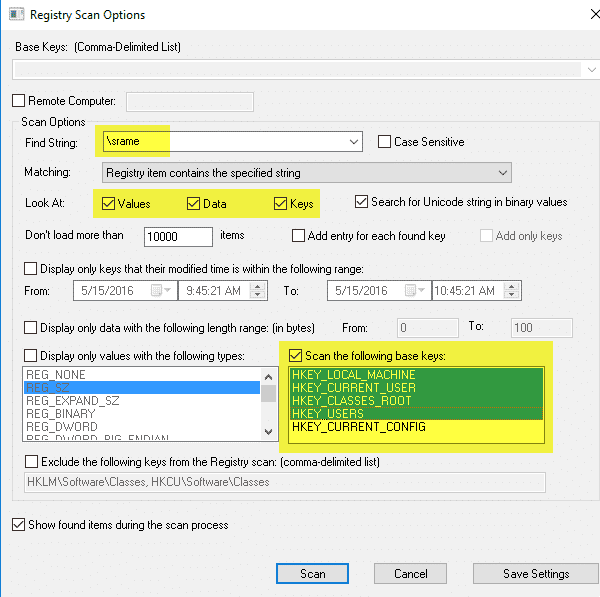
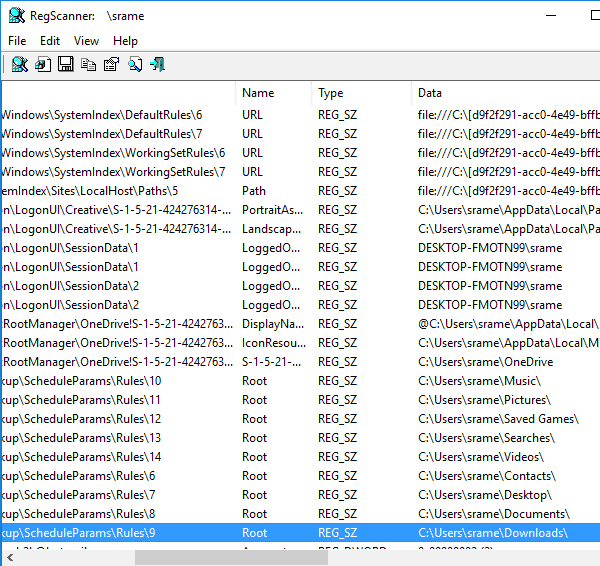
You need a decent registry search and replace tool to bulk find and replace every occurrence of the string “Users\oldname” to “Users\newname“.
![]() You may try the freeware Registry Finder by Sergey Filippov to find and replace the registry values en masse. Register Finder can replace REG_BINARY and REG_MULTI_SZ values as well. For support, visit the Registry Finder forum.
You may try the freeware Registry Finder by Sergey Filippov to find and replace the registry values en masse. Register Finder can replace REG_BINARY and REG_MULTI_SZ values as well. For support, visit the Registry Finder forum.
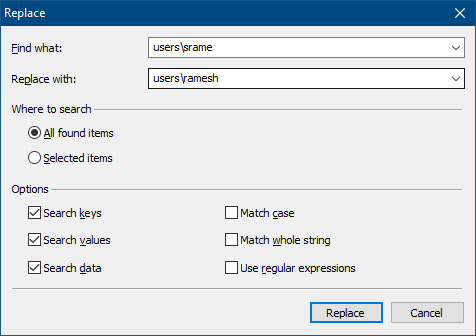
“With the Replace feature (in Registry Finder) you can easily replace all or particular occurrences of one string with another. The replacement is performed only in items that are in the Find Results window. In the Replace dialog, you specify either all items or just selected ones. After the replacement is done, items in the window are updated. If some item does not match the search criteria any more it still remains in the list.”
- In the Registry Finder window, use the Find option to find the string
C:\Users\srame
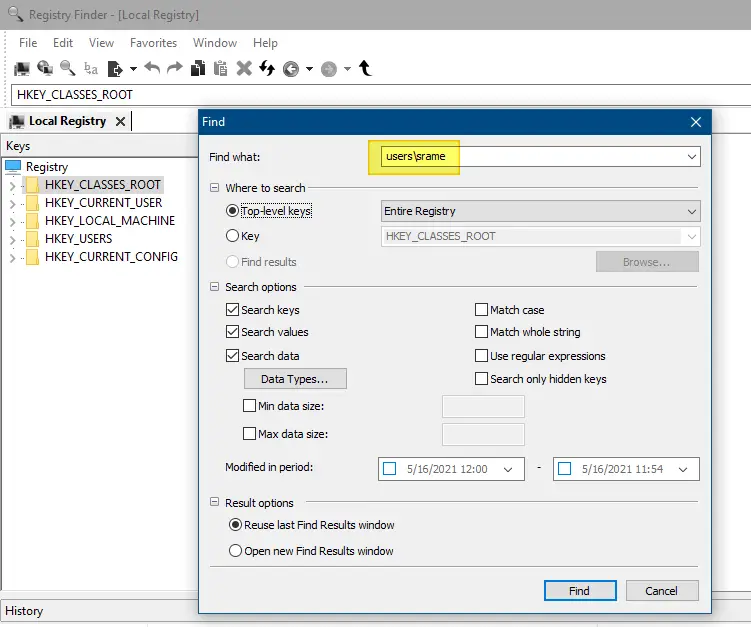
- From the Find Results window, click on the Edit menu, click Replace in Find Results…
- Replace all instances of the old profile name with the new one.
 Rename #1:
C:\Users\srame

to

C:\Users\Ramesh
- Similarly, use the Find option to find the string
C:\\Users\\srame - Replace all instances of the old profile name with the new one.
Rename #2:
C:\\Users\\srame

to

C:\\Users\\Ramesh
Note: Office 365 and other apps store the path in the above format (double backslashes.) in some areas of the registry.
Step 5: Update the per-user Registry Paths (NTUSER.DAT & USRCLASS.DAT)
The NTUSER.DAT and USRCLASS.DAT are per-user registry hives that are separate for each user account. In the previous section, as you were using Registry Finder from the 2nd administrator account, NTUSER.DAT and USRCLASS.DAT of the original account are not updated.
So, you’ll have to load the NTUSER.DAT and USRCLASS.DAT file of the original user account in Registry Finder, find and replace the user profile path accordingly.
Note that the two files are hidden and protected by default. To view them, you need to enable “Show all files…” and disable “Hide protected operating system files..” in Folder Options.
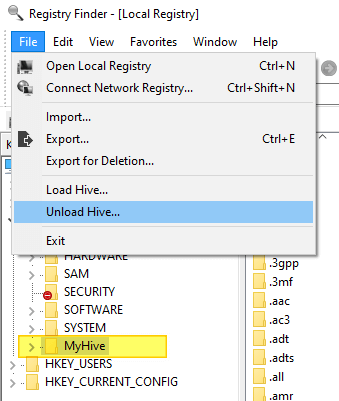
- In the Registry Finder window, click the File menu, and select Load Hive…
- Browse to select the
NTUSER.DATof your user account — e.g.,C:\Users\srame\NTUSER.DAT. - Assign a name for the loaded hive — e.g.,
myhive
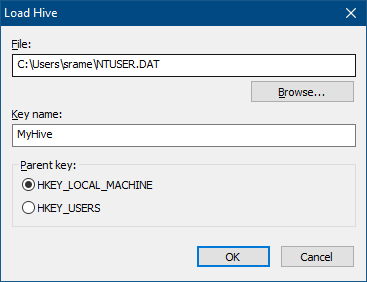
- Select one of the options for the Parent key:
HKEY_LOCAL_MACHINEorHKEY_USERS - Click OK. The hive will be loaded under one of the parent keys above.
- With the
MyHiveregistry branch selected, use the Find option to find the stringC:\Users\srame
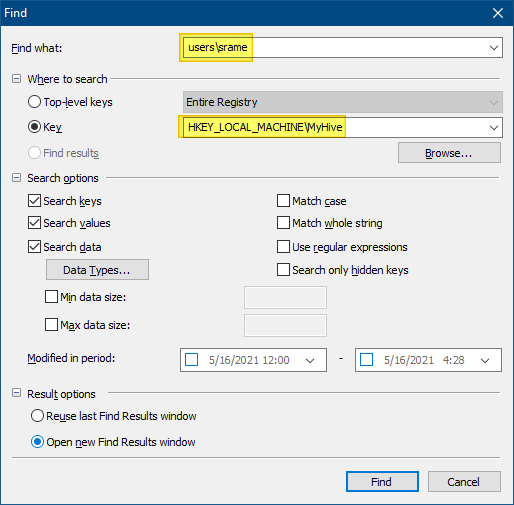 You’ll be surprised to see many entries (especially, OneDrive settings) still pointing to the old user profile folder.
 - Replace all the entries with the new profile folder name — e.g.,
C:\Users\Ramesh
Rename #1:C:\Users\srame to C:\Users\Ramesh
- With the
MyHiveregistry branch selected, use the Find option to find the stringC:\\Users\\srame - Replace all the entries with the new profile folder name — e.g.,
C:\\Users\\RameshRename #2:C:\\Users\\srame to C:\\Users\\Ramesh
Note: Office 365 and other apps store the path in the above format (double backslashes.) in some areas of the registry.
- Once the registry values are updated, switch to the “Local Registry” tab from the “Find the Results” tab.
- In the “Local Registry” tab, select the
MyHivekey - From the File menu, click Unload Hive… and unload
MyHive. This is important!
Note that the Unload Hive… option will be grayed out if you’re in the Find Results tab or if you haven’t selected “MyHive“. - Repeat the steps 1-12, but this time, you need to load the
usrClass.dathive located here:C:\Users\{username}\AppData\Local\Microsoft\Windows\usrClass.dat - Once the registry values are updated, unload the hive via the File menu. This is important!
- Close Registry Finder and restart Windows.
Log in to your primary account and see if everything works correctly. Reconfigure OneDrive now, if required.
Step 6: Update the INI files
This step may be needed if some legacy software on your computer is storing files in text files (e.g. – .ini files), and those entries are pointing to the old profile folder.
You may download Everything search tool from voidtools.com and do a content search within text-based files — especially .ini.
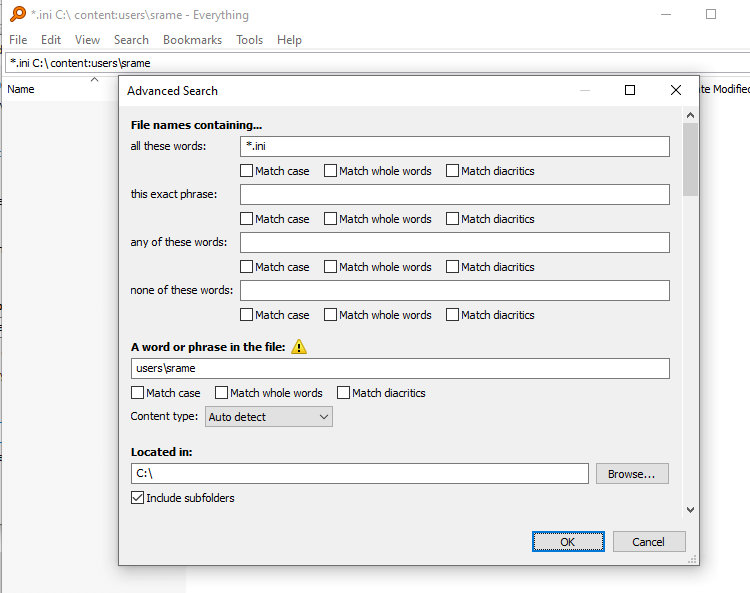
Update the text-based files to reflect the new path.
Caveats
None of the following issues (1 – 4) occurred during my testing, but including them as a general advice:
- On rare occasions, if the registry Search/Replace software can’t modify certain registry keys due to Permission issues, you may run the Registry Editor under System or TrustedInstaller privileges and modify those entries, or fix the Permissions on a per-key basis.
- The registry is not the only place where the profile path information is stored. Some applications store data in text-based files like .ini, .xml, proprietary file format, or even database files. In those cases, the applications still reference the old path and may not work as expected. You can replace the profile path manually on those text-based files. But, there is no single solution to update the paths with a single click. This has to be done on a per-application basis.
- If you find that the old user profile folder is created again automatically, then one or more of your existing applications are still referencing the old path. Open the folder and see which applications are adding files there. That helps you reconfigure that particular application.
- If a mission-critical application breaks after following the above procedure, it may be storing the profile path in a database or proprietary file format. In that case, contact the software vendor for support. Or revert to your old configuration by restoring from the image backup you created earlier. When I tested, such issues didn’t occur.
- It’s better if you unlink OneDrive (before renaming the profile) and then relink after you rename the profile file and log in to it. You may have to re-sign into Office 365 and OneDrive and let OneDrive sync with the new folder change. Open OneDrive Settings → AutoSave → “Update Folders” to ensure that the shell folders such as Desktop, Documents, Pictures, etc., are properly picked up.
- If you’re using File History, you may need to reconfigure it after renaming the user profile folder.
Information in this article applies to all versions of Windows, including Windows 11.
One small request: If you liked this post, please share this?
One "tiny" share from you would seriously help a lot with the growth of this blog. Some great suggestions:- Pin it!
- Share it to your favorite blog + Facebook, Reddit
- Tweet it!
Your information (above) is the best I have been able to access on WWW related to Windows 10 surprise (User Folder Name) limitation to the first 5 characters of a Users login info (typically email address) for their Microsoft Account. It makes one think hard about the risk.
I have one question:
To completely Search/Replace all instances of “Users/srame” include REG_BINARY values? i.e. RegScanner (NirSoft) does find REG_BINARY values. But most Search/Replace software does not “Find” then display/list them. Thus, the Search/Replace of those REG_BINARY values is not certain.
@DennisCPA: Check out Registry Finder (mentioned in the article). It can find and replace binary values as well.
Hey Ramesh,
I was just running through this article to fix the user profile folder name after a windows reinstall. Everything has worked flawlessly until the second to last step.
When creating the hive for “UsrClass.dat” I get the error that the folder “Local Settings” is not accessible.
I did a bit of searching online and found out that ‘C:\Users\”user”\LocalSettings’ is apparently the same as ‘C:\Users\”user”\AppData\Local’ and so you can access “UsrClass.dat” via the path ‘C:\Users\”user”\AppData\Local\Microsoft\Windows’
I saw a little quip from someone that this likely changed at some point (since you wrote this article) due to security changes or something. It has been 5 years I guess…
Anyways, Thanks, this helped a lot
@DanDB: “Local Settings” is actually a junction point that links to “C:\Users\{username}\AppData\Local”
I’ve updated the path to UsrClass.dat. Thanks.
All steps allow me to rename theprofile folder succcesfuly. I had issue with start menu and search box not showing after the rename.
I found the solution: I deleted the whole DefaultAccount key folder under
HKEY_CURRENT_USER\Software\Microsoft\Windows\CurrentVersion\CloudStore\Store\Cache\DefaultAccount
Sign out, sign in.
@Piotr: Excellent. thanks for that valuable information.
Man is it stupid that Windows doesn’t have this functionality as part of renaming a profile.
when i try to load the hive it says NTUSER.DAT is in use