Every System Restore point or shadow copy maintains a complete backup of the registry hives. However, Windows 10/11 doesn’t automatically create System Restore points every day. Restore Points are created only when installing important updates or drivers.
Notwithstanding the System Restore’s excellent capabilities, relying upon System Restore as a file or registry backup method is not sensible. It’s because System Restore points are cleared on a FIFO basis once the space threshold is reached.
The registry files (hives) are located in the Windows\System32\Config folder. The hives are always in use when Windows is running. So, you’ll need a specialized program that uses Windows API or volume shadow to backup the hives.
This article discusses six different methods to completely backup your Windows registry hives.
Backup the Windows Registry
- Enable Windows Periodic Registry Hive Backups (“RegIdleBackup” task)
- Using Tweaking.com “Registry Backup”
- Using ERUNT
- Using “Registry Backup and Restore” Utility
- Exporting the complete registry (hive format) using the Registry Editor
- Exporting the complete registry (hive format) using the REG.exe Tool
Backup a selected registry key
To backup the entire registry in Windows, follow one of these methods:
Option 1: Enable Windows Periodic Registry Hive Backup
In earlier versions of Windows, the registry hives were backed up regularly by the built-in RegIdleBackup scheduled task. But, from Windows 10 v1803 onwards, the RegIdleBackup or the Registry Idle Backup Task no longer backs up the registry hives to the RegBack folder by default. In Windows 10 v1803 and higher, the Windows\System32\Config\RegBack folder may be empty, or it contains 0-byte hive files.

However, you can enable the registry hive periodic backup (to the Regback folder) feature back by configuring the following registry entry:
- Start the Registry Editor (
regedit.exe) and go to the following key:HKEY_LOCAL_MACHINE\System\CurrentControlSet\Control\Session Manager\Configuration Manager
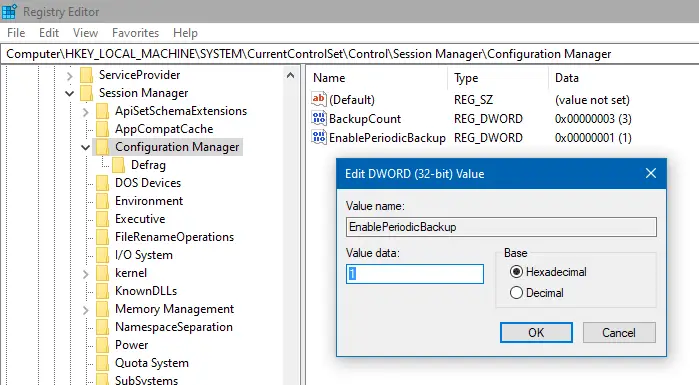
- Create a DWORD (32-bit) value named
EnablePeriodicBackup - Double-click EnablePeriodicBackup and set its data to
1 - Exit the Registry Editor.
See the article The system registry is no longer backed up to the RegBack folder starting in Windows 10 v1803 for more information.
After you enable the above registry setting, restart Windows. Windows will backup the registry to the C:\Windows\System32\Config\RegBack folder once in 10 days, when the Automatic Maintenance kicks in — i.e., if the user leaves the system idle for a considerable time.
When Automatic Maintenance starts, it invokes the RegIdleBackup task, which will update the RegBack folder.
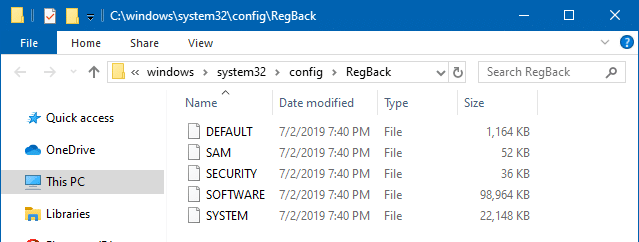
You may also launch Task Scheduler, right-click on the Registry Idle task and click Run to backup registry hives on demand. The RegIdleBackup task is located in the Scheduled Task Library, under the Microsoft\Windows\Registry folder.
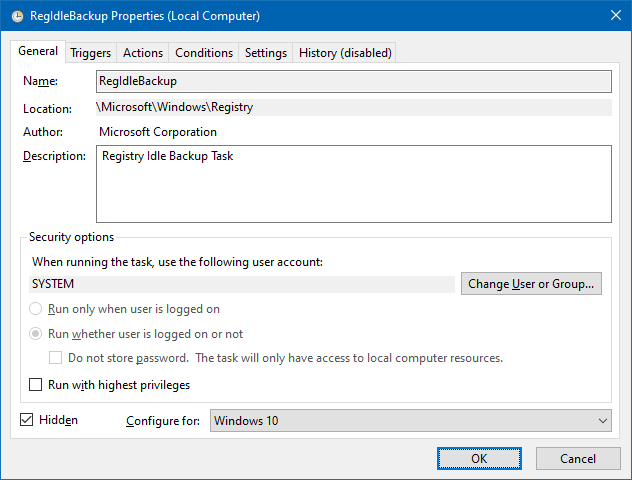
Important: The RegIdleBackup task backs up only the system hives, namely: DEFAULT, SAM, SECURITY, SOFTWARE, SYSTEM. It does not backup the user registry hives, namely NTUSER.DAT and USRCLASS.DAT (located in each user profile.)
Run RegIdleBackup task Daily or Weekly
One important thing to note is that the RegIdleBackup task automatically runs only once in 10 days. Additional triggers you set for the task are ignored.
If you need to backup the registry daily or whenever needed, you can open Task Scheduler to run the task manually, on-demand, using schtasks.exe. Alternately, run the following command-line elevated.
schtasks /run /i /tn "\Microsoft\Windows\Registry\RegIdleBackup"

This starts the RegIdleBackup task, which starts backing up the registry regardless of the task’s last run time.
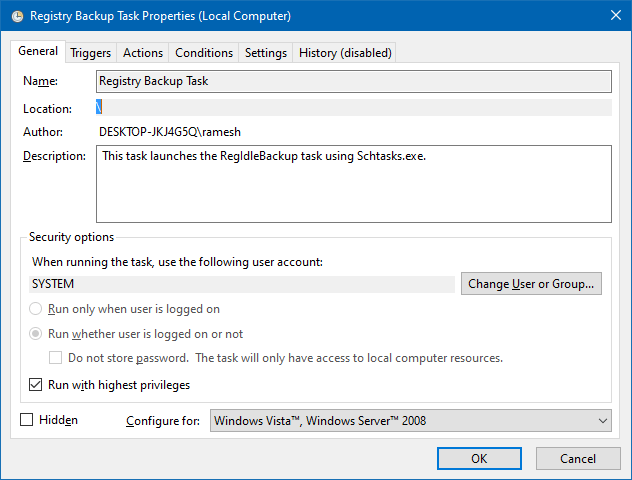
You can also create a new scheduled task that runs the above schtasks.exe command-line and configure it to run weekly or daily basis.
Download the XML file Registry Backup Task.xml (Registry Backup Task) and import it into Task Scheduler. The task is configured to run backups every Monday, Wednesday, and Friday at 1:00 PM. After you import the task in Task Scheduler, you can modify the Task settings as you require.
Option 2: Use Tweaking.com “Registry Backup”
![]() Tweaking.com has a good registry backup utility that helps you easily back up the computer and user registry hives. It can also run as a scheduled task so that you can automatically backup daily, weekly, or at specified intervals. This tool runs on Windows 10 and 11.
Tweaking.com has a good registry backup utility that helps you easily back up the computer and user registry hives. It can also run as a scheduled task so that you can automatically backup daily, weekly, or at specified intervals. This tool runs on Windows 10 and 11.
- Download Tweaking.com’s Registry Backup tool and run it.
- Click on the Settings tab and set the backup location accordingly.
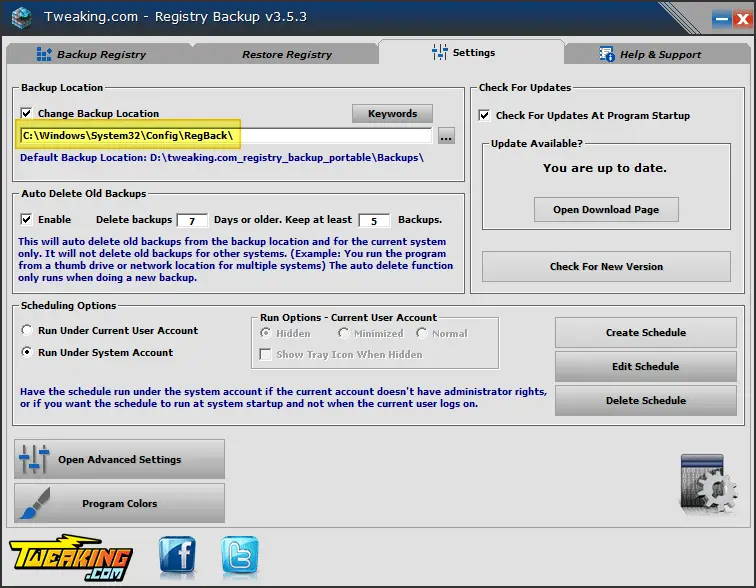
The Windows registry hives are located atC:\Windows\System32\Config. You may set the backup location toC:\Windows\System32\Config\RegBackif you want. - Click on the Backup Registry tab.
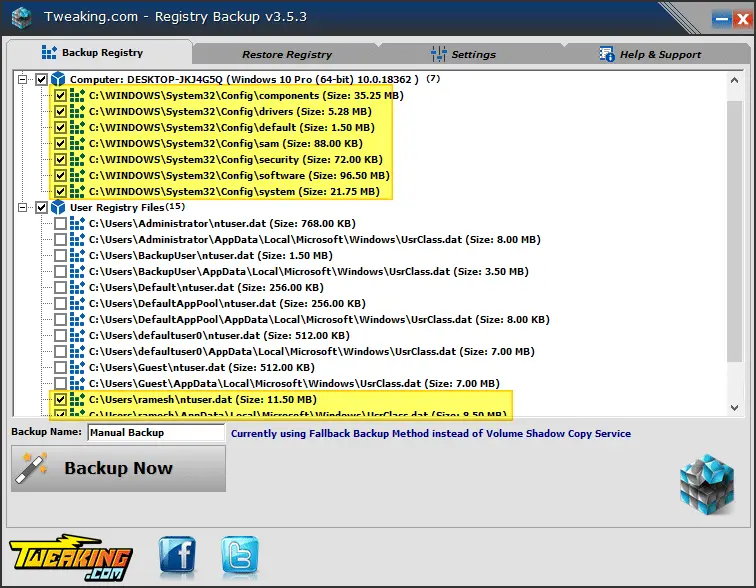
- Under the Computer: section, select all the hives listed there, namely:
- COMPONENTS
- DRIVERS
- DEFAULT
- SAM
- SECURITY
- SOFTWARE
- SYSTEM
- Under the User Registry Files: section, select the registry hives (
ntuser.dat&usrclass.dat) for the required user accounts. - Once selected, click Backup Now. Tweaking.com’s registry backup tool backups up the selected registry hives to the specified folder (e.g., Regback folder). Each backup set is stored in a separate folder with the date and timestamp as the folder name.

Registry Backup as Scheduled Task
- Switch to the Settings tab of the Registry Backup utility.
- Under Scheduling Options, select Run under System account
- Click on the Create Schedule button

Important: If you want to backup the user registry hives
ntuser.datandUsrClass.datin addition to the system registry hives, you must configure the task to run as the current user by selecting Run under Current User account.

This creates a scheduled task that runs the command
TweakingRegistryBackup.exe /supersilentif Hidden mode is selected. The scheduled task is configured to run at every startup if using the System account. If you’ve chosen Run under Current User account, then the task runs at every login. - To change the schedule to weekly, click on the Edit Schedule button, which opens the Task Scheduler window.
- Double-click on the Tweaking.com – Registry Backup task in Task Scheduler.
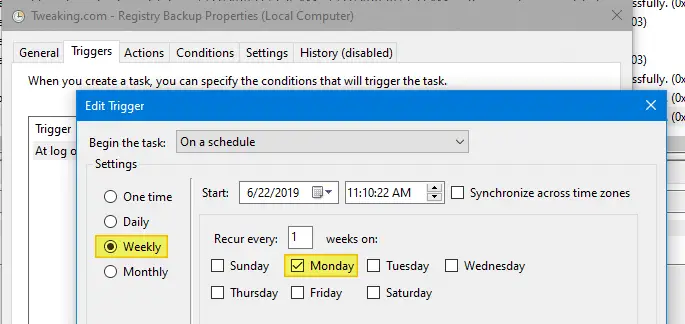
- In the Triggers tab, click the Edit button.
- In the Begin the task: drop-down options, select On a Schedule.
- Select Weekly, and select a day from the list of options provided.
- Click OK
- Click on the Settings tab and enable Run task as soon as possible after a scheduled start is missed.

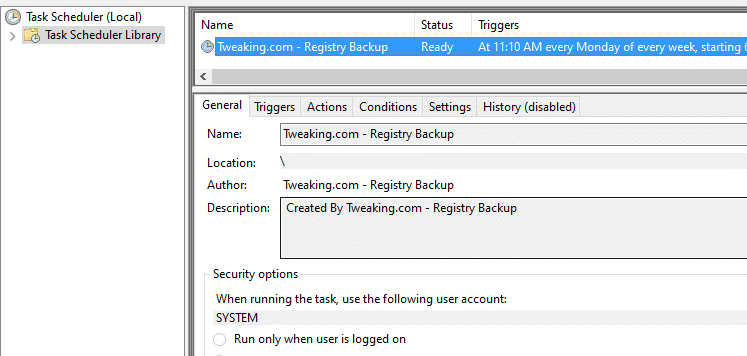
That’s it! The registry backup scheduled task will now run Weekly.
Purge older registry backups automatically
The Registry Backup tool can automatically delete backups older than a certain number of days (FIFO). You can configure it via the Settings tab.

Each registry backup set may be around 150- 200 MB. So, it is better if you eliminate older backups if you no longer need them. You may choose to keep at least 2 backups.
Restore the Registry hives from backup
To restore the registry hives from a previous backup, click on the Restore Registry tab and select the backup from the dropdown list box. Select the registry hives you want to restore, and click Restore Now.
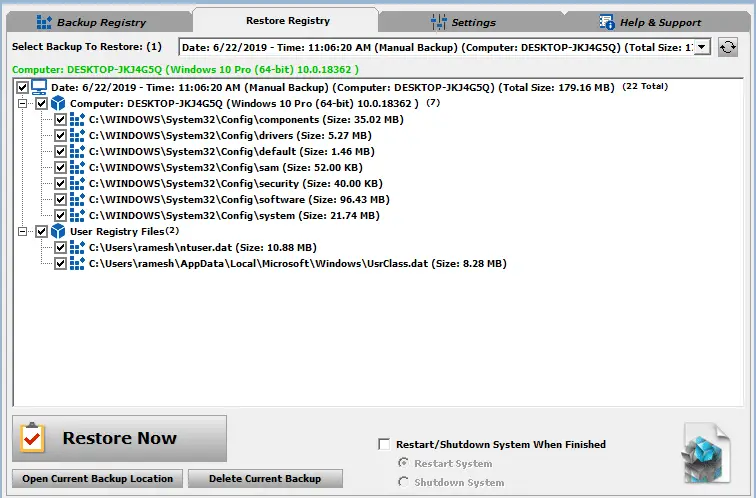
Although Tweaking.com’s Registry Backup tool doesn’t have a modern look, it gets the job done. The scheduled backup or command-line support and the restore feature offered by this tool are handy.
Option 3: Using ERUNT to Backup the Registry
![]() ERUNT, or The Emergency Recovery Utility NT, is a utility that can be used to backup and restore the Windows Registry. This tool has the ability to do a complete backup and restore of the Windows Registry, including the security hive so that permissions are properly backed up and restored.
ERUNT, or The Emergency Recovery Utility NT, is a utility that can be used to backup and restore the Windows Registry. This tool has the ability to do a complete backup and restore of the Windows Registry, including the security hive so that permissions are properly backed up and restored.
To backup the complete set of registry hives in earlier versions of Windows, you may have used the ERUNT utility. As ERUNT is no longer updated, many users are worried about its compatibility with Windows 10. Moreover, ERUNT doesn’t support backing up using Volume Shadow Copy.
Despite those odds, ERUNT runs perfectly fine on Windows 10. It think it should work fine on Windows 11 also.
- Download ERUNT from BleepingComputer.com, and run it (
erunt.exe) as administrator. - Select the backup destination and click OK.
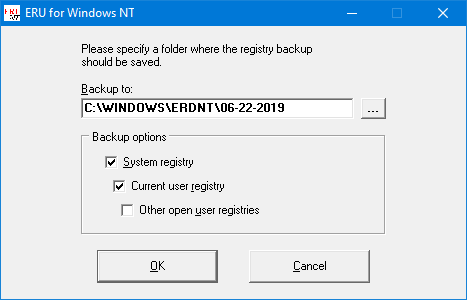
- By default, the System and current user registry hives are backed up. To backup other users’ registries, enable the Other open user registries option.
Run Registry Backup as Scheduled Task
Using Task Scheduler, you can configure ERUNT to backup the registry Weekly or daily (at Startup). By default, ERUNT does not create a new backup if one already exists for the current day.
- Launch Task Scheduler.
- In the Actions pane on the right, click Create Task…
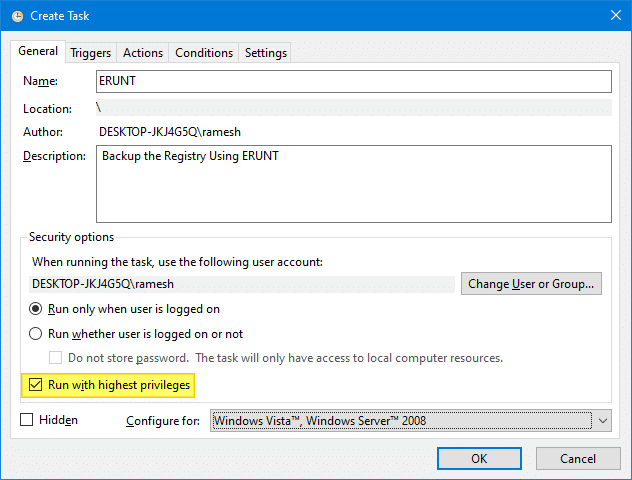
- Type a name for the task that you want to create (for example, ERUNT), and optionally assign a descriptive text.
- Enable the option Run with highest privileges. This is an important step.
- Select the Triggers tab, and click New
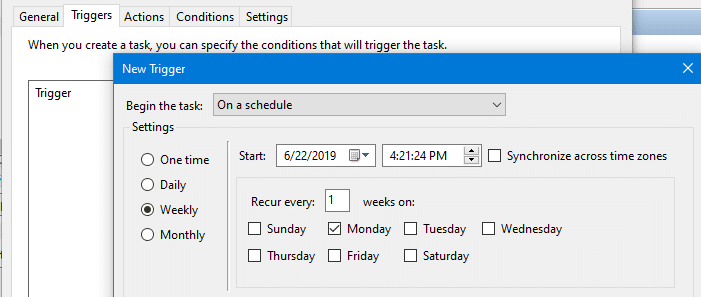
- In the Begin the task drop-down box, select On a schedule, and click OK. If you want to backup the registry at Startup, select At startup from the drop-down list box.
- Select Weekly or Daily. Configure the options accordingly, and click OK.
- Select the Actions tab, and click New
- In the Program/script: text box, type the following (including the quotes):
"C:\Program Files (x86)\ERUNT\AUTOBACK.EXE"
Note: If you’re using ERUNT from a different folder, then mention the correct path for
autoback.exe.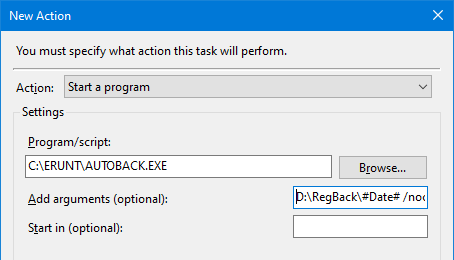
- In the Add arguments (optional) text box, type the following and click OK:
D:\RegBack\#Date# /noconfirmdelete /noprogresswindow /days:10
- Click on the Settings tab and enable Run task as soon as possible after a scheduled start is missed.

- Click OK, and click OK.
You’ve now created a new task to backup the registry at Weekly (or Daily or at Startup). The backups will be stored in the D:\RegBack folder. Each backup set will have its own subfolder with the current date as the subfolder name.
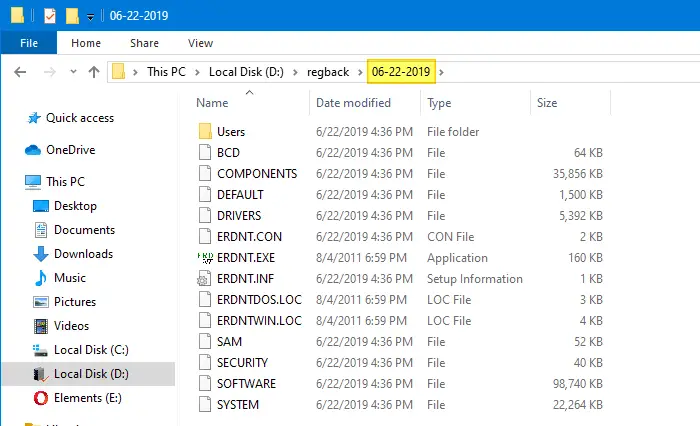
The following system registry hives are backed up:
- BCD
- DEFAULT
- COMPONENTS
- DRIVERS
- DEFAULT
- SAM
- SECURITY
- SOFTWARE
- SYSTEM
And the following current user registry hives:
- NTUSER.DAT
- USRCLASS.DAT
Purge older registry backups automatically
The above command-line also deletes registry backups that are older than 10 days (/days:10 parameter used above.) The number of restore folders to keep can be changed using the /days:n command line switch, e.g. /days:7 would only keep the folders from the last 7 backup days.
By default, Autoback.exe does not create a new backup if one already exists for the current day. Use the /alwayscreate switch to change this behavior and have the program always create a new backup.
For additional command-line parameters, see ERUNT’s readme.txt file.
Restore the Registry hives from backup
When ERUNT backs up the registry hives to a folder, it also stores the file ERDNT.EXE along with the configuration and batch files ERDNT.INF and ERDNT.CON, respectively, for restoration purposes. To restore the registry from a backup folder, all you need to do is run the file ERDNT.EXE as administrator.
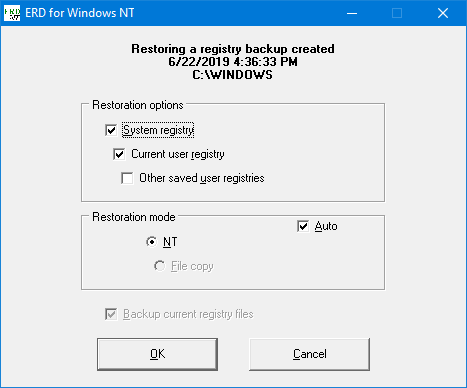
Select which registry components to restore, then click “OK” to start the restoration. When the process is complete, click OK to restart the computer and activate the restored registry.
Option 4: Use “Registry Backup and Restore” Utility
![]() Registry Backup and Restore (“RegBak” utility) is a lightweight utility that helps you backup the registry hives to a location of your choice. It also has command-line support as well as the registry restore feature.
Registry Backup and Restore (“RegBak” utility) is a lightweight utility that helps you backup the registry hives to a location of your choice. It also has command-line support as well as the registry restore feature.
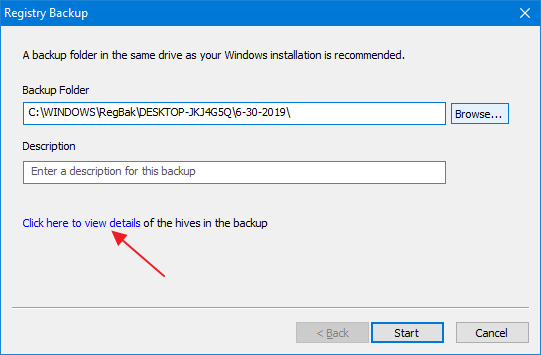
The interface is simple and clean. On the main screen, click New Backup… button.
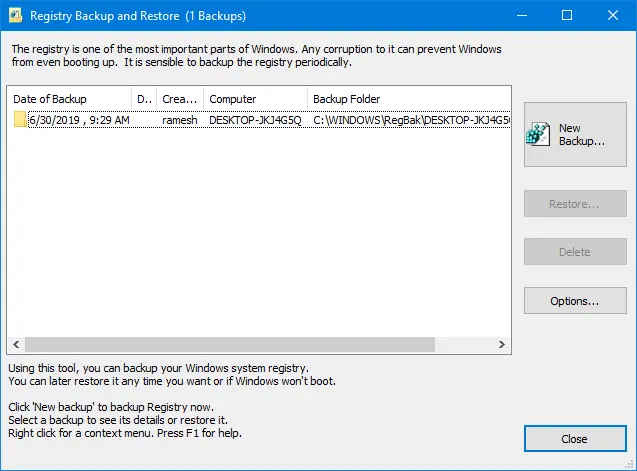
Select the backup folder and type a description.
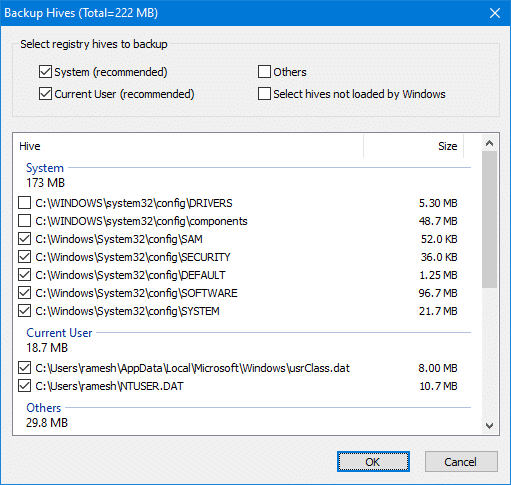
By default, the tool backs up the system hive and current user hives. To backup all other hives, click on the link that says Click here to view details.
Select the hives you want to backup. If System and Current User options are selected, it backs up SAM, SECURITY, DEFAULT, SOFTWARE, AND SYSTEM registry hives along with the current user hives NTUSER.DAT and USRCLASS.DAT. You may include the COMPONENTS and DRIVERS registry hives in the backup.
Click OK, and click Start.
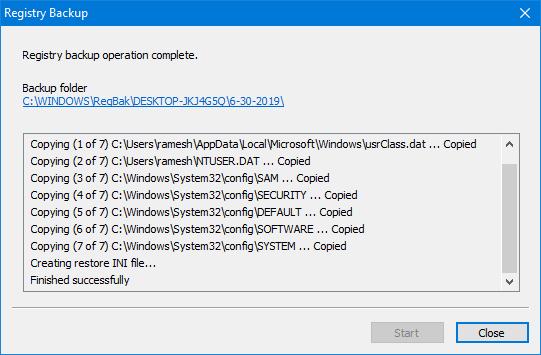
The backup is now complete.

Let’s take a look at the list of options this tool provides:
In the Options dialog, you can select the Default Backup Folder template. You can use different formats of date and time variables as well as environment variables like %SystemRoot%, %SystemDrive%, %CurrentDirectory%, etc. Press F1 to open the help file, which has all the info you need.
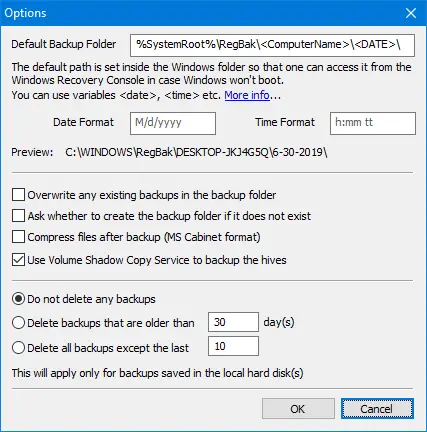
You can choose whether or not to use VSS to copy the hives. By default, the VSS option is enabled. And to compress the hives in .cab file format, use the Compress files after backup option. Compressing the hives into .cab archives can save disk space as well as organize your backups better.
Purge old backups
The older hive backups can be cleared (FIFO) automatically by setting the appropriate values for Delete backups that are older than or Delete all backups except the last n backups.
Run Registry Backup as Scheduled Task
Like the other tools, the Registry Backup and Restore Utility supports automation. You can use the following command-line syntax to backup the registry hives:
regbak /dir:"backup path" /reg:[suo] /silent /overwrite:[y|n] /compress:[y|n] /vss:[y|n] /limitdays:d /limitcount:c /desc:<description for backup>
Here is the list of command-line options supported: (Src: the help file)
| regbak | regbak executable |
| /dir:”backup path” | The path to the folder where the registry backup is to be made. RegBak allows certain parameters to be included while building a backup path. |
| /reg:[suo] | s = system hives, u = user hives, o = all other hives |
| /silent | [Optional] Silent operation; will not show any notifications |
| /overwrite:[y|n] | [Optional] Overwrites previous backup files in the backup folder y = Yes, n = NO |
| /compress:[y|n] | [Optional] Compresses the backup files after they are copied to the backup folder y = Yes, n = NO |
| /vss:[y|n] | [Optional] Use Volume Shadow Copy Service to take backup y = Yes, n = NO |
| /limitdays:d | [Optional] All backups older than ‘d’ days will be deleted |
| /limitcount:c | [Optional] Only keeps the latest ‘c’ number of backups |
| /desc:<description> | [Optional] You can provide a brief description of the nature of the backup |
Note: The command-line does nothing if the utility (GUI) is currently open; it supports single-instance only.
To backup the system & current user hives to a folder named RegBack (and keep only the last 7 backups), run the following command:
regbak.exe /dir:"D:\RegBack\<date> <time>" /reg:su /limitcount:7 /overwrite:y
The subfolder under the RegBack folder will have the date and timestamp in the name.

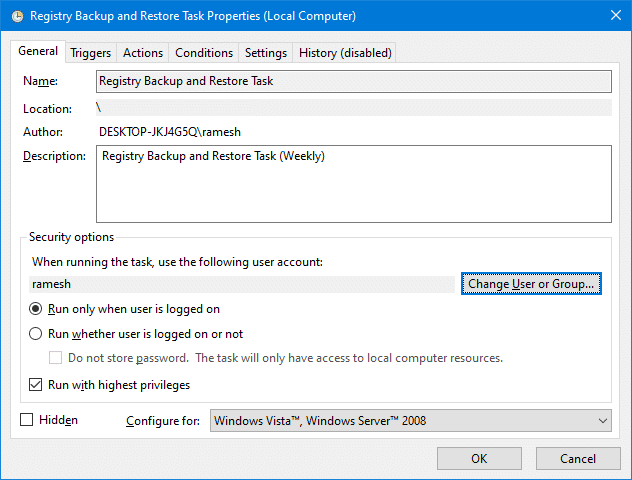
You may also create a scheduled task for the above command-line, and make it run with Highest privileges under your user account. You may configure the registry backup task to run on a Daily or Weekly basis as required.
Restore the Registry hives from backup
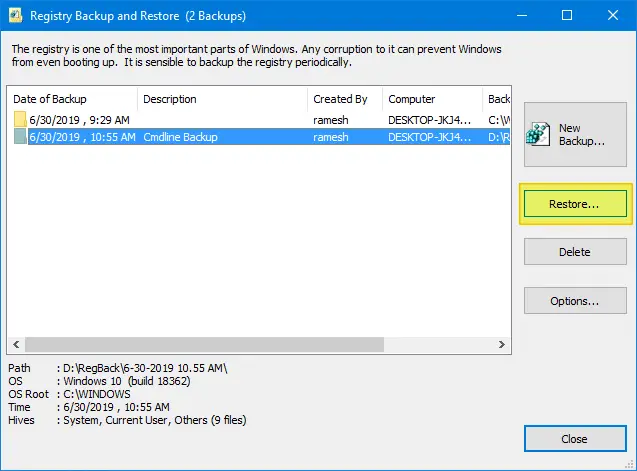
To restore the registry hives from a previous backup, there are two options. Launch the utility, select a backup that you want to restore, and click Restore.
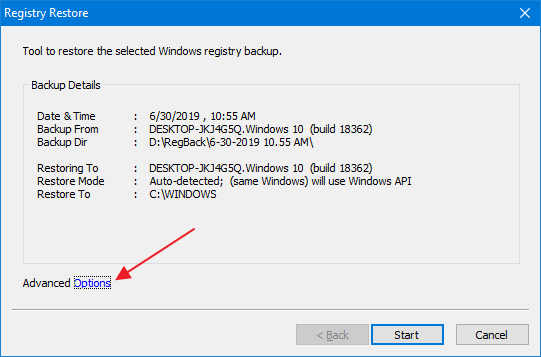
To restore selective hives, click on the options link.
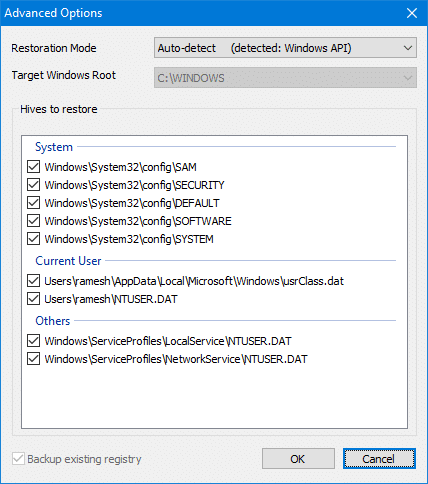
Select the list of hives you want to restore, and click OK.
This restores the registry hives from the previous backup.
Alternately, the REGRES.CMD file present in each hive backup folder helps you restore the registry hives. This file may work only when it’s run from Windows Recovery Console or Windows Recovery Environment, though.
Option 5: Manually export the hives using RegEdit.exe
![]() You can use the Registry Editor in Windows can backup or export the entire registry hives. The key point here is to export the branch as hives (hive file format) instead of Registration Entries (.reg).
You can use the Registry Editor in Windows can backup or export the entire registry hives. The key point here is to export the branch as hives (hive file format) instead of Registration Entries (.reg).
Exporting a large part of the registry to a .reg file is not recommended, as you’ll have problems and errors when restoring it. Complete registry backups need to be made using the hive file format instead.
To backup or export the registry to hive file format using the Registry Editor, follow these steps:
- Launch the Registry Editor (regedit.exe) and go to:
HKEY_LOCAL_MACHINE\SOFTWARE
- From the File menu, click Export…
- In the Save as type: dropdown, click Registry Hive Files (*.*)
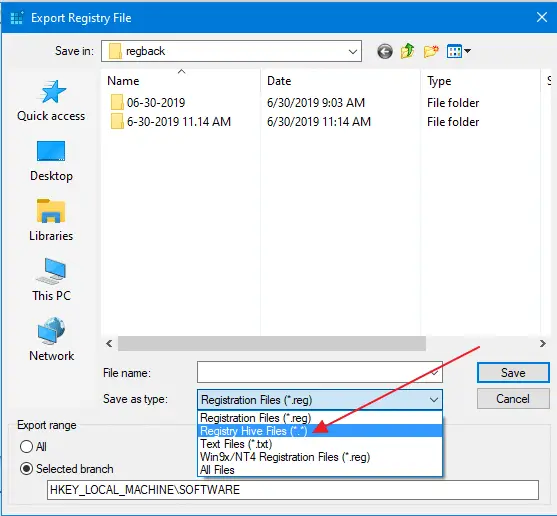
- Save the file as SOFTWARE in your
D:\RegBackfolder or any preferred location. - Likewise, export the necessary branches to hives as per the details below:
Hive file name: SECURITY
Registry key: HKEY_LOCAL_MACHINE\SECURITY

Hive file name: SAM
Registry key: HKEY_LOCAL_MACHINE\SAM

Hive file name: SYSTEM
Registry key: HKEY_LOCAL_MACHINE\SYSTEM

Hive file name: SOFTWARE
Registry key: HKEY_LOCAL_MACHINE\SOFTWARE

Hive file name: DEFAULT
Registry key: HKEY_USERS\.DEFAULT

Hive file name: COMPONENTS
Registry key: HKEY_LOCAL_MACHINE\COMPONENTS
(if the COMPONENTS key is listed)

Hive file name: DRIVERS
Registry key: HKEY_LOCAL_MACHINE\DRIVERS
Current user registry hives:
Hive file name: NTUSER.DAT
Registry key: HKEY_CURRENT_USER (or) HKEY_USERS\<SID>

Hive file name: USRCLASS.DAT
Registry key: HKEY_CURRENT_USER\Software\Classes (or) HKEY_USERS\<SID>\Software\Classes
That’s it! You’ve now backed up the system and the current user registry hives manually.
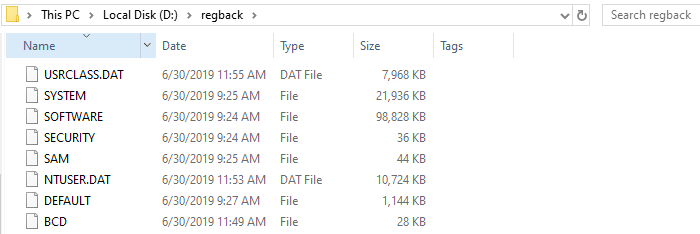
Restoring Registry Hives from Backup
Using the manual method, the registry hives can be restored only via the Windows Recovery Environment Command Prompt. These are the locations where you’ll need to restore the hives from backup, using Windows Recovery Environment:
Folder: \Windows\System32\config\
Hives : SYSTEM
        SOFTWARE
        DEFAULT
        SECURITY
        SAM
        DRIVERS
        COMPONENTS

Folder: \Users\%username%\
Hive  : NTUSER.DAT

Folder: \Users\%username\AppData\Local\Microsoft\Windows\
Hive  : usrClass.dat
Before overwriting files in the Windows\System32\Config folder, make sure you make a backup copy of the same. Or rename the existing set of hives by suffixing .OLD to the file name.
Option 6: Manually exporting the hives using the REG.exe Tool
You can backup the registry hives using the built-in REG.exe console tool in Windows.
- Create a folder named
RegBackon theD:\drive or your preferred location. - From an admin Command Prompt window, run these commands:
REG SAVE HKLM\Software D:\REGBACK\SOFTWARE /y
REG SAVE HKLM\Security D:\REGBACK\SECURITY /y
REG SAVE HKLM\System D:\REGBACK\SYSTEM /y
REG SAVE HKU\.Default D:\REGBACK\DEFAULT /y
REG SAVE HKLM\SAM D:\REGBACK\SAM /y
REG SAVE HKCU D:\REGBACK\NTUSER.DAT /y
REG SAVE HKCU\Software\Classes D:\REGBACK\USRCLASS.DAT /y
REG SAVE HKLM\BCD00000000 D:\REGBACK\BCD /y
REG SAVE HKLM\COMPONENTS D:\REGBACK\COMPONENTS /y
The above commands backup each registry hive to separate files to the
D:\REGBACKfolder. The/ycommand-line argument ensures that the existing backups (if any) are overwritten automatically in that folder.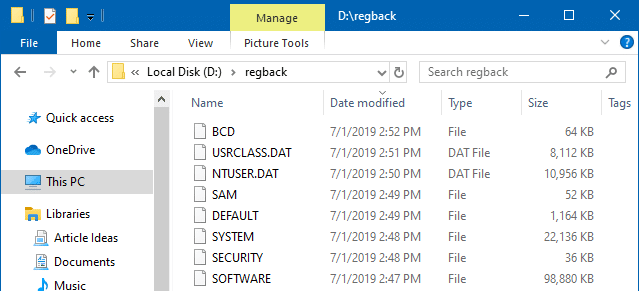
You can even use the above commands in a Windows Batch file (.bat) and optionally, run it using Task Scheduler.
Restoring registry hives from Backup
To restore the hives from backup, it’s highly advisable to restore them offline via Windows Recovery Environment Command Prompt.
Attempting to restore the above critical registry hives using the REG.EXE RESTORE command-line would stall the system. You’ll encounter errors such as Error 800703fa: Illegal operation attempted on a registry key that has been marked for deletion or similar. You won’t be able to run any program or even shut down the computer.
Backup or Export a selected registry branch
Sometimes, you may only want to export a particular branch instead of backing up the entire registry. To exporting a selected branch, it’s always preferred to save the branch in .reg (Registration Entries) file format.
The .reg files are plain-text files whose contents can be viewed by opening the file using Notepad or any other text editor.
To backup a selected branch/key in the registry, use these steps:
- Launch the Registry Editor (
regedit.exe) - Go to the key that you want to export.
- Right-click on the key and choose Export.
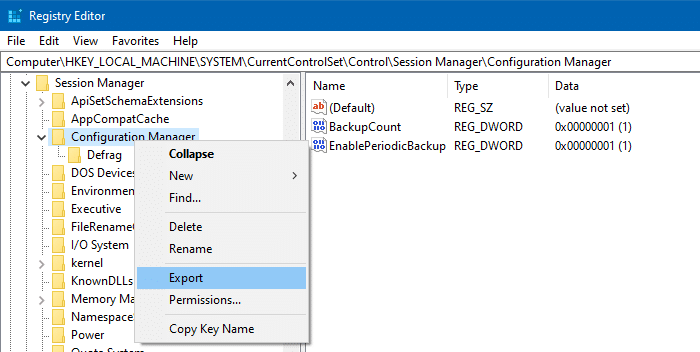
- In the Save in box, select a location where you want to save the Registration Entries (.reg) file
- In the File name box, type a file name, and then click Save.
Alternately, you can use the REG.exe command-line to export a selected registry key.
Examples:
REG EXPORT HKCR\ChromeHTML D:\ChromeHTML.REG
REG EXPORT HKCU\Software\Avast D:\Avast.REG
REG EXPORT HKLM\Software\Classes D:\Classes.REG
where…
HKCR is short for HKEY_CLASSES_ROOT
HKCU is short for HKEY_CURRENT_USER
HKLM is short for HKEY_LOCAL_MACHINE
HKU  is short for HKEY_USERS
Restoring the registry settings from a .reg file
![]() To restore the registry from a .reg file, simply double-click the .reg file, and click Yes when asked for confirmation to apply the settings to the registry. Or, right-click on the .reg file and click Merge.
To restore the registry from a .reg file, simply double-click the .reg file, and click Yes when asked for confirmation to apply the settings to the registry. Or, right-click on the .reg file and click Merge.
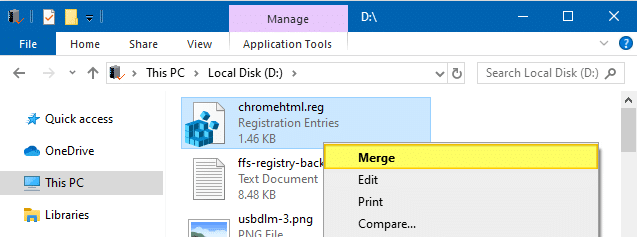
Note that restoring the registry from a .reg file doesn’t delete the existing contents from the corresponding registry branch. For instance, if the registry branch has additional subkeys and values that are not found in the .reg file, the additional keys and values are not removed.
If you need to delete the existing values and subkeys in that location, you may use the Registry Editor.
Alternately, edit the .reg file and use the following syntax to delete a registry key:
Windows Registry Editor Version 5.00

[-HKEY_LOCAL_MACHINE\Software\Classes\doc_auto_file]
This removes the doc_auto_file key in the above branch (since there is a minus symbol at the beginning of the key.)
(For detailed information, see Microsoft the article How to add, modify, or delete registry subkeys and values by using a .reg file)
Closing Words
Tweaking.com’s Registry Backup tool is preferable of the three utilities above as the author maintains it and the program is digitally signed. It can use volume shadow copy to backup if the regular method (using API) fails.
The Registry Backup and Restore tool has a simple and clean interface. The program is digitally signed. The program’s documentation doesn’t say anything about Windows 10/11, although it works perfectly fine on Windows 10 and 11. This tool supports backing up the registry hives using volume shadow copy.
ERUNT is equally good, except that it sports an outdated user interface and doesn’t provide the choice of selecting specific registry hives. ERUNT was developed by Lars Hederer, a trusted source. ERUNT was the favorite registry backup tool for most users and technicians during the Windows XP/Vista/7 era. And the tool manages to run perfectly well on Windows 10.
These tools are designed for registry backup purposes, and each does the job excellently. Another advantage of the above tools is that they offer command-line support and the Restore Registry option to quickly roll back the registry to a previous configuration.
Do you know you can restore registry hives from the Previous Versions tab (shadow copy/System Restore/File History snapshot) in any version of Windows?
One small request: If you liked this post, please share this?
One "tiny" share from you would seriously help a lot with the growth of this blog. Some great suggestions:- Pin it!
- Share it to your favorite blog + Facebook, Reddit
- Tweet it!
Your instructions worked perfectly. However, I have since removed ERUNT from my system but the scheduled task still remains and I have no way of deleting it. The task shows up in the Task Scheduler Summary pane but not when I click on Task Scheduler Library, so there is no option to delete. Thanks.
Thanks for taking the time to create this post, some of the simplest things are hard to figure out.
I have documented a few improvements and fixed a few issues with the scheduled ERUNT registry backups for Win7 & Vista. Backup now includes the full Current_User_Account registry and supports 64bit versions of Windows.
See my notes here http://www.stargateuk.info/upload/ERUNT_Tweaks_Win7.txt
Hi DougCuk,
I have used ERUNT on my Windows 7 computer with no problems. Now I am looking to see if it will work on Windows 10. Based on this article above, it will work.
I went to your documented notes but it was hard for a non-technical person to fully grasp the changes you offer. Question, Is there a way to fully supply an updated and fixed ERUNDT program that encompasses all the recommended changes in one folder so all of us can take advantage of it? You know, load it into Windows 10 and run it.
I would also like to mention that if you read the readme and create a ERUNT.ini you are able to configure settings like default file location, file name format and so on.
I prefer to use the date format 20131020 for directory names, as the alphanumerical sort order is the same as chronological.
I use in ERUNT.INI:
[ERUNT]
DateFormat=yyyyMMdd
DateSeparator=
I prefer using regedit /e
BAT file to backup entire registry + 7zip (went from 200MB+ to 6MB)
******************************************************
@echo off
set year=%date:~-4,4%
set month=%date:~-10,2%
set day=%date:~-7,2%
set hour=%time:~-11,2%
set hour=%hour: =0%
set min=%time:~-8,2%
set filename=X:\backup\registry.%year%.%month%.%day%.%hour%%min%
regedit /e %filename%.reg”
set AppExePath=”%ProgramFiles(x86)%\7-Zip\7z.exe”
if not exist %AppExePath% set AppExePath=”%ProgramFiles%\7-Zip\7z.exe”
if not exist %AppExePath% goto notInstalled
%AppExePath% a -rt7z “%filename%.7z” %filename%.reg”
del “%filename%.reg”
goto end
:notInstalled
echo Can not find 7-Zip, please install it from:
echo http://7-zip.org/
PAUSE
:end
Thanks for the simple, step-by-step instructions. I was lost with the others. Great job.
Thanx for your article.
As I understand it, only the following are necessary for a system restore,
Software, Security, System, Default, Sam.
This is the kind of backing up the system does.
The rest of are not necessary.
Please correct me if i’m wrong.
Option 6: Manually exporting the hives using the REG.exe Tool
****HUGE**** omission (what the heck happened to the author here?) in that the related restore part using the REG.exe tool is NOT described right alongside the backup part and NOT EVEN described in the related link:”https://www.winhelponline.com/blog/edit-registry-offline-windows-re/” where the restore is desperately needed to be done offline especially if the user can’t boot their PC in order to restore the registry hives.
I think it would be EXTREMELY beneficial for the author to go back and completely put in the entire restore steps when using the REG.exe Tool particularly in the case the user cannot boot into their drive.