The “Security and Maintenance” Control Panel applet or the Action Center in Windows 10 may warn you that Windows Defender is disabled and no anti-virus is protecting your system. If you open the Windows Defender interface, it offers to Turn On protection, but the button doesn’t work.
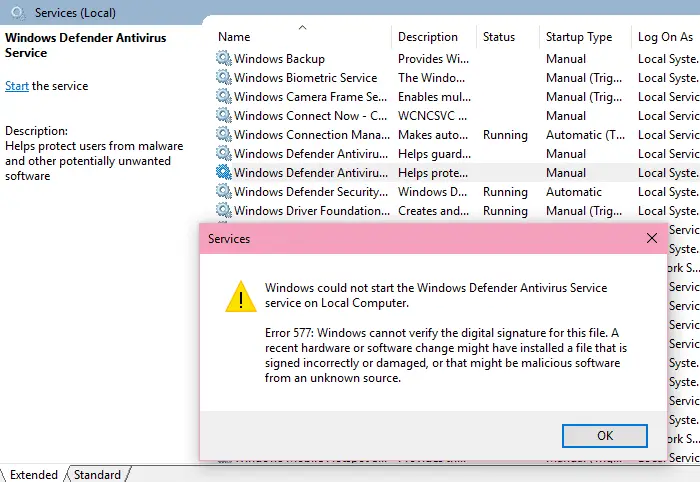
In the Services MMC, when you try to start Windows Defender Antivirus Service (now “Microsoft Defender Antivirus Service”) or Windows Defender Antivirus Network Inspection Service (“Microsoft Defender Antivirus Network Inspection Service”), you may get Error 577, as seen below:

Windows could not start Windows Defender.

Error 577: Windows cannot verify the digital signature for this file. A recent hardware or software change might have installed a file that was signed incorrectly or damaged, or that might be malicious software from an unknown source.
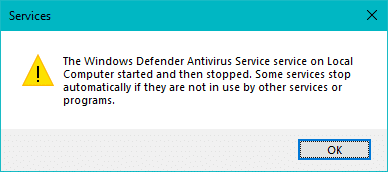
Sometimes, you may see a different error.

The Windows Defender Antivirus Service service on Local Computer started and then stopped. Some services stop automatically if they are not in use by other services or programs.
Fix: Microsoft Defender Antivirus Service Error 577
This problem can happen if you’ve been using a 3rd party anti-virus solution and later uninstalled it or its trial period has ended. Installation of a third-party anti-virus program automatically disables Windows Defender anti-virus.
If a trial version of your anti-virus software (i.e. Avast, McAfee, Norton, etc) came preinstalled on your computer (or you installed one), it most likely turned Windows Defender off to avoid conflicts.
Until the third-party anti-virus software has been completely uninstalled, Windows Defender will remain disabled. Sometimes, you’ll need to download and run the anti-virus software vendor’s uninstaller/cleanup tool to remove traces of the software completely. Once done, Windows Defender and the related services should resume automatically.
Step 1: Uninstall third-party anti-virus software
Open Apps & Features or Programs and Features and uninstall the third-party software. If the uninstall process fails, or the uninstall doesn’t fix the problem even after restarting the system, use the specialized cleanup tool from the respective anti-virus software vendor.
- Avast Uninstall Utility (aswClear)
- AVG Remover
- Avira: Manual uninstallation instructions
- Bitdefender Uninstall Tools
- Removal tool for Kaspersky products (kavremover) – Direct download kavremvr.exe
- F-Secure Uninstall Tool
- Remove McAfee products
- Uninstall ESET manually using the ESET uninstaller tool
Also, see the comprehensive list of anti-virus uninstaller tools compiled by ESET Knowledgebase team: Uninstallers (removal tools) for common Windows antivirus software.
Step 2: Fix Windows Defender Registry Settings
If clean uninstalling third-party anti-virus solution and restarting Windows doesn’t help, follow these steps in addition:
- Download PsExec from Microsoft Sysinternals.
- Unzip and extract the tool to a permanent folder — e.g.,
d:\tools. - Open an elevated or admin Command Prompt window.
- Type the following command, and press ENTER:
d:\tools\psexec.exe -sid c:\windows\regedit.exe

The above
PsExeccommand-line starts the Registry Editor underLOCALSYSTEMaccount so that you can modify some protected keys in the registry. - In the Registry Editor window, go to the following key:
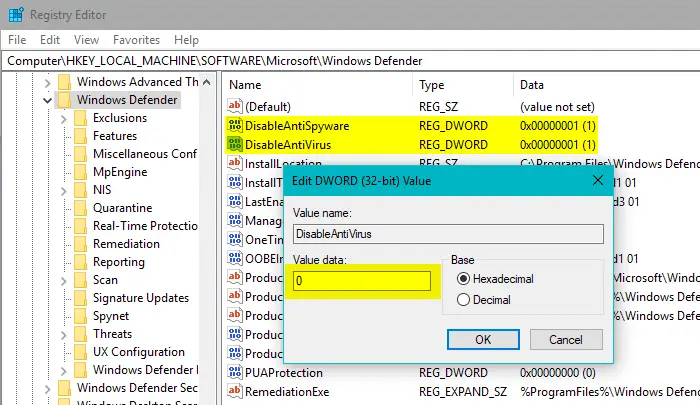
HKEY_LOCAL_MACHINE\SOFTWARE\Microsoft\Windows Defender
- Double-click
DisableAntiVirusand sets its data to0 - Double-click
DisableAntiSpywareand sets its data to0

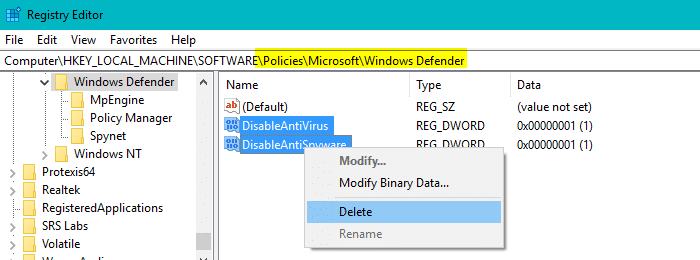
- Go to the following policies branch:
HKEY_LOCAL_MACHINE\SOFTWARE\Policies\Microsoft\Windows Defender
- Delete the two values
DisableAntiVirus&DisableAntiSpywareif found in the above location.

- Exit the Registry Editor.
- Restart Windows and see if Windows Defender is able to start correctly.
Automate the above steps using a Registry file
You can automate the steps 4-8 above by importing the .reg file in the Registry Editor (launched using PsExec tool).
- Download fix-defender-error-577.zip, unzip, and extract the .reg file to the desktop.
- In the Registry Editor, click the File menu, click Import…
- Select the file
fix-defender-error-577.regto apply it. - Exit the Registry Editor.
- Restart Windows.
Hope the above steps have resolved the Microsoft Defender Antivirus Service error 577.
One small request: If you liked this post, please share this?
One "tiny" share from you would seriously help a lot with the growth of this blog. Some great suggestions:- Pin it!
- Share it to your favorite blog + Facebook, Reddit
- Tweet it!
Finally a working solution!!!! For anyone attempting to manually remove Vipre AntiVirus on Windows 8.1, this is the trick.
Thank you
it works; thanks
Thank you a lot mate, finally working solution. I have searched everywhere for solutions and i could not solve the problem.
There was an error message saying it wasn’t possible to change the value.
Pls, how could I proceed in this case?
It Works 100% thank you soo much
Thank you..
Tried so many options but only this worked.
Glad I came to this site.
Since I am using official windows I prefer to stick with windows defender rather than custom antivirus system.
@parag:
Glad it worked.. and thanks for the feedback.
@henry
did you follow below steps?
10Download PsExec from Microsoft’s Windows Sysinternals site. Unzip and extract the tool to a permanent folder, say d:\tools
2)Open an elevated or admin Command Prompt window.
3)Type the following command, and press ENTER:
d:\tools\psexec.exe -sid c:\windows\regedit.exe
dont work for me
Thanks it really works.
HKLM:\SOFTWARE\Policies\Microsoft\Windows Defender\DisableAntiSpyware is also worth a look, mine was set to 1.
thank you soo much