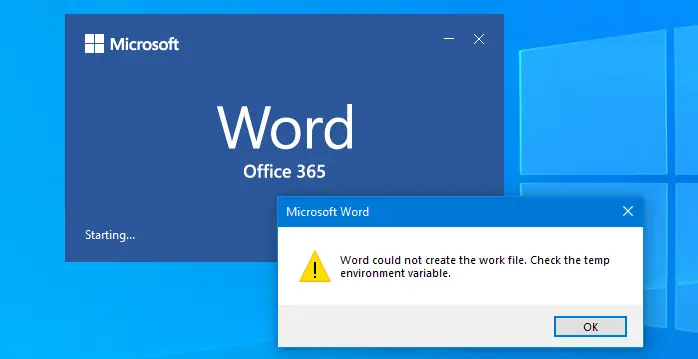
When you try to open or save a document in Microsoft Word, you receive the following error message:
Word could not create the work file. Check the Temp environment variable.
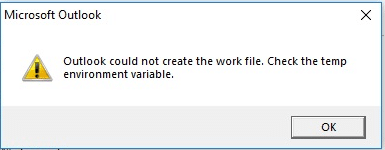
The error message can also appear when you preview a .docx or .xlsx file using the File Explorer preview pane. The same error occurs when you start any other Office application — e.g., Outlook, Excel, etc.
Outlook could not create the work file. Check the Temp environment variable.
Cause
This problem can occur if you’ve previously installed 64-bit Office, uninstalled it, and then installed the 32-bit version on a 64-bit Windows system. If a 64-bit version of Office 365 is installed, then uninstalled, and then a 32-bit version of Office 365 is subsequently installed, Explorer may not show document previews. Instead, an error may be shown:
Word: Word could not create the work file. Check the temp environment variable.
PowerPoint: Access denied. Contact your administrator.
Excel: This file cannot be previewed.
Outlook: Outlook could not create the work file. Check the Temp environment variable.
The above errors can also happen if the Temporary Internet Files location for Internet Explorer is set incorrectly. It is possible that the Temporary Internet Files location points to a folder where the user does not have permission to create new temporary files. Office applications use the Temporary Internet Files folder to create temporary files when you open Office documents or preview a document using the File Explorer preview pane.
Resolution
 Easy fix: If you’re using Office 32-bit on a 64-bit Windows edition and facing this issue, you can fix it by uninstalling the Office 32-bit version and installing Office 64-bit.
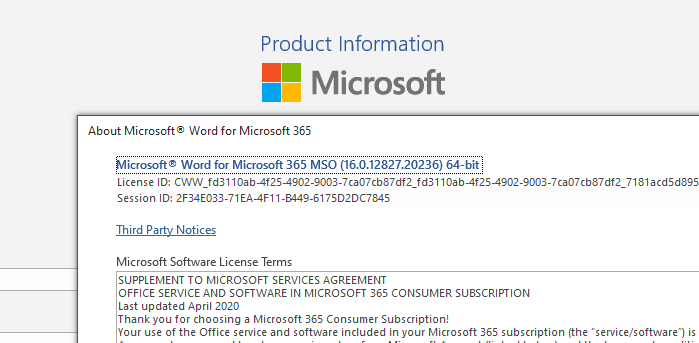
You can check the bitness of your Office installation by opening an Office product, clicking on the File menu, choosing Accounts, and clicking the About button.
If installing the 64-bit Office is not a feasible option for you due to plugin compatibility or other issues, here are some other solutions to help you get rid of the preview errors without switching to the 64-bit version.
Delete the Office 64-bit Previewer registry entries
If you’re running Office 32-bit Edition, then follow these steps to remove the 64-bit previewer registry entries. Follow these steps:
- Start the Registry Editor (
regedit.exe) - Go to the following branches one by one:
[Word Preview] HKEY_CLASSES_ROOT\CLSID\{84F66100-FF7C-4fb4-B0C0-02CD7FB668FE} [PowerPoint Preview] HKEY_CLASSES_ROOT\CLSID\{65235197-874B-4A07-BDC5-E65EA825B718} [Excel Preview] HKEY_CLASSES_ROOT\CLSID\{00020827-0000-0000-C000-000000000046} - Delete all of the above registry keys. Make sure you export each registry key to a separate .reg file before deleting the keys.
- Exit the Registry Editor.
- Log off and log back in to your account.
Windows will now use the preview handlers registered under the HKEY_CLASSES_ROOT\Wow6432Node\CLSID\ branch. This should fix the preview issues in the 32-bit version of Office running on a 64-bit Windows.
Change the Temporary Internet Files location
An incorrect Temporary Internet Files location can cause Office document preview issues in Explorer. To fix this, follow these steps:
Method 1: Using Internet Options
- Open Internet Options (
inetcpl.cpl) - In the Internet Options dialog box, click the General tab.
- In the Browsing history section, click Settings to open the Website Data Settings dialog box.
- In the Website Data Settings dialog, click Move Folder to open the Browse for Folder dialog box.
- In the Browse for Folder dialog box, select the following location:
C:\Users\<user name>\AppData\Local\Microsoft\Windows
- Note: Whichever location you select, a folder called INetCache is created.
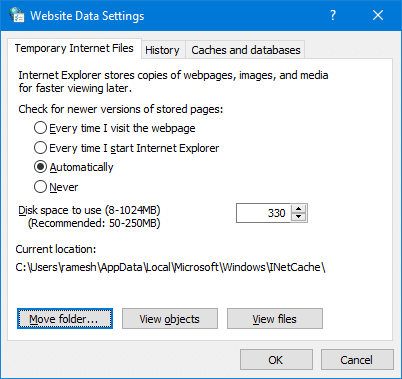
- Click OK to close the Browse for Folder dialog box.
- Click OK to close the Website Data Settings dialog box.
- Click OK to close the Internet Options dialog box.
- Log off and log back in to your user account.
Method 2: Using the Registry Editor
- Start the Registry Editor (regedit.exe) and go to the following branch:
HKEY_CURRENT_USER\Software\Microsoft\Windows\CurrentVersion\Explorer\User Shell Folders
- Double-click Cache and set its data to:
%USERPROFILE%\AppData\Local\Microsoft\Windows\INetCache
(Make sure that the value named Cache is of type REG_EXPAND_SZ. If it’s showing up as REG_SZ, delete the value and create a new one.)
- Exit the Registry Editor.
- Log off and log back in for the change to take effect.
Automate using a .reg file
You can also apply the above settings using the following .reg file:
Windows Registry Editor Version 5.00

[HKEY_CURRENT_USER\Software\Microsoft\Windows\CurrentVersion\Explorer\User Shell Folders]
"Cache"=hex(2):25,00,55,00,53,00,45,00,52,00,50,00,52,00,4f,00,46,00,49,00,4c,\
00,45,00,25,00,5c,00,41,00,70,00,70,00,44,00,61,00,74,00,61,00,5c,00,4c,00,\
6f,00,63,00,61,00,6c,00,5c,00,4d,00,69,00,63,00,72,00,6f,00,73,00,6f,00,66,\
00,74,00,5c,00,57,00,69,00,6e,00,64,00,6f,00,77,00,73,00,5c,00,49,00,4e,00,\
65,00,74,00,43,00,61,00,63,00,68,00,65,00,00,00
In the above .reg file, the hex code refers to the following path:
%USERPROFILE%\AppData\Local\Microsoft\Windows\INetCache
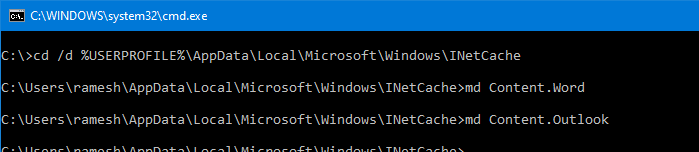
Create the Office app temp folders
If the above solution isn’t sufficient, manually create the temp folders for Word and/or Outlook. To do so, run the following commands via Command Prompt:
cd /d %USERPROFILE%\AppData\Local\Microsoft\Windows\INetCache
md Content.Word
md Content.Outlook
Check the INetCache folder permissions
To check permissions, run the command in Command Prompt.
icacls "%USERPROFILE%\AppData\Local\Microsoft\Windows\INetCache"
The INetCache folder has the following permissions by default:
NT AUTHORITY\SYSTEM:(I)(OI)(CI)(F)
BUILTIN\Administrators:(I)(OI)(CI)(F)
Computer_name\your_username:(I)(OI)(CI)(F)
Hope one or more of the above methods helped you resolve the error “could not create the work file. Check the Temp environment variable” when starting Microsoft Word or Outlook. The solution should work in any version of Office and Windows, even in Microsoft 365 Word.
One small request: If you liked this post, please share this?
One "tiny" share from you would seriously help a lot with the growth of this blog. Some great suggestions:- Pin it!
- Share it to your favorite blog + Facebook, Reddit
- Tweet it!
Tried these and still have the problem, verified I could create a file in cd /d %USERPROFILE%\AppData\Local\Microsoft\Windows\INetCache\Content.Word and delete it.
Verified the pointers in the registry.
Still have the same problem.
Windows 10 PC
Office 365
The issue is with Word
i have the same issue but it only seems to happen when the Preview Pane is turned on in Explorer
@Tommy, Can you run a ProcMon trace and send me the log?
Can confirm… it seems to be related to the Preview Pane. If it’s off… problem goes away. Anyone found a full resolution?
@Cliff: Have you tried some of the methods discussed in the page? the INetcache folder path and permissions…
Thanks a million!!
??
This worked for me.
I tried all above other tricks but no avail. However, I would like to see the preview as well?
Sure it is.
The issue for me was the Intel 10 Series Processor
running 32 bit office 365
works fine with 64 Bit , but does not preview emails in explorer
What if all my settings are correct, but I’m still getting the error message?
The preview pane is what causes the error for me too… I tried everything, but fortunately a user mentioned the preview panel!
Thanks Tommy
Method 2 – Works fine for me
Thanks
Don’t make it so complicated. If you install office 32-bit of your 64-bit system, then you will get the above error! Just install a correct version and enjoy your life! No need to deactivate anything or change the preview in your windows.
THANK YOU! This solved my problem! I appreciate the time you took in sharing your solution with the Internet community!
Your suggestion to remove the 64-bit previewer registry entries worked perfectly. I had previously installed the office 365 64-bit version, changed my mind and then install the 32-bit version. After that I couldn’t use the preview feature with my office documents. I been looking for a solution for 2 years, and it never occurred to me that this was the reason. Many thanks!
AFTER 7 MONTHS OF LOOKING AT THIS ERROR, THIS FINALLY SOLVED IT FOR ME!!
I tried all the folder things a million times, none of that ever did anything. What finally fixed it for me was the “Delete the Office 64-bit Previewer registry entries” stuff. Deleted those 3 registry keys, logged off and back in, and it works perfectly again.
THANK YOU SO MUCH!!
Thanks a lot , its work ?
Awesome! It was the preview issue. I removed the registry keys (after exporting them) and that fixed the problem.
Thank you, this fixe the error, for my users.
I had read some of the “solutions” on different pages dealing with the registry etc., so I started from the bottom-up on this page. Nothing worked. Then, the very first solution about deleting the 64-bit keys worked like a charm. Here’s to a good, smart solution to a very idiotic MS issue.
Thank you. This finally solved it for me.
I have had this problem with Office 365 and prior versions for years. It was extremely annoying. I would get the error message 20-50 times for each document I tried to open. I have read just about every solution posted to the internet. I just installed a new version of Office 2019 hoping the problem would be solved but it persisted. Then I read this article. It turned out I unknowingly had a 32 bit version of Office on a 64 bit Windows 10 computer. I followed the instructions to delete three registry entries and now PROBLEM IS FIXED. THANK YOU THANK YOU THANK YOU.
What if the problem occurs in Microsoft Word of Office for Mac?
Thanks,
Tried so many suggestions, non worked, including MS help site.
Perfect, it worked for me
BTW I only had this error on Word
Fantastic! Worked great. Thanks!
Amazing. Finally a solution for this. I got error message on preview of doc in explorer. Excel caused explorer to freeze from time to time. Preview did not work in explorer for Excel. I had Office 32-bit. Upgraded to 64-bit. Then the problems started. Searched the internet. Found that there were problems with 64-bit. Uninstalled 64-bit and reinstalled 32-bit. The problems did not disappear. 2 years with office that has not worked properly… I have been looking and searching for solutions. I have changed the registry countless times after searching for a solution.
Today I came across this blog. Here I found a solution with three lines in the register to be removed. It works for me.
Thank you so much Ramesh !!!
Finally! I had the same issue, I bought a Dell with Office 365 (64) but decided instead to use the 32 bit version (needed to use some add ins that are not compatible with 64 bit).
Followed the instructions to remove the 64 bit entries in the registry and after restarting, explorer is now showing the previews for Word, Excel and PowerPoint.
THANK YOU!!
Lucky me i didnt have to through them all. Number 1 worked for Word x32 2016.
Also fixed thumbnail preview for other file types
OS server 2012R1
Thank you
Thanks a lot, deleting HKEY_CLASSES_ROOT\CLSID\{84F66100-FF7C-4fb4-B0C0-02CD7FB668FE}
was the solution for me (problem from preview panel in the explorer)
It worked many thanks
Thanks for the solution. It worked perfectly!
Thanks for sharing your knowledge! It helped me to get back the preview pane feature after Office 365 64bit to 32bit re-installation. Reason for going back to 32bit is the incompatibility of EXCEL VBA mscomct2.ocx.
Hi all, thanks for the helps and solutions. I tried most of the method and the one that workable is the preview panel method. It’s WORKED like magic once disable the preview and the entire annoying ‘ding sound’ just vanished off. However, I yet to delete the HKEY_CLASSES_ROOT\CLSID\{84F66100-FF7C-4fb4-B0C0-02CD7FB668FE}.
Thank you guys, you save my day.
Gracias From Spain -)
Thanks a lot !!!! It works smoothly..
Start the Registry Editor (regedit.exe)
Go to the following branches one by one:
[Word Preview]
HKEY_CLASSES_ROOT\CLSID\{84F66100-FF7C-4fb4-B0C0-02CD7FB668FE}
[PowerPoint Preview]
HKEY_CLASSES_ROOT\CLSID\{65235197-874B-4A07-BDC5-E65EA825B718}
[Excel Preview]
HKEY_CLASSES_ROOT\CLSID\{00020827-0000-0000-C000-000000000046}
This one I used… Thank you so much.!!! Good Bless!!!
Been searching for a month for a solution to preview not working correctly in Explorer (Windows 11/Word 2007). Below is the solution!! (Caveat– there will only be keys for Office apps you have installed, so all the keys may be present in Registry.) THANKS RAMESH
Start the Registry Editor (regedit.exe)
Go to the following branches one by one:
[Word Preview]
HKEY_CLASSES_ROOT\CLSID\{84F66100-FF7C-4fb4-B0C0-02CD7FB668FE}
[PowerPoint Preview]
HKEY_CLASSES_ROOT\CLSID\{65235197-874B-4A07-BDC5-E65EA825B718}
[Excel Preview]
HKEY_CLASSES_ROOT\CLSID\{00020827-0000-0000-C000-000000000046}
The registry fix was great and worked with no fuss! This had been driving me mad! I need the 32 bit version for a pluggin so had previously installed 64 bit and had to change.
Just some pointers if you want to try this. First, I only needed to delete the registry entries I didn’t have to read or act beyond this first short section. I was originally put off by all the instructions but I think these are different options.
Second, I was way nervous about doing anything in the registry having not done this before and the instructions were a bit brief and assumed a level of knowledge I didn’t have. I did work out how to find the entry in the registry though and then was able to see there was an export option. I exported the key and deleted it and reimported it to check that all was working ok. Having built my confidence I then exported the remaining 2 keys and deleted them and then restarted. And BLOODY brilliant, it worked!
I cannot describe how happy I am not to have that annoyance anymore! Thank you so much!