Windows allows you to create USB recovery media using the RecoveryDrive.exe (“Create a recovery drive”) utility. When you attempt to create the recovery drive in Windows 10 or 11, the following error appears, and the process stalls:
We can’t create a recovery drive on this PC

 Go to the solution directly.
Contents
What causes the error “We can’t create a recovery drive on this PC”
The above error occurs if Windows RE is disabled or the Windows RE image file (Winre.wim) is missing from the Recovery folder.
The Recovery Drive creation process starts with the verification of core files, including the Windows RE image (Winre.wim) file. If the WIM is missing from its designated location (defined in the Reimage.xml file), Windows attempts to look at the alternate locations such as Windows\System32 & Windows\System32\Recovery folders for Winre.wim.
If the file is not present in any of the above locations, the above error is triggered.
The failed event is logged in setupact.log & setuperr.log. Here are sample events:
setupact.log
============

Info       [RecoveryDrive.exe] WinRE config file path: C:\WINDOWS\system32\Recovery\ReAgent.xml
Info       [RecoveryDrive.exe] Update enhanced config info is enabled.
Warning    [RecoveryDrive.exe] Failed to get recovery entries: 0xc0000225
Info       [RecoveryDrive.exe] winreGetWinReGuid returning 0X490
Info       [RecoveryDrive.exe] ReAgentConfig::ReadBcdAndUpdateEnhancedConfigInfo WinRE disabled, WinRE Guid could not be determined  (0x490)
Info       [RecoveryDrive.exe] Wim dir location: \\?\GLOBALROOT\device\harddisk0\partition2\Recovery\WindowsRE
Info       [RecoveryDrive.exe] System is WimBoot: FALSE
Info       [RecoveryDrive.exe] Exit WinReGetConfig return value: 1, last error: 0x0
Error      GetRecoveryInfo(160): Result = 0x80070002[gle=0x00000002]


setuperr.log
============

Error      GetRecoveryInfo(160): Result = 0x80070002[gle=0x00000002]
Error      GetRecoveryInfo(160): Result = 0x80070002[gle=0x00000002]
Error      Failed to get recovery info, error code: 0x80070002[gle=0x00000002]
Error      CreateRecoveryUsb(531): Result = 0x80070002[gle=0x00000002]
Error      BuildUsbDriveList(368): Result = 0x80070002[gle=0x00000002]
Error      UsbWaitThreadProc(488): Result = 0x80070002[gle=0x00000002]
Error      Failed !!!!!, error code: 0x80070002[gle=0x00000002]
Error      RecoveryDrive.exe execution failed: 0x80070002
Error      GetRecoveryInfo(160): Result = 0x80070002[gle=0x00000002]
Error      GetRecoveryInfo(160): Result = 0x80070002[gle=0x00000002]
Error      Failed to get recovery info, error code: 0x80070002[gle=0x00000002]
Error      CreateRecoveryUsb(531): Result = 0x80070002[gle=0x00000002]
Error      BuildUsbDriveList(368): Result = 0x80070002[gle=0x00000002]
Error      UsbWaitThreadProc(488): Result = 0x80070002[gle=0x00000002]
Error      Failed !!!!!, error code: 0x80070002[gle=0x00000002]
Error      RecoveryDrive.exe execution failed: 0x80070002
You can see the system error 0x80070002 in multiple areas. Error 0x80070002 denotes The system cannot find the file specified. And the file it’s looking for is Winre.wim.
What is a Recovery Drive?
The Recovery media helps restore a Windows device to the factory state, even if the user needs to replace the hard drive or completely wipe the drive clean. Restoring Windows using the Recovery Drive is also called bare-metal recovery. The recovery drive would contain a bootable copy of Windows RE so that the users get access to troubleshooting and recovery tools when booting from recovery media.
When you create the Recovery Drive, the Windows system files (including the Windows and driver updates installed), and any customizations included in the OEM provisioning package, are copied to create the recovery media.
Users can optionally back up (Windows system) files required to perform bare metal recovery. When the Back up system files to the recovery drive option is selected, the following are copied onto the USB recovery media as well, into WIM files named Reconstruct.WIM, Reconstruct.WIM2 and so forth.
- Windows Component Store
- Installed drivers
- Backup of preinstalled Windows apps
- Provisioning packages containing preinstalled customizations (under C:\Recovery\Customizations)
- Push-button Reset configuration XML and scripts (under C:\Recovery\OEM)
Note: The personal files won’t be backed up or restored when you do a bare metal recovery using the Recovery Drive.
The partitions are removed, recreated, and reformatted automatically during the process.
![]() The size of the recovery media will depend on the size of the recovery folder,
The size of the recovery media will depend on the size of the recovery folder, Windows\System32, the WinSxS folder, etc. You can reduce the size of the backup by reducing the size of the WinSxS (“Component Store”) folder.
What does the Recovery Drive contain?
Folder PATH listing for volume RECOVERY
G:.
│   reagent.xml
│
├───EFI
│   ├───Microsoft
│   │   ├───Boot
│   │   │   │   boot.stl
│   │   │   │   bootmgfw.efi
│   │   │   │   bootmgr.efi
│   │   │   │   kdnet_uart16550.dll
│   │   │   │   kdstub.dll
│   │   │   │   kd_02_10df.dll
│   │   │   │   kd_02_10ec.dll
│   │   │   │   kd_02_1137.dll
│   │   │   │   kd_02_14e4.dll
│   │   │   │   kd_02_15b3.dll
│   │   │   │   kd_02_1969.dll
│   │   │   │   kd_02_19a2.dll
│   │   │   │   kd_02_1af4.dll
│   │   │   │   kd_02_8086.dll
│   │   │   │   kd_07_1415.dll
│   │   │   │   kd_0C_8086.dll
│   │   │   │   memtest.efi
│   │   │   │   winsipolicy.p7b
│   │   │   │   BCD
│   │   │   │
│   │   │   ├───bg-BG
│   │   │   │       bootmgfw.efi.mui
│   │   │   │       bootmgr.efi.mui
│   │   │   │
│   │   │   ├───cs-CZ
│   │   │   │       bootmgfw.efi.mui
│   │   │   │       bootmgr.efi.mui
│   │   │   │       memtest.efi.mui
│   │   │   │
│   │   │   ├───da-DK
│   │   │   │       bootmgfw.efi.mui
│   │   │   │       bootmgr.efi.mui
│   │   │   │       memtest.efi.mui
│   │   │   │
│   │   │   ├───de-DE
│   │   │   │       bootmgfw.efi.mui
│   │   │   │       bootmgr.efi.mui
│   │   │   │       memtest.efi.mui
│   │   │   │
│   │   │   ├───el-GR
│   │   │   │       bootmgfw.efi.mui
│   │   │   │       bootmgr.efi.mui
│   │   │   │       memtest.efi.mui
│   │   │   │
│   │   │   ├───en-GB
│   │   │   │       bootmgfw.efi.mui
│   │   │   │       bootmgr.efi.mui
│   │   │   │
│   │   │   ├───en-US
│   │   │   │       bootmgfw.efi.mui
│   │   │   │       bootmgr.efi.mui
│   │   │   │       memtest.efi.mui
│   │   │   │
│   │   │   ├───es-ES
│   │   │   │       bootmgfw.efi.mui
│   │   │   │       bootmgr.efi.mui
│   │   │   │       memtest.efi.mui
│   │   │   │
│   │   │   ├───es-MX
│   │   │   │       bootmgfw.efi.mui
│   │   │   │       bootmgr.efi.mui
│   │   │   │
│   │   │   ├───et-EE
│   │   │   │       bootmgfw.efi.mui
│   │   │   │       bootmgr.efi.mui
│   │   │   │
│   │   │   ├───fi-FI
│   │   │   │       bootmgfw.efi.mui
│   │   │   │       bootmgr.efi.mui
│   │   │   │       memtest.efi.mui
│   │   │   │
│   │   │   ├───fr-CA
│   │   │   │       bootmgfw.efi.mui
│   │   │   │       bootmgr.efi.mui
│   │   │   │
│   │   │   ├───fr-FR
│   │   │   │       bootmgfw.efi.mui
│   │   │   │       bootmgr.efi.mui
│   │   │   │       memtest.efi.mui
│   │   │   │
│   │   │   ├───hr-HR
│   │   │   │       bootmgfw.efi.mui
│   │   │   │       bootmgr.efi.mui
│   │   │   │
│   │   │   ├───hu-HU
│   │   │   │       bootmgfw.efi.mui
│   │   │   │       bootmgr.efi.mui
│   │   │   │       memtest.efi.mui
│   │   │   │
│   │   │   ├───it-IT
│   │   │   │       bootmgfw.efi.mui
│   │   │   │       bootmgr.efi.mui
│   │   │   │       memtest.efi.mui
│   │   │   │
│   │   │   ├───ja-JP
│   │   │   │       bootmgfw.efi.mui
│   │   │   │       bootmgr.efi.mui
│   │   │   │       memtest.efi.mui
│   │   │   │
│   │   │   ├───ko-KR
│   │   │   │       bootmgfw.efi.mui
│   │   │   │       bootmgr.efi.mui
│   │   │   │       memtest.efi.mui
│   │   │   │
│   │   │   ├───lt-LT
│   │   │   │       bootmgfw.efi.mui
│   │   │   │       bootmgr.efi.mui
│   │   │   │
│   │   │   ├───lv-LV
│   │   │   │       bootmgfw.efi.mui
│   │   │   │       bootmgr.efi.mui
│   │   │   │
│   │   │   ├───nb-NO
│   │   │   │       bootmgfw.efi.mui
│   │   │   │       bootmgr.efi.mui
│   │   │   │       memtest.efi.mui
│   │   │   │
│   │   │   ├───nl-NL
│   │   │   │       bootmgfw.efi.mui
│   │   │   │       bootmgr.efi.mui
│   │   │   │       memtest.efi.mui
│   │   │   │
│   │   │   ├───pl-PL
│   │   │   │       bootmgfw.efi.mui
│   │   │   │       bootmgr.efi.mui
│   │   │   │       memtest.efi.mui
│   │   │   │
│   │   │   ├───pt-BR
│   │   │   │       bootmgfw.efi.mui
│   │   │   │       bootmgr.efi.mui
│   │   │   │       memtest.efi.mui
│   │   │   │
│   │   │   ├───pt-PT
│   │   │   │       bootmgfw.efi.mui
│   │   │   │       bootmgr.efi.mui
│   │   │   │       memtest.efi.mui
│   │   │   │
│   │   │   ├───qps-ploc
│   │   │   │       memtest.efi.mui
│   │   │   │
│   │   │   ├───ro-RO
│   │   │   │       bootmgfw.efi.mui
│   │   │   │       bootmgr.efi.mui
│   │   │   │
│   │   │   ├───ru-RU
│   │   │   │       bootmgfw.efi.mui
│   │   │   │       bootmgr.efi.mui
│   │   │   │       memtest.efi.mui
│   │   │   │
│   │   │   ├───sk-SK
│   │   │   │       bootmgfw.efi.mui
│   │   │   │       bootmgr.efi.mui
│   │   │   │
│   │   │   ├───sl-SI
│   │   │   │       bootmgfw.efi.mui
│   │   │   │       bootmgr.efi.mui
│   │   │   │
│   │   │   ├───sr-Latn-RS
│   │   │   │       bootmgfw.efi.mui
│   │   │   │       bootmgr.efi.mui
│   │   │   │
│   │   │   ├───sv-SE
│   │   │   │       bootmgfw.efi.mui
│   │   │   │       bootmgr.efi.mui
│   │   │   │       memtest.efi.mui
│   │   │   │
│   │   │   ├───tr-TR
│   │   │   │       bootmgfw.efi.mui
│   │   │   │       bootmgr.efi.mui
│   │   │   │       memtest.efi.mui
│   │   │   │
│   │   │   ├───uk-UA
│   │   │   │       bootmgfw.efi.mui
│   │   │   │       bootmgr.efi.mui
│   │   │   │
│   │   │   ├───zh-CN
│   │   │   │       bootmgfw.efi.mui
│   │   │   │       bootmgr.efi.mui
│   │   │   │       memtest.efi.mui
│   │   │   │
│   │   │   ├───zh-TW
│   │   │   │       bootmgfw.efi.mui
│   │   │   │       bootmgr.efi.mui
│   │   │   │       memtest.efi.mui
│   │   │   │
│   │   │   ├───Fonts
│   │   │   │       chs_boot.ttf
│   │   │   │       cht_boot.ttf
│   │   │   │       jpn_boot.ttf
│   │   │   │       kor_boot.ttf
│   │   │   │       malgunn_boot.ttf
│   │   │   │       malgun_boot.ttf
│   │   │   │       meiryon_boot.ttf
│   │   │   │       meiryo_boot.ttf
│   │   │   │       msjhn_boot.ttf
│   │   │   │       msjh_boot.ttf
│   │   │   │       msyhn_boot.ttf
│   │   │   │       msyh_boot.ttf
│   │   │   │       segmono_boot.ttf
│   │   │   │       segoen_slboot.ttf
│   │   │   │       segoe_slboot.ttf
│   │   │   │       wgl4_boot.ttf
│   │   │   │
│   │   │   └───Resources
│   │   │       │   bootres.dll
│   │   │       │
│   │   │       └───en-US
│   │   │               bootres.dll.mui
│   │   │
│   │   └───Recovery
│   └───Boot
│           bootx64.efi
│
└───sources
        boot.wim
        $PBR_ResetConfig.xml
        $PBR_Diskpart.txt
        Reconstruct.WIM
        Reconstruct.WIM2
Fix for Error “We can’t create a recovery drive on this PC”
- First, let’s check the status of the Windows RE on the computer. To do so, open an admin Command Prompt window, and then type the following command:
reagentc /info
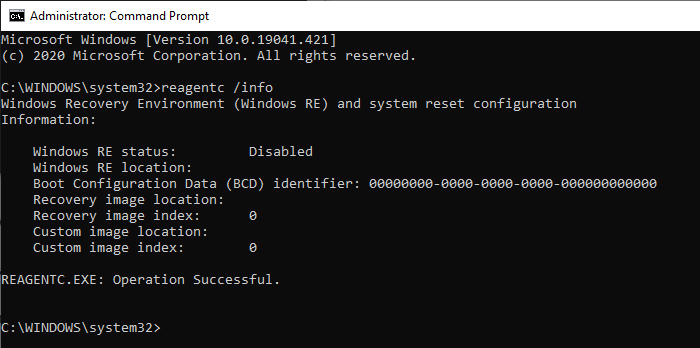
The above command shows the Windows Recovery Environment (Windows RE) and system reset configuration.
- If the Windows RE status shows up as
Disabledor if the Windows RE location is empty, here is the command you need to run:reagentc /enable
This enables the Windows Recovery Environment on the computer.

When you run the enable command, what happens in the background is that the Windows RE image file (
Winre.wim) is copied from theWindows\System32\Recoveryto theC:\Recovery\WindowsREfolder and the boot configuration entries (BCD) is updated accordingly.
Can’t enable Windows RE?
If you encounter errors when enabling the Windows RE using reagentc.exe command-line, see the next section, “How to Repair or restore the Windows Recovery Environment” for a solution.
Repair the Windows Recovery Environment
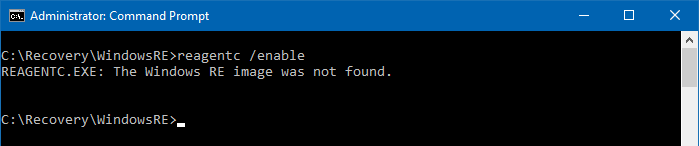
If the Windows RE image Winre.wim is missing from the source or is corrupted, the following error occurs when running the reagentc.exe /enable command-line:
REAGENTC.EXE: The Windows RE image was not found.
To resolve this, we need to extract a fresh copy of Winre.wim from the Windows 10 Setup disk or ISO. Follow these steps:
![]() For maximum compatibility, make sure you select the version of Windows 10 ISO/DVD that matches the version of Windows 10 currently installed. You can download any version of Windows 10 ISO using Rufus.
For maximum compatibility, make sure you select the version of Windows 10 ISO/DVD that matches the version of Windows 10 currently installed. You can download any version of Windows 10 ISO using Rufus.
- Extract
Winre.wimfrom theinstall.wimfile located inside the Windows Setup disk or ISO. You can find detailed instructions in the article How to Extract Files from Windows 10 ISO or DVD (Install.wim)Let’s say you extractWinre.wimfrom the ISO/DVD source to theD:\drive using the instructions in the linked article above. - Next, open an admin Command Prompt Window, and type the following command:
cd /d C:\Recovery\WindowsRE
If the above command is successful, you’ll see
C:\Recovery\WindowsREin the prompt. - Type the following commands:
attrib -s -h -r reimage.xml
ren reimage.xml reimage.xml.001
copy D:\Winre.wim
You should see the
1 file(s) copiedmessage in the output. The fileWinre.wimwhich we extracted to theD:\drive, is now copied to theC:\Recovery\WindowsREfolder. - Type the following command:
reagentc /setreimage /path C:\Recovery\WindowsRE
You should see the output similar to the following:
Directory set to: \\?\GLOBALROOT\device\harddisk0\partition2\Recovery\WindowsRE

REAGENTC.EXE: Operation Successful.
The above path starting with theGLOBALROOTis the symbolic link that points to theRecovery\WindowsREfolder on the C: drive. The partition# and the harddisk# would vary depending upon the configuration of each computer.Note that the fileWinre.wimmust exist in that folder before running thereagentc.exe /setreimagecommand-line. Otherwise, you’ll get the error REAGENTC.EXE: No valid image found in the specified path. - Finally, run the following command to enable the Windows Recovery Environment and reconfigure the Boot Configuration Data (BCD) entries present in the System Reserved partition.
reagentc /enable
- If you see
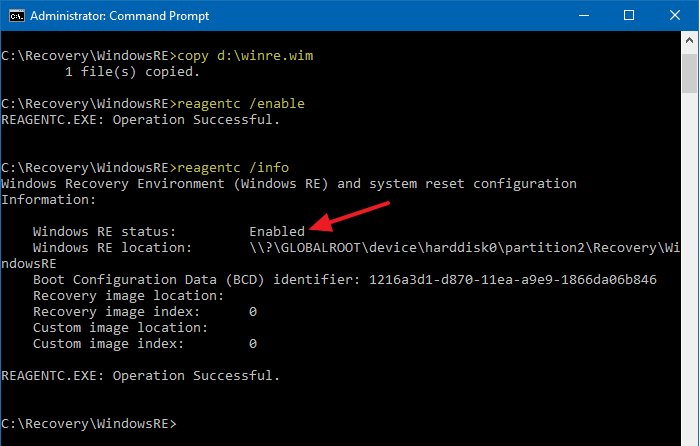
REAGENTC.EXE: Operation successfulin the output of the previous command, then type the following command to verify if the Windows Recovery Environment is enabled:reagentc /info
You should see something like this in the output.
Windows Recovery Environment (Windows RE) and system reset configuration

Windows RE status: Enabled
Windows RE location: \\?\GLOBALROOT\device\harddisk0\partition2\Recovery\WindowsRE
Boot Configuration Data (BCD) identifier: 1216a3d5-d870-11ea-a9e9-1866da06b846
Recovery image location:
Recovery image index: 0
Custom image location:
Custom image index: 0

REAGENTC.EXE: Operation Successful.
After following the above steps, the Windows 10/11 Recovery Drive creation error We can’t create a recovery drive on this PC will be resolved.
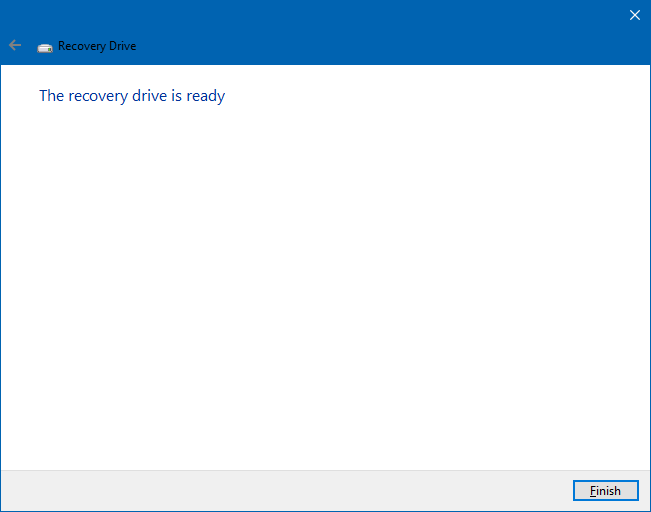
You’ll also find that the tools, such as Startup Repair, System Restore, Uninstall Updates, etc., are restored to the Windows RE page.
One small request: If you liked this post, please share this?
One "tiny" share from you would seriously help a lot with the growth of this blog. Some great suggestions:- Pin it!
- Share it to your favorite blog + Facebook, Reddit
- Tweet it!