The XPS Viewer Feature on Demand (FOD) component allows you to read, copy, print, sign, and set permissions for XPS documents. This article explains installing the XPS Viewer in Windows 10 and 11.
Installing the “XPS Document Writer” via the classic Windows Features dialog (i.e., OptionalFeatures.exe) doesn’t install the XPS Viewer. They’re two different components.
How to Install the XPS Viewer
The XPS Viewer FOD component can be installed using different methods. Follow one of the options below.
Method 1: Using Settings
- Open Settings → System → Optional features.
- Click “View features.”
- In the “Add an optional feature” dialog, type
xps. - Select the “XPS Viewer” checkbox, and click Next.
- On the next screen, click Install.
The above steps are for Windows 11.
On Windows 10, follow the steps below:
- Open Settings, System.
- Click “Optional features”.
Note: If “XPS Viewer” is not already installed, it won’t appear in the “Installed Features” listing - Click “Add a feature.”
- Type xps
- Select the “XPS Viewer” checkbox.
- Click “Install.”
Method 2: Using DISM
To install the XPS Viewer using DISM, ensure the system is connected to the internet. And then, run the following commands from the admin Command Prompt:
dism /online /remove-capability /capabilityname:XPS.Viewer~~~~0.0.1.0
dism /online /add-capability /capabilityname:XPS.Viewer~~~~0.0.1.0
The above commands uninstall XPS Viewer and reinstall XPS Viewer by downloading the source files from Windows Update.
Method 3: Using DISM (using CAB file) offline
Methods 1 and 2 require internet access to download the FOD packages. To install the XPS Viewer or other FOD packages on a computer that’s offline (i.e., with no internet access), you must use the .cab file. The FOD .cab files will be available in the Windows FOD ISO.
The download links for the Language and Optional Features ISOs are below:
Windows 11 Language and Optional Features ISO (Source)
22621.1.220506-1250.ni_release_amd64fre_CLIENT_LOF_PACKAGES_OEM.iso (for Windows 11 22H2 and 23H2.)
26100.1.240331-1435.ge_release_amd64fre_CLIENT_LOF_PACKAGES_OEM.iso (for Windows 11 24H2.)
Windows 10, version 2004 (and later) Features on Demand #1 ISO (Link Source)
19041.1.191206-1406.vb_release_amd64fre_FOD-PACKAGES_OEM_PT1_amd64fre_MULTI.iso
Instructions
- Download the appropriate FOD ISO and mount the ISO. To mount the ISO, right-click on it and click “Mount”. The cab file name for the XPS Viewer is mentioned below:
XPS Viewer – FOD Info
Feature name: XPS Viewer
Capability name: XPS.Viewer~~~~0.0.1.0
CAB file name: Microsoft-Windows-Xps-Xps-Viewer-Opt-Package~31bf3856ad364e35~amd64~~.cab
Note
The above CAB file will be present in the
rootfolder of the Windows 10 FOD ISO. Whereas in the Windows 11 FOD ISO, this file is located under theLanguagesAndOptionalFeaturesfolder. - Suppose the FOD ISO’s mounted drive-letter is
H:\. To install the XPS Viewer FOD component, run the following command:Windows 11dism /online /add-package /packagepath:"H:\LanguagesAndOptionalFeatures\Microsoft-Windows-Xps-Xps-Viewer-Opt-Package~31bf3856ad364e35~amd64~~.cab"
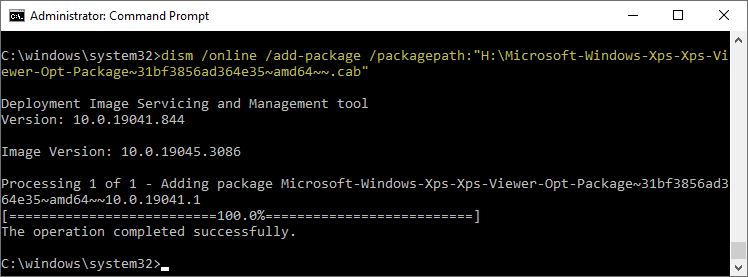
Windows 10dism /online /add-package /packagepath:"H:\Microsoft-Windows-Xps-Xps-Viewer-Opt-Package~31bf3856ad364e35~amd64~~.cab"
You’ll see the following output:
Deployment Image Servicing and Management tool
Version: 10.0.19041.844

Image Version: 10.0.19045.3086

Processing 1 of 1 - Adding package Microsoft-Windows-Xps-Xps-Viewer-Opt-Package~31bf3856ad364e35~amd64~~10.0.19041.1
[==========================100.0%==========================]
The operation completed successfully.
That’s it!
One small request: If you liked this post, please share this?
One "tiny" share from you would seriously help a lot with the growth of this blog. Some great suggestions:- Pin it!
- Share it to your favorite blog + Facebook, Reddit
- Tweet it!
The Apps screen on my Windows 11 system does not show Optional features. It has Advanced app settings; Default apps; Offline maps; Apps for websites; Video playback and Startup but no Optional features.
@Eza: Please try:
Open Settings → System → Optional features
Thanks!
This post helps a lot!
Finally, XPS viewer is installed and I can continue my work!
this worked fine, then all of a sudden I am getting access denied for DISM even when ran as admin or even local system.
I don’t have the “Add Aditional Feature” option
metod 2 work great for my windows 11 24H2.