You can add custom folders to the Explorer navigation pane in pretty much all versions of Windows. This post has the instructions on adding a custom folder under This PC in the navigation pane in Windows 10/11 File Explorer.
How to Add a Custom Folder under “This PC” in Explorer
Method 1: Add a Custom folder Manually
If you’re going to create/add a custom shell folder manually, an easy way to add a custom folder to the navigation pane is to mimic the settings of an existing/built-in shell folder like Music or Videos, and use them with a custom GUID. For example, here are the Videos shell folder’s registry settings that we’ll use with a different GUID (and a custom folder path).
- Copy the above contents to Notepad, and save with .reg extension (e.g.
mytools.reg). Don’t close the file yet. - Generate a unique ID (GUID) string by running the command
New-Guidin PowerShell. Alternately, you can visit GuidGen.com to generate a random GUID string. This site uses Microsoft’sGUIDGen.exeat the backend. - In this example, the GUID is
{d464e152-bde0-4a84-9160-bd183268ad35}. Copy the GUID to Clipboard.
- In Notepad, replace every occurrence of the following string:
{f86fa3ab-70d2-4fc7-9c99-fcbf05467f3a}Replace the above GUID with the following:
{d464e152-bde0-4a84-9160-bd183268ad35} - Save the .reg file, and close Notepad.
- Double-click the .reg file to apply the settings to the registry.
- Start the Registry Editor (
Regedit.exe): - In Regedit, navigate to the following branches one by one:
HKEY_LOCAL_MACHINE\SOFTWARE\Classes\CLSID\{d464e152-bde0-4a84-9160-bd183268ad35} HKEY_LOCAL_MACHINE\SOFTWARE\WOW6432Node\Classes\CLSID\{d464e152-bde0-4a84-9160-bd183268ad35} - In the right pane, change the value data for
(Default)andInfoTipaccordingly.
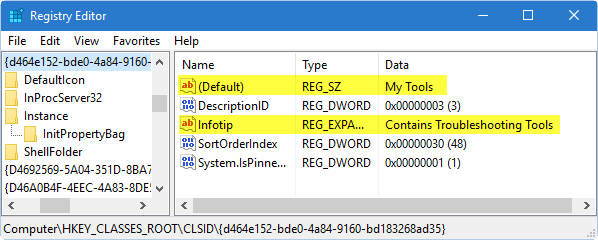
(InfoTip text will be shown when you hover the mouse over the custom folder in File Explorer.) - Then navigate to the
DefaultIconsubkeys below:HKEY_LOCAL_MACHINE\SOFTWARE\Classes\CLSID\{d464e152-bde0-4a84-9160-bd183268ad35}\DefaultIcon HKEY_LOCAL_MACHINE\SOFTWARE\WOW6432Node\Classes\CLSID\{d464e152-bde0-4a84-9160-bd183268ad35}\DefaultIcon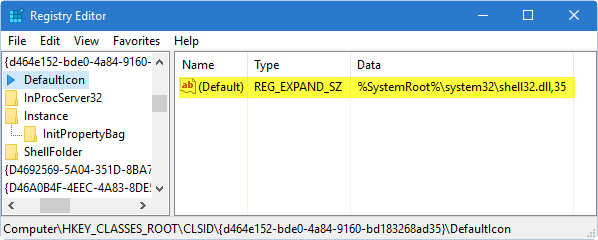
- Set the icon value accordingly. I chose the
shell32.dll,35icon for theMy Toolsfolder we’re adding. You can also use a custom .ico file if you want.
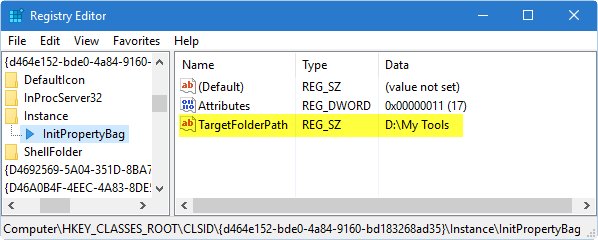
- Navigate to the
Instance\InitPropertyBagsubkeys below:HKEY_LOCAL_MACHINE\SOFTWARE\Classes\CLSID\{d464e152-bde0-4a84-9160-bd183268ad35}\Instance\InitPropertyBag HKEY_LOCAL_MACHINE\SOFTWARE\WOW6432Node\Classes\CLSID\{d464e152-bde0-4a84-9160-bd183268ad35}\Instance\InitPropertyBag - Delete the
TargetKnownFoldervalue, as we’re going to add a custom folder path. - Create a string value (REG_SZ) named
TargetFolderPathand set its value data, with the full folder path.
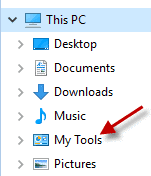
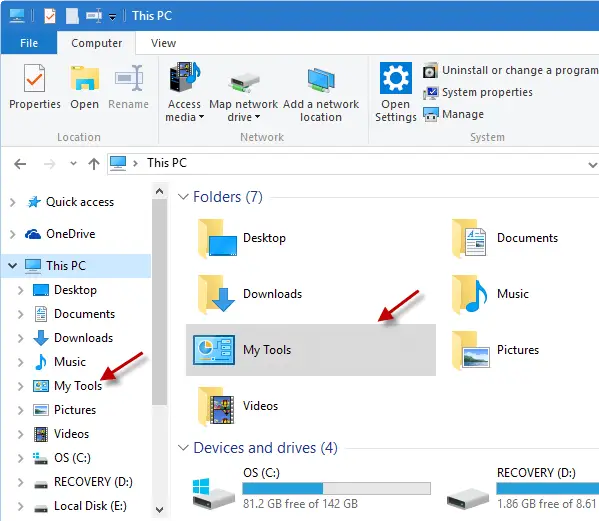
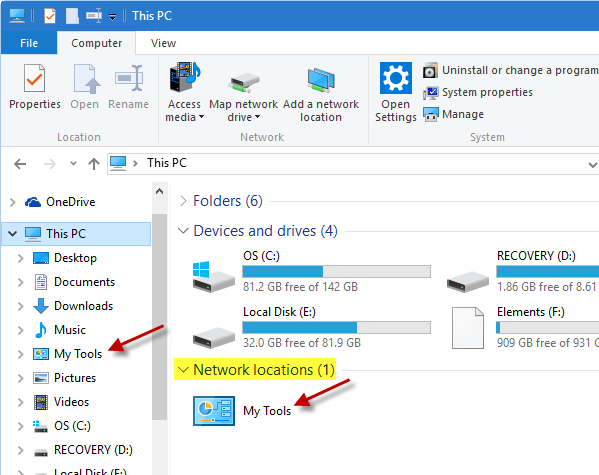
That’s it! TheMy Toolsfolder should show up in the navigation pane and the Folders section in This PC view.
Method 2: Add a Custom folder Using Script
Here’s a VBScript I wrote that will output the registry file that will create and add a custom shell folder under This PC and/or Pin it to the Explorer navigation pane when run. The outputted .reg file can also be deployed to other computers if needed.
- Download the script
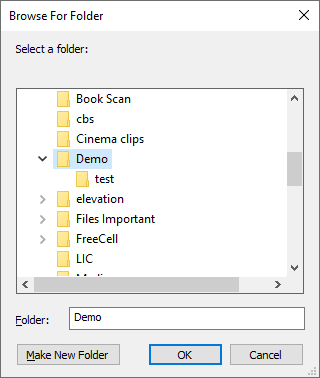
add_custom_folder_this_pc.vbsbelow and save it to Desktop. - Select the folder you want to add under This PC and/or Pin to Explorer Navigation pane.
The script will now output two registry files on your desktop. The 2nd file is the “Undo” registry file that needs to be run if you wish to reverse the setting (i.e., remove the custom folder from This PC/Explorer navigation pane)

- Double-click the registry file (not the Undo registry file) to apply the settings to the registry.
- Close all folder windows and then open a folder.
- There you go! Your custom folder is now pinned to the navigation pane.
Customizations
Before running the registry file, you can edit the file using Notepad and remove the lines containing “
MyComputer\NameSpace” entries in the file and save it. This is to prevent the item from appearing in 3 locations in File Explorer. For more information, see Tip #3 below. This, however, is an optional step.
You can also change the InfoTip in the registry file. By default, it has the placeholder text that says “
YOUR INFOTIP HERE”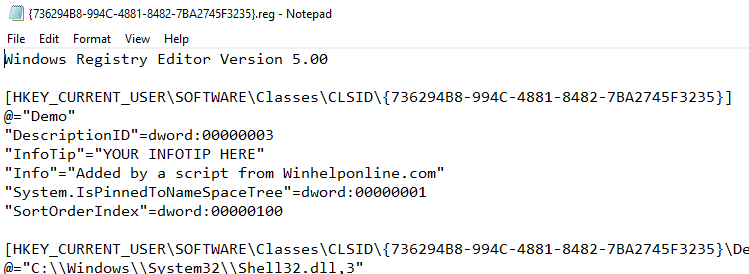
Per-User Registry File: The registry file adds the shell folder for the current user only (i.e., it writes to
HKEY_CURRENT_USERinstead ofHKEY_LOCAL_MACHINE). If you want it per-system, then replace every instance ofHKEY_CURRENT_USERwithHKEY_LOCAL_MACHINEand save the file.
(To unpin the custom shell folder, run the “undo” registry file. Rest assured, it won’t delete the actual folder.)
Bonus Tips
Tip #1: Add the custom folder under “Folders” or “Network Locations” section
If you’re adding a mapped drive or folder pointing to a network location, you can make the item appear under the Network locations section in This PC view. To do so, modify the DescriptionID value (see screenshot #2 above) in this registry key:
HKEY_LOCAL_MACHINE\SOFTWARE\Classes\CLSID\{d464e152-bde0-4a84-9160-bd183268ad35}
Set the DescriptionID to 9 (0x00000009)
- Setting
DescriptionIDto3shows it under Folders category. - Setting
DescriptionIDto9shows it under Network locations category.
Tip #2: Move “My Tools” to the top of the This PC hierarchy
To move My Tools to the top of the This PC hierarchy, create a DWORD (32 bit) value named SortOrderIndex, in the following registry key:
HKEY_LOCAL_MACHINE\SOFTWARE\Classes\CLSID\{d464e152-bde0-4a84-9160-bd183268ad35}

HKEY_LOCAL_MACHINE\SOFTWARE\WOW6432Node\Classes\CLSID\{d464e152-bde0-4a84-9160-bd183268ad35}
Set the SortOrderIndex to a lower value.
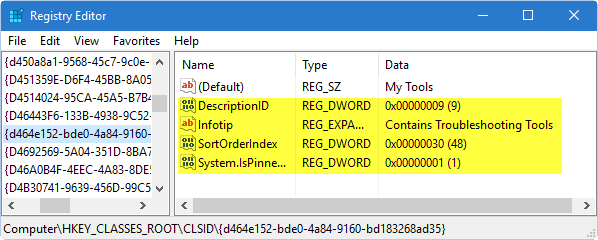
For example, setting it to 0x00000030 moves the item up, like this:
Tip #3: Pin the folder to the Navigation pane separately (instead of under This PC) above or below OneDrive
To pin the custom folder to the navigation pane as a separate category, like OneDrive, Quick access, etc., you need to implement it under the Desktop namespace. This is similar to our Pin Recent Places registry edit.
The registry keys to create are as follows:
HKEY_CURRENT_USER\SOFTWARE\Microsoft\Windows\CurrentVersion\Explorer\Desktop\NameSpace\{d464e152-bde0-4a84-9160-bd183268ad35}

HKEY_CURRENT_USER\SOFTWARE\WOW6432Node\Microsoft\Windows\CurrentVersion\Explorer\Desktop\NameSpace\{d464e152-bde0-4a84-9160-bd183268ad35}
Note: The above edit would also add the custom folder icon on your desktop. To hide the custom folder icon on the desktop, create a DWORD value named {d464e152-bde0-4a84-9160-bd183268ad35} and set it to 1, under the following registry key:
HKEY_CURRENT_USER\Software\Microsoft\Windows\CurrentVersion\Explorer\HideDesktopIcons\NewStartPanel
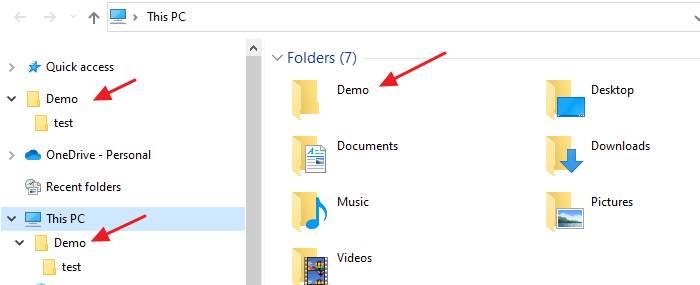
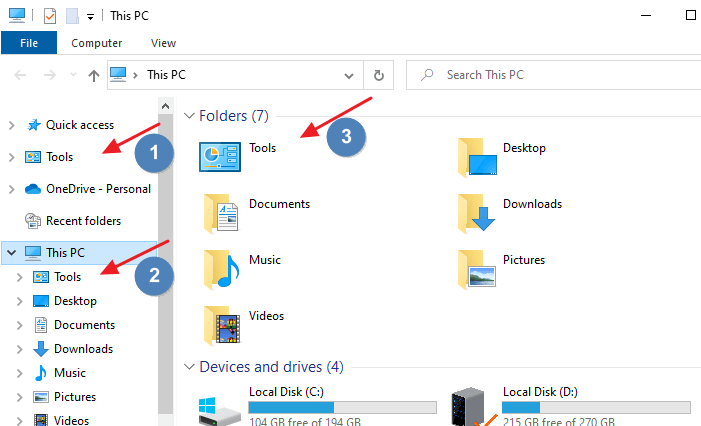
The custom folder now appears in 3 places
With the above registry changes done, the custom folder appears in three places:
- As a separate pinned item, vertically next to the Quick Access/OneDrive section.
- In the navigation pane under This PC, and
- In the right pane of This PC.
So, (optionally) to prevent the custom folder from appearing under the “This PC” tree (a.k.a. “My Computer” namespace) and in the right pane of This PC, delete these keys:
HKEY_CURRENT_USER\SOFTWARE\Microsoft\Windows\CurrentVersion\Explorer\MyComputer\NameSpace\{d464e152-bde0-4a84-9160-bd183268ad35}

HKEY_CURRENT_USER\SOFTWARE\WOW6432Node\Microsoft\Windows\CurrentVersion\MyComputer\Desktop\NameSpace\{d464e152-bde0-4a84-9160-bd183268ad35}
This eliminates the custom folder icon from locations #2 and #3 (see screenshot).
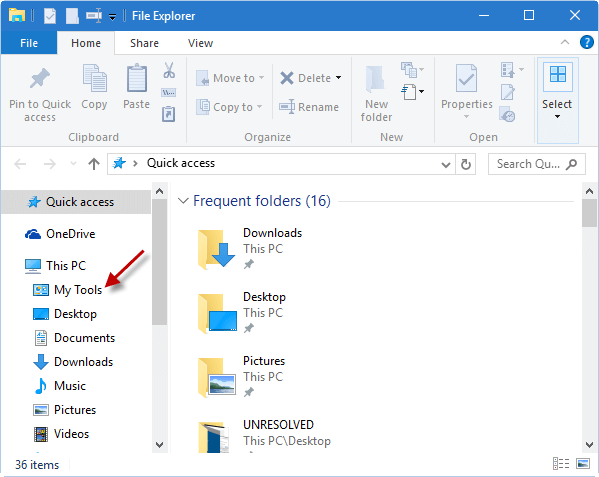
The result of the above registry edits is seen in the following image:
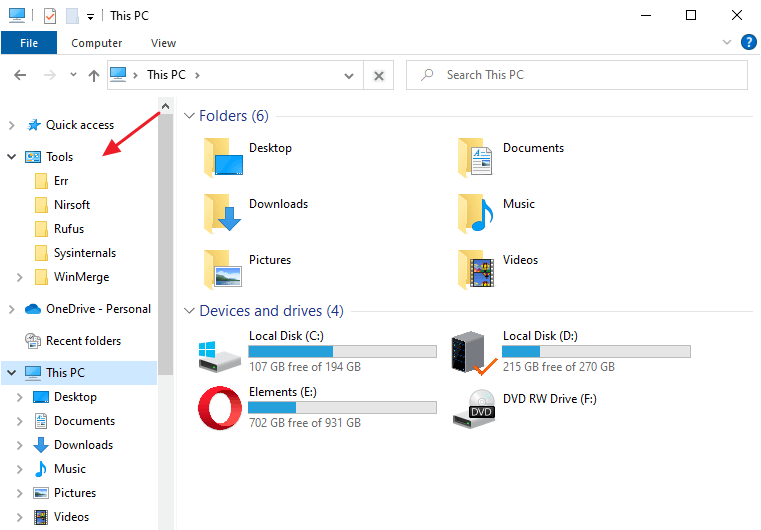
The custom folder (“Tools”) is now pinned to the navigation pane. You can also expand the folder to access its subfolders, or keep it collapsed.
Tip #4: How to create a per-user special folder?
To create the special folder for your user account only, in Notepad, replace every instance of the following:
Note: You need to do this after completing step 4 above. Then, follow the rest of the instructions, till Step 14.
HKEY_LOCAL_MACHINE
with the following registry root:
HKEY_CURRENT_USER
That’s it! You can add as many custom folders under This PC (My Computer) in the Explorer navigation pane as you want. Make sure you generate a different GUID from the GuidGen.com website for every folder you want to add to the navigation pane.
Editor’s Note: The registry file I made several years ago for Windows XP (Ref: My Pictures, My Music and My Videos namespace extensions for the Explorer folder pane) still works on Windows 10 and 11. That uses a slightly different method, where Shdocvw.dll is referenced instead of Shell32.dll. And, if you’re using the old method for Windows 10 or 11, you need to add the System.IsPinnedtoNameSpaceTree DWORD value, and change the Attributes data to f080004d in those sample REG files. Both methods work fine.
One small request: If you liked this post, please share this?
One "tiny" share from you would seriously help a lot with the growth of this blog. Some great suggestions:- Pin it!
- Share it to your favorite blog + Facebook, Reddit
- Tweet it!
What would be the appropriate values for adding the Recycle Bin under This PC? Is the folder’s GUID really the only thing that matters?
just add {645FF040-5081-101B-9F08-00AA002F954E} as new key in: HKEY_LOCAL_MACHINE\SOFTWARE\Microsoft\Windows\CurrentVersion\Explorer\MyComputer\NameSpace
Anon: You can try something like System.IsPinnedToNameSpaceTree (DWORD:0x00000001) for Recycle Bin GUID, and implement the GUID under My Computer namespace. No need to generate another shell object instance as above.
I like to put Google Drive under my PC like Microsoft’s OneDrive is listed. Will this work?
@Davin. Sure.. can be done. Pl check out https://www.winhelponline.com/blog/pin-google-drive-navigation-pane/
You can also just drop the shortcut into “%appdata%\Microsoft\Windows\Network Shortcuts” and not mess with the registry at all. It will show up in exactly the same place in the nav pane.
@Rod B: That didn’t work. It did however add the item under Network category in the main window. But no shortcut showed up in the nav pane.
Thank you! Found this a while ago and it works perfectly! Then couldn’t find it again when I switch job and has been desperate to find it again! So glad I finally did!
It is important that you don’t drag and drop the shortcut to “%appdata%\Microsoft\Windows\Network Shortcuts”.
Instead you have to right-click the actual folder you want to appear under “This PC”, choose “copy”, go to “%appdata%\Microsoft\Windows\Network Shortcuts”, right-click and choose “Paste Shortcut”. It’ll instantly appear. Has worked for me with three different PCs now
Using the method I mentioned, adding Recycle Bin is very simple: (1) show the icon on the desktop if it’s not there already, (2) right click and Create Shortcut, (3) move the shortcut to the folder I specified
@Ramesh My apologies, I realize now I ended up on a post for Win10. This method works on 8.1
@Rod B: No worries. I learnt something new. Shall test that out in 8.1 certainly.
This worked for 1 folder, giving me a total of 8 folders (7 default ones plus my custom one). However, when I tried to add a 9th, the folder does not show in This PC.
For some weird reason, navigating to subfolders in one of these links is damn slow. I don’t know why. Going to the linked folder the default way is fast as always.
In some file dialogs the new systempaths are not shown.
For example in the one Adobe is useing.
@Jonas: For 32-bit apps to see the custom folder, the setting has to be duplicated under
HKCR\SOFTWARE\WOW6432Nodekey. The article has now been updated!Thanks a lot
HKEY_LOCAL_MACHINE\SOFTWARE\Classes\CLSID\{d464e152-bde0-4a84-9160-bd183268ad35} branch missing for me
how do you undo this
my best guess would be to delete the folder you made in the registry
I successfully added a custom folder under this pc using your blog.
I’m hardly trying to achieve what happens with the default user shell folders like music, pictures and the others.
That is, if I type win key + r and write down the path C:\Users\username\Pictures explorer opens with the pictures folder selected on the left navigation pane.
This does not happen with the custom folder added under this pc, instead the c drive is selected on the navigation pane.
I tried all the possible registry tweaks but with no success.
Is it possible to make so that explorer recognizes the custom folder added under this pc and acts like it does with the default folders under this pc?
Hi,
I’ve successfully added a new Folder under the Win10 ‘This PC’ tree..
But apparently the folder name still shown as ‘Videos’, no matter what i do to the (Default) value on main key. (i did also on the Wow6432Node)
Is there any trick to do rename it ?
oh, nvm..
I just need to restart my PC.
Thanks, cheers!
interesting, for me i just had the close the file exproler and re open it
Thanks!
Doent’s work for me, it says “not available”. (W10)
@Poll: Can you kindly upload or send me the exact registry settings you used, so that I can repro the issue?
What was the solution for this issue please?
I created a folder but is not available when I want to open it.
Thanks for this tutorial.
According to my test, the Default value where you enter “My Tools” has no impact, if you try to change it to “My Own Tools”, it doesn’t reflect in the navigation pane of Windows Explorer. It automatically takes the name of the folder you’re pointing to.
@Gilles: this is interesting. It works fine here, even on Windows 10 20H2. Can you send me the registry exports ?
Mine doesn’t work I just got a folder in this pc with no name an I can’t open it I followed everything exactly and I even double checked. I’m on Windows 10 Pro.
@Chamath: Can you share the registry settings or screenshot here?
Here’s a google drive link to a screenshot and a copy of my HKEY_LOCAL_MACHINE file
@Chamath: It appears that you’ve skipped steps #12 and 13 in the above tutorial.
#12: “Delete the TargetKnownFolder value, as we’re going to add a custom folder path”
#13: “Create a string value (REG_SZ) named TargetFolderPath and set its value data, with the full folder path.”
That should fix the problem.
@Ramesh here’s link to a screenshot and my registry file
https://link_removed
Sorry about saying the same thing twice. Your website does not load new replies when entered throgh a bookmark. Anyways thanks for the reply now it works perfectly.
@Chamath: Excellent. Thanks for the update.
This really did help as I was able to make a custom folder. However, it ended up my my D drive, so with that being said, how do I save my custom folder under my C drive instead?
@Nicole: You can change the “
TargetFolderPath” value data in the registry to make it link to the right folder/drive.The easier way is using winareo tweaker. Download and install de software, then go to section “File Explorer” -> “Customize This PC Folders” -> You can add and remove any folder you desire
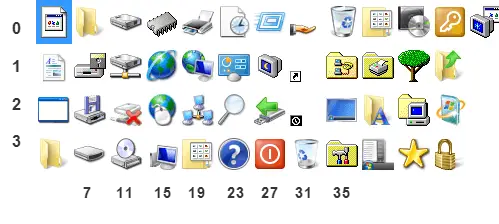
How to apply Different Folder Icon. It is very hard to find the suitable icon by changing the number 35 of shell32.dll,35. Can you give me the Icon and its Number in Shell32 for Windows 10.
@Kichu: which icon are you looking for?
Actually I want all Icon picture in shell32.dll with there number so in future also it becomes easy to find. Does there any file do you with all the number and with picture of icon.
Anyway, I want to ask a question.
In windows 10, This PC has many inbuild folders( eg Downloads) we can see two different icon, one with Yellow file and Downward arrow symbol. and another in the nav panel with only downward arrow symbol only But when I tried to set Two different folder icon one in HKEY_LOCAL_MACHINE\SOFTWARE\Classes\CLSID\{6bb5b14c-464f-43a7-bbc8-4ae47d072ed7}\DefaultIcon
and another in
HKEY_LOCAL_MACHINE\SOFTWARE\WOW6432Node\Classes\CLSID\{6bb5b14c-464f-43a7-bbc8-4ae47d072ed7}\DefaultIcon
Only one is set two both.
What is the reason? Does i did Wrong?
You can browse shell32.dll using icon picker dialog via shortcut properties. The index starts from 0.
Alternately, use IconsExtract from Nirsoft.net.
Regarding the 2nd question, let me repro the problem and then post back.
Ramesh Thankyou for the effort.
I finally got the icon number correctly. Now I get it, Starts form 0 And you have to just look the correct order it is displayed not the number it has. For example There is a icon number 144 But if we count until it, its number is 64 and you have to Start counting with 0 First.
Thanks for the knowledge you have given to me
Thanks a lot
@Kichu: Thanks for the feedback.
Thank you for the article, i’m trying to pin a custom location along with it’s sub-items
How can new folders be added to Computer\HKEY_LOCAL_MACHINE\SOFTWARE\WOW6432Node\Microsoft\Windows\CurrentVersion\Explorer\ ?
I want to pin sub-items to my folder in the following way, for eg:
Computer\HKEY_LOCAL_MACHINE\SOFTWARE\WOW6432Node\Microsoft\Windows\CurrentVersion\Explorer\MyCustomFolder\NameSpace\{Set of CLSIDs of sub-items}
@maximumus: To pin the item separately to the Nav pane, implement it in the Desktop namespace key here:
HKEY_CURRENT_USER\Software\Microsoft\Windows\CurrentVersion\Explorer\Desktop\NameSpace
Please see “Tip #3” in this (now updated) article.
This is amazing. If we could only find a way to do this with a GPO that would be amazing. I mean without spending 2 hours making lots of reg entries to the GPO. Thank you for posting this though. I appreciate it.
thanks very much!!!!!!!!!!!! very useful!!!!!!
Hi, thanks for this post. I have followed the instructions and the folder is visible but when I click on it it comes up saying it is unavailable like it can’t find the location. I have designated my storage drive (D) in the registry. When I click on my actual D drive it shows all my folders from This PC but this new folder is not showing there along with the others. it is as if the new custom folder I made is just a shortcut only.
Hope you have an idea of why this could be?
Kind regards
James
@James: Can you upload your custom registry settings (.reg file) to pastebin and post the link here?
how do i delete a folder when it’s been added this way?
By deleting every registry key you just created.
I compiled everything in one REG script!
You can generate your own GUID if you want. Just replace @=, @= in DefaultIcon and TargetFolderPath to add the folder that you want. You can repeat this for any number of folders.
Windows Registry Editor Version 5.00

[HKEY_LOCAL_MACHINE\SOFTWARE\Classes\CLSID\{9E134050-221D-49C8-9DB8-9474E2569DA4}]
@="ScienceDiscoverer"
"DescriptionID"=dword:00000003
"System.IsPinnedToNameSpaceTree"=dword:00000001

[HKEY_LOCAL_MACHINE\SOFTWARE\Classes\CLSID\{9E134050-221D-49C8-9DB8-9474E2569DA4}\DefaultIcon]
@="C:\\ScienceDiscoverer\\AtomNewAgeBIG.ico,0" ; !!!!!!!!!!!!!!!CUSTOM_CHANGE!!!!!!!!!!!!!!!

[HKEY_LOCAL_MACHINE\SOFTWARE\Classes\CLSID\{9E134050-221D-49C8-9DB8-9474E2569DA4}\InProcServer32]
@=hex(2):25,00,73,00,79,00,73,00,74,00,65,00,6d,00,72,00,6f,00,6f,00,74,00,25,\
  00,5c,00,73,00,79,00,73,00,74,00,65,00,6d,00,33,00,32,00,5c,00,73,00,68,00,\
  65,00,6c,00,6c,00,33,00,32,00,2e,00,64,00,6c,00,6c,00,00,00
"ThreadingModel"="Both"

[HKEY_LOCAL_MACHINE\SOFTWARE\Classes\CLSID\{9E134050-221D-49C8-9DB8-9474E2569DA4}\Instance]
"CLSID"="{0E5AAE11-A475-4c5b-AB00-C66DE400274E}" ; Shell File System Folder

[HKEY_LOCAL_MACHINE\SOFTWARE\Classes\CLSID\{9E134050-221D-49C8-9DB8-9474E2569DA4}\Instance\InitPropertyBag]
"Attributes"=dword:00000011
"TargetFolderPath"="C:\\ScienceDiscoverer" ; !!!!!!!!!!!!!!!CUSTOM_CHANGE!!!!!!!!!!!!!!! REPLACE TargetKnownFolder

[HKEY_LOCAL_MACHINE\SOFTWARE\Classes\CLSID\{9E134050-221D-49C8-9DB8-9474E2569DA4}\ShellFolder]
"Attributes"=dword:f080004d
"FolderValueFlags"=dword:00000029
"SortOrderIndex"=dword:00000000

; =============================================================WOW64=========================================

[HKEY_LOCAL_MACHINE\SOFTWARE\WOW6432Node\Classes\CLSID\{9E134050-221D-49C8-9DB8-9474E2569DA4}]
@="ScienceDiscoverer" ; !!!!!!!!!!!!!!!CUSTOM_CHANGE!!!!!!!!!!!!!!!
"DescriptionID"=dword:00000003
"System.IsPinnedToNameSpaceTree"=dword:00000001

[HKEY_LOCAL_MACHINE\SOFTWARE\WOW6432Node\Classes\CLSID\{9E134050-221D-49C8-9DB8-9474E2569DA4}\DefaultIcon]
@="C:\\ScienceDiscoverer\\AtomNewAgeBIG.ico,0" ; !!!!!!!!!!!!!!!CUSTOM_CHANGE!!!!!!!!!!!!!!!

[HKEY_LOCAL_MACHINE\SOFTWARE\WOW6432Node\Classes\CLSID\{9E134050-221D-49C8-9DB8-9474E2569DA4}\InProcServer32]
@=hex(2):25,00,73,00,79,00,73,00,74,00,65,00,6d,00,72,00,6f,00,6f,00,74,00,25,\
  00,5c,00,73,00,79,00,73,00,74,00,65,00,6d,00,33,00,32,00,5c,00,73,00,68,00,\
  65,00,6c,00,6c,00,33,00,32,00,2e,00,64,00,6c,00,6c,00,00,00
"ThreadingModel"="Both"

[HKEY_LOCAL_MACHINE\SOFTWARE\WOW6432Node\Classes\CLSID\{9E134050-221D-49C8-9DB8-9474E2569DA4}\Instance]
"CLSID"="{0E5AAE11-A475-4c5b-AB00-C66DE400274E}" ; Shell File System Folder ; Shell File System Folder

[HKEY_LOCAL_MACHINE\SOFTWARE\WOW6432Node\Classes\CLSID\{9E134050-221D-49C8-9DB8-9474E2569DA4}\Instance\InitPropertyBag]
"Attributes"=dword:00000011
"TargetFolderPath"="C:\\ScienceDiscoverer" ; !!!!!!!!!!!!!!!CUSTOM_CHANGE!!!!!!!!!!!!!!! REPLACE TargetKnownFolder

[HKEY_LOCAL_MACHINE\SOFTWARE\WOW6432Node\Classes\CLSID\{9E134050-221D-49C8-9DB8-9474E2569DA4}\ShellFolder]
"Attributes"=dword:f080004d
"FolderValueFlags"=dword:00000029
"SortOrderIndex"=dword:00000000

; =========================================================END=WOW64=========================================

[HKEY_LOCAL_MACHINE\SOFTWARE\Microsoft\Windows\CurrentVersion\Explorer\MyComputer\NameSpace\{9E134050-221D-49C8-9DB8-9474E2569DA4}]

; =============================================================WOW64=========================================

[HKEY_LOCAL_MACHINE\SOFTWARE\WOW6432Node\Microsoft\Windows\CurrentVersion\Explorer\MyComputer\NameSpace\{9E134050-221D-49C8-9DB8-9474E2569DA4}]

; =========================================================END=WOW64=========================================
To delete it, the scrip is much simpler:
Windows Registry Editor Version 5.00 [-HKEY_LOCAL_MACHINE\SOFTWARE\Classes\CLSID\{9E134050-221D-49C8-9DB8-9474E2569DA4}] [-HKEY_LOCAL_MACHINE\SOFTWARE\WOW6432Node\Classes\CLSID\{9E134050-221D-49C8-9DB8-9474E2569DA4}] [-HKEY_LOCAL_MACHINE\SOFTWARE\Microsoft\Windows\CurrentVersion\Explorer\MyComputer\NameSpace\{9E134050-221D-49C8-9DB8-9474E2569DA4}] [-HKEY_LOCAL_MACHINE\SOFTWARE\WOW6432Node\Microsoft\Windows\CurrentVersion\Explorer\MyComputer\NameSpace\{9E134050-221D-49C8-9DB8-9474E2569DA4}]@ScienceDiscoverer: Nice! BTW, the script mentioned in the article spits out the appropriate REG files automatically. The user only needs to select the folder in the Browse dialog. ?
Excellent tutorial as always, but I was having one problem. To delete the folder from the ‘navigation pane under This PC’ and from the ‘right pane of This PC’ I should delete some keys. But I couldn’t find those in that directory.
HKEY_LOCAL_MACHINE\SOFTWARE\Microsoft\Windows\CurrentVersion\Explorer\MyComputer\NameSpace\{d464e152-bde0-4a84-9160-bd183268ad35}I deleted this one and they disappeared from those 2 panels, in case someone else has the same problem
@Curious: Yeah. The registry keys are mentioned in Line 69 and 71 of the REG file (the 2nd is for 32-bit apps).
Now, you have the custom script that will automate things for you. It will create two registry files so that you can add and remove the shell folder quickly.
I dont really understand how this works but it did, so thank you!
for some reason, I used this script before and it worked, now if I use it it will not create the folders with the reg files after opening the GUI and selecting the folder.
@Unknown: Can you explain the steps to repro the issue? I’ll try to fix it if possible.
The undo file does not undo the operation.
What can I do to reverse it??
@Francesco: Can you upload the Undo file?
Hi dear friend,
In first place, thanks for your good job, and that you and all yours be well and healthy.
1 – Is possible that your script “add_custom_folder_this_pc.vbs” save the regs on the same folder where the script is located?
2- Is possible that the script save the reg file using the of the folder selected?
Thanks in advanced
Best Regards.
JeepWillys58
Hey, this is a really great find, I was trying to figure out how to add a Home folder equivalent, because too much Linux in my brain, I guess. Or maybe not enough. Anyway! A ways up thread someone asked about hiding the custom folder location in various spots, leading to Tip #3; however, I’d like to have sort of the inverse of that setup, where the custom directory is only present in the “2” spot in the screenshot, but not “1” or “3”.
I’ve tried all sorts of permutations from the registry file the script generated, can I can’t figure out if it’s even possible. Do you happen to know of a hammer I can whack the registry with to make the other two instances go away? If not, it’s not a big deal, I generally don’t have explorer windows open in their default state.
[Your script, by the way, is fantastic for someone who keeps overlooking a step or two and keeps making things worse and worse. Did you know that with a Linux live USB you can actually go into /system32/config and swap out entire registry hives, because I do now, and my life is the worse for it.]
@Deco: Removing the “System.IsPinnedToNameSpaceTree” entry will remove/unpin the item from location #1.
Going down a rabbit hole with this.
Just instal Winaero Tweaker to do it in 30 sec.