When you attempt to upgrade to the latest feature update (e.g., Windows 11 24H2). the following error may occur:
This PC doesn't currently meet Windows 11 system requirements.

We couldn't update system reserved partition.
The error code 0xc1900201 – 0x40008 or 0xc1900200 – 0x20008 will be logged in the setupact.log.
Info    CFreeSystemPartitionDiskSpaceChecker: checked InsufficientSystemPartitionDiskSpace, found HardBlock.Not enough space on partition [\\?\GLOBALROOT\Device\HarddiskVolume1\] Required: 15 MB. Available: 0 MB.
Info    MOUPG  ImageExit: Initializing SetupResult: [0xc1900201]
Info    MOUPG  ImageExit: Initializing Extended:    [0x40008]
(or)
Info    CFreeSystemPartitionDiskSpaceChecker: checked InsufficientSystemPartitionDiskSpace, found HardBlock.Not enough space on partition [\\?\GLOBALROOT\Device\HarddiskVolume1\] Required: 15 MB. Available: 4 MB.
Info    MOUPG  ImageExit: Initializing SetupResult: [0xc1900200]
Info    MOUPG  ImageExit: Initializing Extended:    [0x20008]

Also, deleting the optional font files (.ttf) in the EFI folder, as mentioned in the article, “We couldn’t update system reserved partition may not help in some cases.
Cause
The BIOS update images may consume vast disk space in the EFI partition.
Resizing the EFI partition using a third-party partitioning tool such as MiniTool Partition Wizard, NUIBI, AOMEI, or EaseUS Partition Manager should permanently fix the issue. Alternatively, deleting the font files and BIOS update images will workaround the problem.
Resolution
Option 1: Resize the EFI System partition
Please use AOMEI partition manager (free) or a similar software to extend the EFI partition to 200 MB or more. This is a permanent fix for the problem.
See How to Resize the EFI System Partition in Windows
Caution: It’s highly recommended that the data be backed up to an external drive before modifying the disk layout.
Option 2: Free up the EFI System partition
Step 1: Delete unneeded fonts and get the list of big files in the EFI partition
Please open an admin Command Prompt window and run these commands one by one:
mountvol Y: /s

cd /d Y:\EFI\Microsoft\Boot\Fonts

del *.ttf

dir Y:\

powershell -command "GCI Y:\ -File -Recurse | Sort Length -descending | Select FullName, Length -first 10"
The output of the last command will show the top 10 files that consume the most space on the EFI partition.
Freeing up 20 MB of disk space in the EFI partition should resolve the Windows 11 Setup error.
If deleting the .ttf files is not enough, move the BIOS update images as mentioned below.
Step 2: Freeing up additional space on the EFI partition
You’ll need to move the BIOS images to a folder on the C drive or another partition.
For HP systems:
mountvol Y: /s

md C:\HP\BIOS\Previous

md C:\HP\HP_DEVFW

cd /d Y:\EFI\HP\BIOS\Previous

move *.* C:\HP\BIOS\Previous\

robocopy Y:\EFI\HP\DEVFW C:\HP\HP_DEVFW /MIR

del Y:\EFI\HP\DEVFW\firmware.bin /a

Dir Y:\
For Dell systems:
mountvol Y: /s

md C:\Dell\BIOS

Move Y:\EFI\Dell\Bios\Recovery\* C:\Dell\BIOS\

dir Y:\
For ASUS systems
mountvol Y: /s

md C:\ASUS\BIOS

move Y:\*.bin  C:\ASUS\BIOS\

dir Y:\
For Lenovo systems:
To do so, on Lenovo systems, run these commands from the admin Command Prompt:
mountvol Y: /s

md C:\Lenovo\BIOS

cd /d Y:\EFI\Insyde

move isflash.bin C:\Lenovo\BIOS\

dir Y:\
Additional note, for Lenovo systems
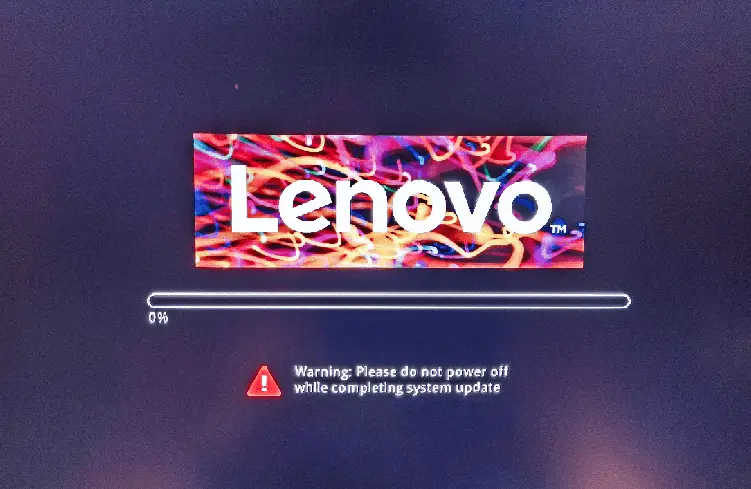
If you move the BIOS backup image, SelfHealing.fd, from the EFI partition, Lenovo systems may show the “Warning: Please do not power off while completing system update” screen when turning off the computer. The system will boot fine, though. To avoid this issue, move the file “IsFlash.bin” instead.
In that case, moving the file SelfHealing.fd to the EFI partition (after installing the feature update, e.g., 24H2) should stop the above screen from appearing. To do so, run these commands:
mountvol Y: /s

xcopy /h C:\Lenovo\BIOS\Selfhealing.fd  Y:\EFI\Lenovo\BIOS\
That should do the trick. Please see if you can now install the feature update.
One small request: If you liked this post, please share this?
One "tiny" share from you would seriously help a lot with the growth of this blog. Some great suggestions:- Pin it!
- Share it to your favorite blog + Facebook, Reddit
- Tweet it!
Windows PowerShell
Copyright (C) Microsoft Corporation. All rights reserved.
新機能と改善のために最新の PowerShell をインストールしてください!https://aka.ms/PSWindows
PS C:\WINDOWS\system32> dir Y:\
dir : ドライブが見つかりません。名前 ‘Y’ のドライブが存在しません。
発生場所 行:1 文字:1
+ dir Y:\
+ ~~~~~~~
+ CategoryInfo : ObjectNotFound: (Y:String) [Get-ChildItem], DriveNotFoundException
+ FullyQualifiedErrorId : DriveNotFound,Microsoft.PowerShell.Commands.GetChildItemCommand
PS C:\WINDOWS\system32>
@Shinji:
Please run the following from admin Command Prompt.
Post the contents of c:¥dir.txt
Had to clear fonts AND move BIOS files but it worked after that. Appreciate the ideas!
Hi, I now have the same error on my Lenovo laptop as you described at the end of this article. But if I write mountvol Y: /s to the command prompt, I get the message “Folder is not empty”. And because of that, I can’t fix this error. Please help me
@Kostas:
The error “Folder is not empty” occurs if you run “mountvol y: /s” more than once in a single logon session. Ignore the error and please run the other commands.
I spent a whole day updating Drivers from Dell, Intel and
Microsoft; loaded all kinds of unnecessary Back Up and
Partician Management Freewear for nothing. This Blog
Solved The Problem Completely. And Immediately. Your straightforward, simple explaination and instructions
eliminated the need for further research and action.
Thank You.
Thank you, the instructions to move the BIOS recovery files out of the boot partition allowed me to update to Windows 11 24H2 from 23H2.
I accidentally deleted a copy of the SelfHealing.fd file, and after updating Windows, it weighs 0 bytes. How can I recover it?