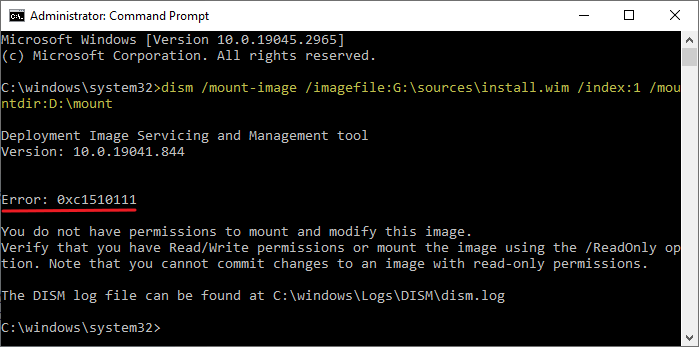
When you use DISM to mount a WIM file, the error code 0xc1510111 appears. The full error message is below:
Error: 0xc1510111 You do not have permissions to mount and modify this image.

Verify that you have Read/Write permissions or mount the image using the /ReadOnly option. Note that you cannot commit changes to an image with read-only permissions.

The DISM log file can be found at C:\windows\Logs\DISM\dism.log.
However, you should be able to mount it as “read-only” (e.g., to extract files from the WIM). But the read-only mode will not let you service the WIM image.
Cause
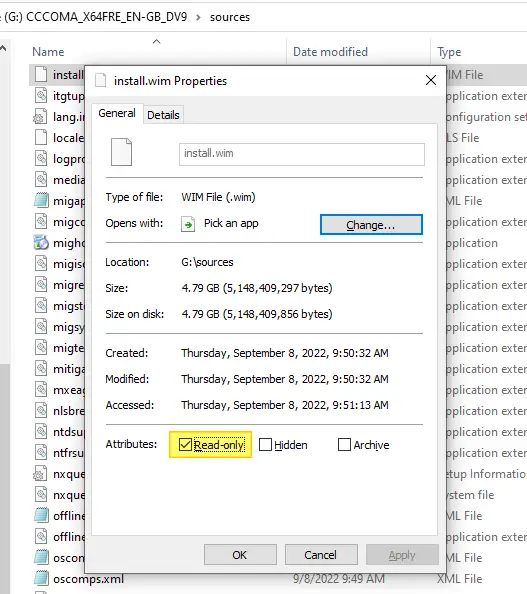
The above error occurs when you try to mount the image from the ISO drive letter. This doesn’t work because the files in the mounted ISO will have the Read-only attribute.
So, you need to copy the WIM to your hard drive or USB/external hard drive and mount the WIM file for servicing it.
Resolution
To mount a WIM file for modification, do the following:
- Create a folder on your hard disk — e.g.,
C:\WIM - Create another folder to store the mounted files — e.g.,
C:\Mount - Copy install.wim from the Windows ISO’s “Sources” folder to your hard disk — i.e., “
C:\Wim“. - Right-click “
C:\Wim\Install.wim” and click Properties. - Ensure the “Read-only” attribute is removed via the WIM file’s properties dialog.
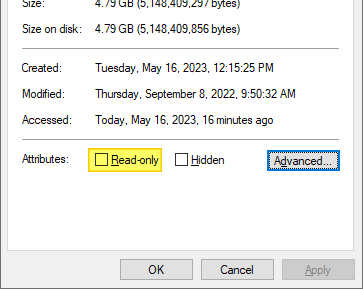
- Click Apply, OK.
Now, you should be able to mount the WIM using DISM. For example, here’s the command-line example:
dism /mount-image /imagefile:C:\WIM\install.wim /index:1 /mountdir:C:\mount
Customize the WIM file as desired. For example, you may add drivers or packages to the WIM or slipstream the WIM with the latest quality update. Once done, to apply the changes to the WIM file and unmount it, run the following command:
dism /unmount-image /mountdir:C:\mount /Commit
That’s it! You now have an updated WIM file — C:\WIM\install.wim.
For more information, see Modify a Windows Image Using DISM at Microsoft Learn.
One small request: If you liked this post, please share this?
One "tiny" share from you would seriously help a lot with the growth of this blog. Some great suggestions:- Pin it!
- Share it to your favorite blog + Facebook, Reddit
- Tweet it!