Starting with the Windows 10 v1703 (also known as Creators Update), OneNote’s popular screenshot feature has been made an Operating System feature — you can capture a specific region of your screen to the clipboard using the Win + Shift + S shortcut key.
Screenshot a Portion of the Screen
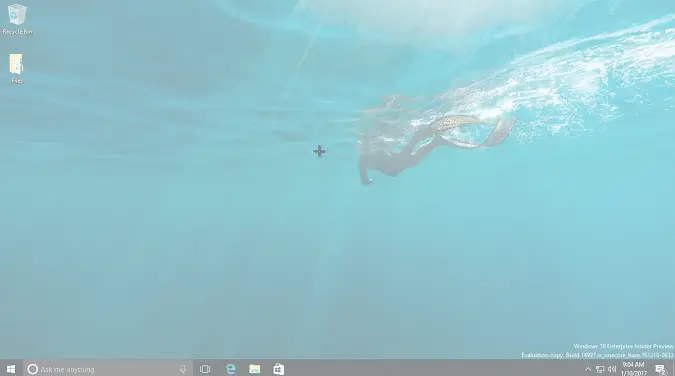
Press Winkey + Shift + S. The screen will be covered with an overlay and the mouse cursor turns into a plus (+) symbol, which indicates that the capture mode is on.
Since Windows 10 v1809, you’ll see the following bar at the top. From there, choose one of the snipping modes: Rectangular snip, Freeform snip, Window snip, or Fullscreen snip.

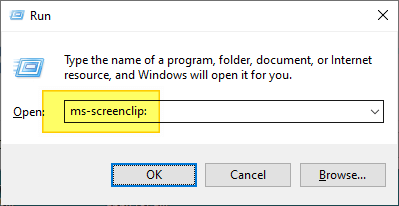
Tip: You can also launch the above snip toolbar by running the command “ms-screenclip:” from the Run dialog.
This tool copies the chosen screen area, a window, or the full screen to the clipboard. It also saves the file (in recent Windows 10 builds such as 2004/20H2 and higher) to a temporary folder.
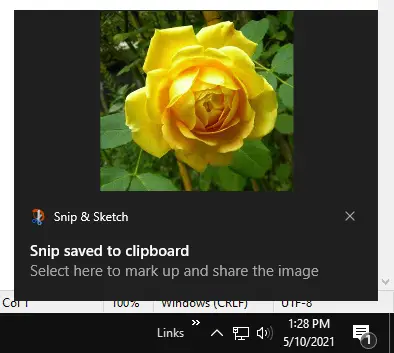
You’ll then see a notification message displaying the miniature image of the captured screen area.
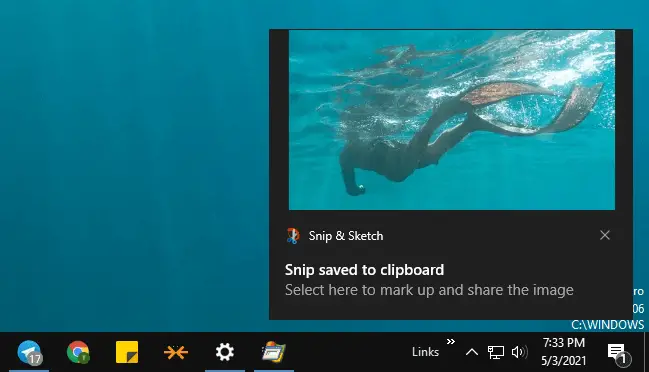
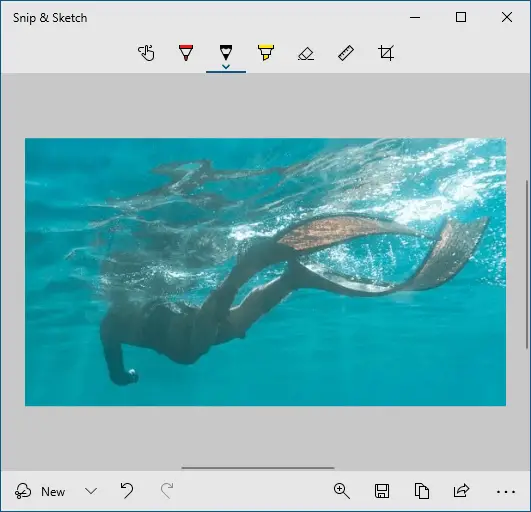
If you need to annotate, edit or share the image via the Snip & Sketch tool, click on the notification area message. If you miss it, you can still view the notification by opening the Action Center. (Win + A)
Clicking on the notification message opens Snip & Sketch.
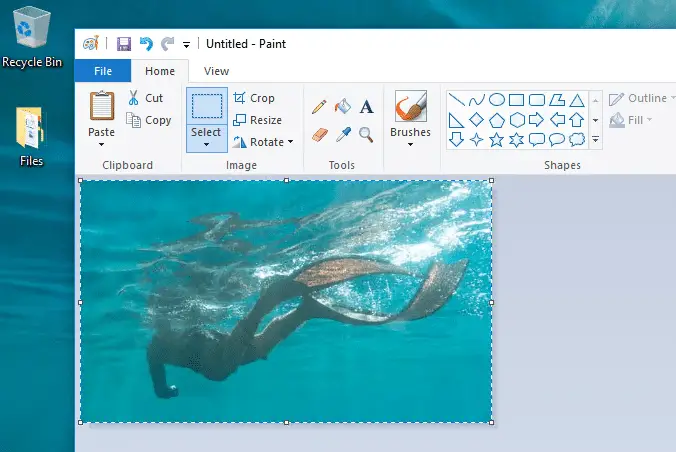
On the other hand, if you don’t want to open Snip & Sketch but want to paste the captured image into another application (e.g., Word, Paint, chat window, etc.), you can do so.
Open Paint or any other image editor of your choice and paste (Ctrl + V) the image from the clipboard.
Winkey + Shift + S is powered by Snip & Sketch in v1809 & higher
In Windows 10 v1809 and higher, the Winkey + Shift + S is powered by the new Snip & Sketch feature. You’re shown the 4 snipping options when you use the keystroke. Snip & Sketch is the new tool that will replace the legacy Snipping Tool in future Windows 10 builds.
Note that the native Win + Shift + S hotkey replaces the one in OneNote 2016. See article OneNote 2016 Screen Clipping Shortcut Key – How to Change?
Winkey + Shift + S uses the Snipping Tool in Creators Update
In Windows 10 Creators Update, the Winkey + Shift + S runs the Snipping Tool (in non-interactive mode) under the hood, using a new command-line switch. The following is what’s executed behind the scenes when you use the Winkey + Shift + S keystroke in the Creators Update.
snippingtool.exe /clip
As said earlier, this has changed in v1809 where the keystroke is powered by Snip & Sketch. For more information, see Using the built-in Snip & Sketch app in the article A Complete Guide to Taking Screenshots in Windows 10
Where is the screenshot file saved?
In Windows 11, the recent versions of the Snipping Tool save the screenshots to your Pictures\Screenshots folder.
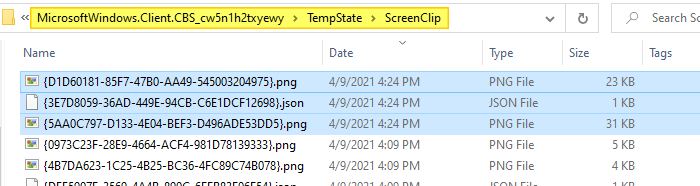
In Windows 10, it auto-saves the screenshot of a selected screen area to a PNG file when you use Winkey + Shift + S. A background process named ScreenClippingHost.exe saves the image (PNG file) in the following folder:
C:\Users\%username%\AppData\Local\Packages\MicrosoftWindows.Client.CBS_cw5n1h2txyewy\TempState\ScreenClip
Tip: Reverse-sort the folder by the “Date” column to locate the latest screenshot. Also, you can create a shortcut of the ScreenClip folder on your desktop, or pin it to Quick access in File Explorer if you like.
ScreenClip folder would be located at the following path instead:
C:\Users\%username%\AppData\Local\Packages\Microsoft.Windows.ShellExperienceHost_cw5n1h2txyewy\TempState\ScreenClip
Every time you press Winkey + Shift + S and select a screen area or window, Windows saves the screenshot to two PNG files in addition to saving the image on the Windows clipboard. One PNG file is a resized (lower resolution) screenshot, and the other one is a normal resolution.
Additionally, a .JSON file is saved which stores the coordinates of the rectangular area you selected on the screen. The JSON file is a plain-text file that contains a line similar to the following:
{"clipPoints":[{"x":0,"y":0},{"x":345,"y":0},{"x":345,"y":174},{"x":0,"y":174}]}
For Freeform snip, the JSON file would contain multiple lines. The .JSON file has no significant value for the user.
Additional Tip: To take a screenshot of the entire screen and save it to a PNG file in your Pictures\Screenshots folder, use the WinKey + PrntScrn keys.
Launch Screen snip by pressing PrintScreen (Remapping)
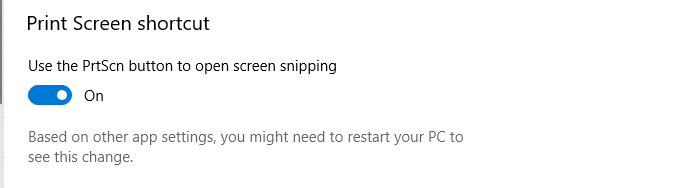
If you think the three keys combo Winkey + Shift + S is tough to operate, you can choose to have your PrtScn key open the new snipping bar, instead of Winkey + Shift + S. To do so:
- Click Start → Settings → Ease of Access → Keyboard → Use the PrtScn button to open screen snipping
If the above setting is enabled, your third-party screen capture tool, if installed any, may complain that it’s unable to register hotkey – PrintScreen. That’s normal, as only one application can register the hotkey at a time.
Remapping Win+Shift+S to a different key using PowerToys
Not all users prefer replacing the default shortcuts below:
- PrntScrn
- Win + PrntScrn
- Alt + PrntScrn
Instead, you can assign Ctrl + PrntScrn for the task.
To bind Ctrl + PrntScrn shortcut to Win + Shift + S, you can install the Windows 10 PowerToys from Microsoft. PowerToys has a feature named Keyboard Manager with which you can remap individual keys as well as shortcuts.
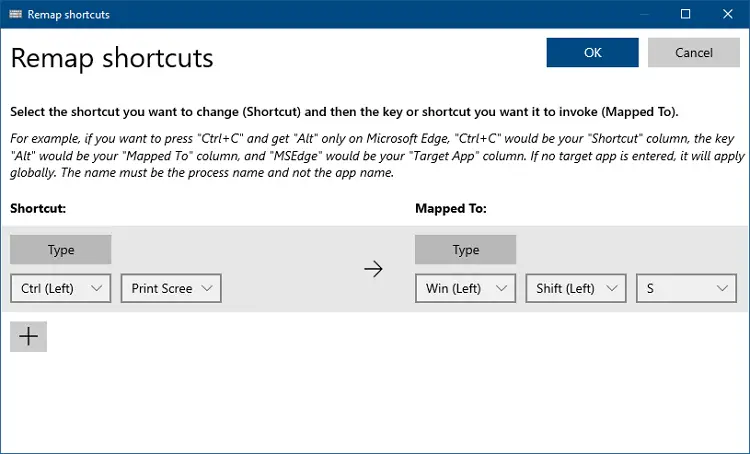
In the above example, I remapped Ctrl + PrntScrn shortcut to Win + Shift + S. Now, I can invoke the snip screen by pressing Ctrl + Print Screen. Likewise, you may try your preferred keyboard shortcut that doesn’t conflict with any program — e.g., Win + Shift + Z.
Launch captured snip in a different editor (Registry Tweak)
Using a registry edit and a custom script, you can open the snip (from the Snip & Sketch notification window) in your preferred image editor.
'File: open_snip_in_editor.vbs
'Ramesh Srinivasan, Winhelponline.com
'Date created: May 10, 2021
'Find the latest snip (PNG) in the ScreenClip folder and open it in editor.
'For use with [Win + Shift + S] Snip & Sketch shortcut

Option Explicit
Dim sEditor, fso, WshShell, sfldr, arrMostRecent, f, sTarget, sDiff
Set WshShell = CreateObject("WScript.Shell")
Set fso = CreateObject("Scripting.FileSystemObject")
sfldr = WshShell.ExpandEnvironmentStrings("%userprofile%")
sfldr = sfldr & "\AppData\Local\Packages\MicrosoftWindows.Client.CBS_cw5n1h2txyewy\" & _
			"TempState\ScreenClip"
If Not fso.FolderExists(sfldr) Then WScript.Quit

'Set the Image Editor Path
sEditor = "c:\windows\system32\mspaint.exe"
'sEditor = "C:\Program Files (x86)\PicPick\picpick.exe"

'Find the latest two PNG files in that folder
arrMostRecent = Array(Nothing, Nothing)

For Each f In fso.GetFolder(sfldr).Files
   If LCase(fso.GetExtensionName(f.Name)) = "png" Then
      If arrMostRecent(0) Is Nothing Then
         Set arrMostRecent(0) = f
      ElseIf f.DateLastModified > arrMostRecent(0).DateLastModified Then
         Set arrMostRecent(1) = arrMostRecent(0)
         Set arrMostRecent(0) = f
      ElseIf arrMostRecent(1) Is Nothing Then
         Set arrMostRecent(1) = f
      ElseIf f.DateLastModified > arrMostRecent(1).DateLastModified Then
         Set arrMostRecent(1) = f
      End If
   End If
Next

'Win+Shift+S produces a miniature image along with the original snip.
'We'll need to find the original snip file name.
'Check the time (seconds) difference to find if they're of the same snip set.
sDiff = Int(DateDiff("s", arrMostRecent(0).DateLastModified, arrMostRecent(1).DateLastModified))

If sDiff >= -3 Then  'Max 3 seconds diff between the 2 PNGs indicating "same batch".
   If arrMostRecent(0).size > arrMostRecent(1).size Then
      sTarget = arrMostRecent(0)
   Else
      sTarget = arrMostRecent(1)
   End If
Else 'More time (seconds) difference between two PNGs
   'Pick whichever is the latest file.
   If sDiff < 0 Then
      sTarget = arrMostRecent(0)
   Else
      sTarget = arrMostRecent(1)
   End If
End If

'Open the right PNG file in your image editor
WshShell.Run Chr(34) & sEditor & Chr(34) & " " & Chr(34) & sTarget & Chr(34)
How to Use it:
- Download the above script to a folder -- e.g.,
D:\Scripts. Alternately, you can copy the above code to Notepad and save it with .vbs extension, sayopen_snip_in_editor.vbs - Open the Registry Editor and go to the following branch:
HKEY_CURRENT_USER\SOFTWARE\Classes\AppXreyvazcs64j2pgtpwyt49g6ce85mwrwg\Shell\open\command
- From the File menu in the Registry Editor, export the branch to a .reg file for backup.
- Double-click
(default)and set it as follows:wscript.exe "D:\Scripts\snip_open_mspaint.vbs" %1
- Rename
DelegateExecutetoDelegateExecute.old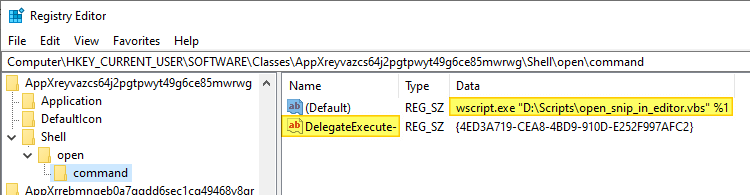
- Exit the Registry Editor.
- Create a screen clip by using Win + Shift + S.
- Click on the Snip & Sketch notification window.
It should open in your chosen editor -- e.g., Paint, instead of Snip & Sketch app.
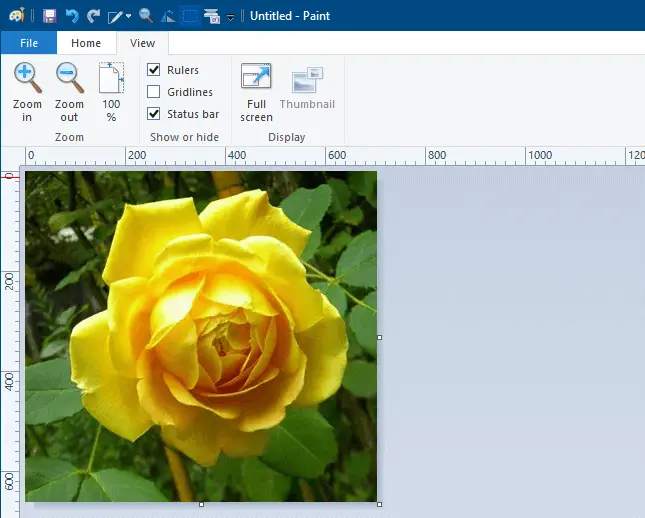
Note that you can change the editor by mentioning its path in line #16 of the script file.
One small request: If you liked this post, please share this?
One "tiny" share from you would seriously help a lot with the growth of this blog. Some great suggestions:- Pin it!
- Share it to your favorite blog + Facebook, Reddit
- Tweet it!
Where are the Screen Shots stored? Since my upgrade, I can not find any of my screenshots (which used to be in OneNote).
I see now that I’ve LOST all of the screenshots that used to automatically be stored in OneNote. Is there a way to bring this feature back? I liked the fact that I could take screen shots and they would *automatically* be stored in OneNote. Is there a SIMPLE workaround? (The simplest solution is to return it to OneNote. The solution above is inconvenient.)
Appreciate the tip! I take it there’s no way to have it automatically save to a file like you can on macOS using Command – Shift – 4?
I guess its progress for windows ui but its a big step back for onenote users, now I need 3 extra clicks and keyboard input just to store a screenshot, way to go microsoft 🙁
It is clear that Microsoft didn’t talk to Onenote users before they made this change. It breaks the entire way I use it.
Hilariously doesn’t work right. Snip, select size, disappears, no screenshot saved in the screenshots folder, don’t even have a screenshots folder.
@Draylynn: The screenshot is copied to the clipboard when you use Win + Shift + S and select the screen region. The file is stored in a temp location. Only Win+ PrintScreen stores the file in your
Pictures\Screenshotsfolder.This is very helpful, thank you!
One follow up – up until very recently, when I pasted the clip it would maintain the same aspect and size, but suddenly it will only paste in a VERY large size. This makes it very clunky for Outlook usage, and it requires me to drag the corners to resize, every time… How can I keep the size of the actual screenshot when it is pasted?
Great article, but stupid requirement. Who would not want to be able to select a portion of the screen and do a one-click copy-and-create-new-file in a place where I can find it, like Pictures\Screenshots. That should be available for selected areas of the screen, as well as for video captures from the screen. These have been available on a certain other platform for at least a decade.
@Keith: Agree. The feature (to auto-save snips to the Screenshots folder) is available in 11 22H2. Until the option comes to Windows 10, you may create a desktop shortcut to the “ScreenClip” folder for easy access.