After installing a Windows 10 Feature update (v2004 or higher) or Windows 11, you may observe that the Print Management MMC console is missing from the system. Print Management is a Microsoft Management Console (MMC) snap-in that lets you install, view, and manage all printers on your local computer or the network. You can add or delete printer driver packages, manage the print queue, and do much more.
This issue can occur in Windows 10/11 Professional or Enterprise edition. Note that the Print Management console is not available on Home editions of Windows. If you’re using Windows Home Edition, this article doesn’t apply to you.
The Print Management shortcut may be missing in the Administrative Tools folder. And, when you attempt to run printmanagement.msc directly, you’ll see the following error:
Windows cannot find 'printmanagement.msc'. Make sure you typed the name correctly, and then try again.
Also, copying the file printmanagement.msc file from another Windows 10 computer and running it would cause the error “couldn’t load the snap-in” since the supporting files are missing from the computer.
Cause
Since Windows 10 v2004, many built-in components have been made into optional features. Microsoft calls this as Feature-on-Demand (FOD). Other programs that were made into optional components are Notepad, Paint, WordPad, etc. This Feature on Demand package includes the Print Management Console, enabling the management of printers, printer drivers, and printer servers.
Feature: Print Management Console

Capability Name: Print.Management.Console~~~~0.0.1.0
Sample package name: Microsoft-Windows-Printing-PMCPPC-FoD-Package~31bf3856ad364e35~amd64~~.cab
Install size: 2.50 MB
Satellites: Yes
Availability: Windows 10, version 2004 and later
It’s straightforward to add or reinstall the optional features (FOD) via the Settings app.
Restore Missing “Print Management” Console
To restore the missing “Print Management” MMC console in Windows 10 or 11, use one of the following methods.
Step 1: Bypass WSUS Server Temporarily
On a computer connected to the domain, the client systems would be configured to use a WSUS server (instead of the public Windows Update server) to install updates. You need to temporarily bypass the WSUS server to install optional features like Print Management Console, RSAT Tools, or .Net Framework.
To bypass the WSUS server for installing features or updates, follow these steps:
- Right-click Start, and click Run
- Type
regedit.exeand click OK - Go to the following registry key:
HKEY_LOCAL_MACHINE\SOFTWARE\Policies\Microsoft\Windows\WindowsUpdate\AU
- On the right pane, if the value named
UseWUServerexists, set its data to0 - Exit the Registry Editor
- Launch
services.mscand restart the Windows Update service.
Important: The above policy setting will be reverted back (set to “1”) by the domain GPO when you restart Windows.
Here are the PowerShell commands to automate the following steps:
Set-ItemProperty -Path "HKLM:\SOFTWARE\Policies\Microsoft\Windows\WindowsUpdate\AU" -Name "UseWUServer" -Value 0
Restart-Service wuauserv
Add-WindowsCapability –Online -Name NetFx3~~~~
What it does:
- Set “
UseWUServer” registry setting to0. - Remove the Print Management console.
- Restart the Windows Update service
- Install the Print Management console.
The above steps prevent the following errors (0x800f081f and 0x800F0954) when installing optional components.
Error: 0x800f081f
The source files could not be found.
Use the "Source" option to specify the location of the files that are required to restore the feature. For more information on specifying a source location, see https://go.microsoft.com/fwlink/?LinkId=243077.
Error: 0x800f0954
DISM failed. No operation was performed.
For more information, review the log file.
If you’re still seeing errors when using DISM or Windows Features, apply the following registry fix and restart the Windows Update service:
Windows Registry Editor Version 5.00

[HKEY_LOCAL_MACHINE\SOFTWARE\Policies\Microsoft\Windows\WindowsUpdate\AU]
"UseWUServer"=dword:00000000

[HKEY_LOCAL_MACHINE\SOFTWARE\Microsoft\Windows\CurrentVersion\Policies\Servicing]
"RepairContentServerSource"=-

[HKEY_LOCAL_MACHINE\SOFTWARE\Policies\Microsoft\Windows\WindowsUpdate]
"DoNotConnectToWindowsUpdateInternetLocations"=-

[HKEY_LOCAL_MACHINE\SOFTWARE\Microsoft\Windows\CurrentVersion\Policies\Servicing]
"LocalSourcePath"=-

[HKEY_LOCAL_MACHINE\SOFTWARE\Microsoft\Windows\CurrentVersion\Policies\Servicing]
"UseWindowsUpdate"=-
Step 2: Install “Print Management Console”
Now, attempt to install the Print Management console using one of these options.
Option 1: Using Windows Features in Settings
- Click Start, Settings, System, and click Optional features
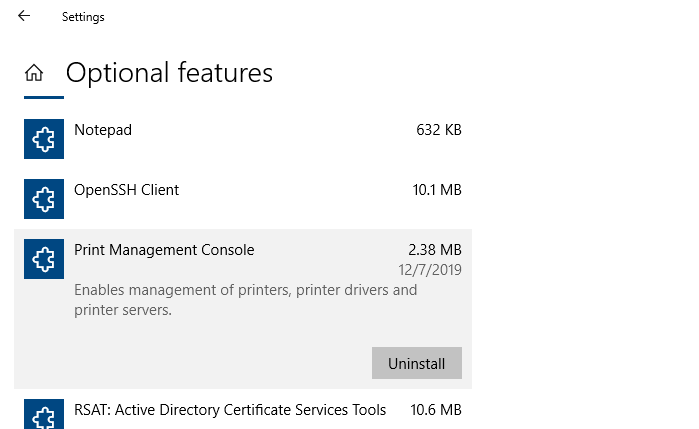
- In the Optional Features page, locate Print Management Console from the list. If the list is too lengthy, you can search using the search bar at the top of the page.
- Select Print Management Console, and click Uninstall.
 (Note: If “Print Management Console” is missing from the list, then continue from Step 4.)
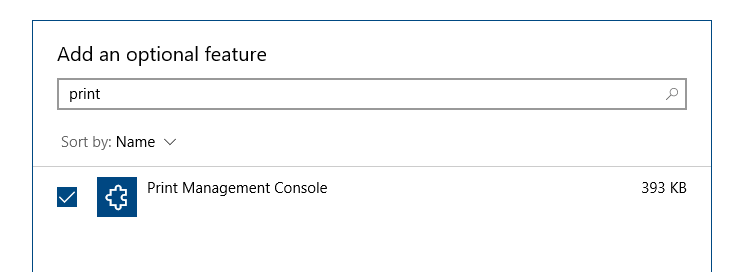
 - Once Print Management Console is uninstalled, click on the Add a feature button at the top of the Optional Features page.
- Type
printin the search bar. Select the Print Management Console checkbox from the list, and click on the Install button.

This procedure reinstalls Print Management.
If “Print Management Console” is not on the list of available features or you prefer a command-line method to install the component, read on.
Option 2: Uninstall & Reinstall Print Management using DISM
Alternatively, you can use the DISM command-line to uninstall and then reinstall Print Management Console.
Open an admin Command Prompt and then run the following commands:
dism /Online /Remove-Capability /CapabilityName:Print.Management.Console~~~~0.0.1.0

dism /Online /add-Capability /CapabilityName:Print.Management.Console~~~~0.0.1.0
(You must run the uninstall command first. Please don’t skip it. Else, the reinstall won’t be clean.)
Note that the above reinstall procedure requires internet connectivity, as the system downloads the package via Windows Update. Running the above commands on an offline system would cause the DISM error 0x8024402c.
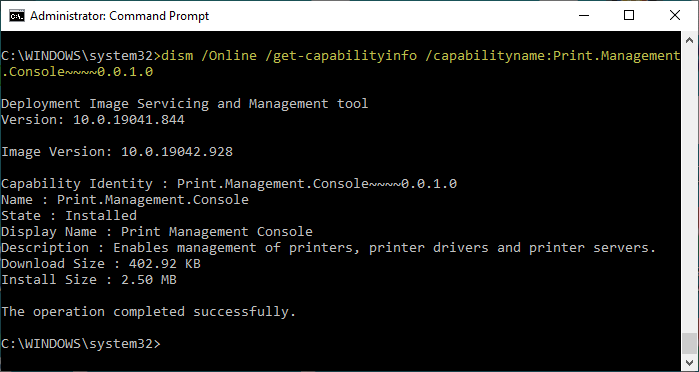
Optionally, to verify if the package has been installed correctly, run one of these commands:
dism /Online /get-capabilityinfo /capabilityname:Print.Management.Console~~~~0.0.1.0

(or)

dism /Online /get-capabilities

The State field should say Installed.
Capability Identity : Print.Management.Console~~~~0.0.1.0
Name : Print.Management.Console
State : Installed
Display Name : Print Management Console
Description : Enables management of printers, printer drivers and printer servers.
Download Size : 402.92 KB
Install Size : 2.50 MB
Here are some of the files (related to Print Management) that get installed.
C:\ProgramData\Microsoft\Windows\Start Menu\Programs\Administrative Tools\Print Management.lnk
C:\Windows\System32\pmcsnap.dll
C:\Windows\System32\ppcsnap.dll
C:\Windows\System32\printmanagement.msc
C:\Windows\System32\en-US\pmcsnap.dll.mui
C:\Windows\System32\en-US\ppcsnap.dll.mui
C:\Windows\System32\en-US\printmanagement.msc
C:\Windows\servicing\Packages\Microsoft-Windows-Printing-PMCPPC-FoD-Package~31bf3856ad364e35~amd64~~10.0.19041.1.cat
C:\Windows\servicing\Packages\Microsoft-Windows-Printing-PMCPPC-FoD-Package~31bf3856ad364e35~amd64~~10.0.19041.1.mum
C:\Windows\servicing\Packages\Microsoft-Windows-Printing-PMCPPC-FoD-Package~31bf3856ad364e35~amd64~en-GB~10.0.19041.1.cat
C:\Windows\servicing\Packages\Microsoft-Windows-Printing-PMCPPC-FoD-Package~31bf3856ad364e35~amd64~en-GB~10.0.19041.1.mum
C:\Windows\servicing\Packages\Microsoft-Windows-Printing-PMCPPC-FoD-Package~31bf3856ad364e35~amd64~en-US~10.0.19041.1.cat
C:\Windows\servicing\Packages\Microsoft-Windows-Printing-PMCPPC-FoD-Package~31bf3856ad364e35~amd64~en-US~10.0.19041.1.mum
I hope you were able to get back the Print Management console feature in Windows 10.
One small request: If you liked this post, please share this?
One "tiny" share from you would seriously help a lot with the growth of this blog. Some great suggestions:- Pin it!
- Share it to your favorite blog + Facebook, Reddit
- Tweet it!
It’s working. Thanks
Mine says “staged” How do I get it to be “Installed”?
Mine also says ‘staged’….help.
Failed on the manual Apps in the Settings and using the DISM. Error: 0x800f0954. Looked online for what the error means and it recommended a registry change to the Windows WSUS. Changed the BIT to 0 and restarted. Still no joy.
@Greg,
gpedit.msc).Alternately, use the following registry setting equivalent:
This fixes the error
0x800f0954when installing a feature (FOD) using GUI or DISM.After 12 hours of trying all the “fixes” listed here and other places, I found out that Print Management only works on Windows10 PRO not Home! Upgraded to PRO and there it is!
@Geoff: Pls note that the 2nd paragraph in this article has the following information:
“Note that the Print Management console is not available on Home editions of Windows.”
it also just does not work on 11 pro. and I cannot install it. And those dism-fakes are also not working.
Thanks very much! Just what I needed