Sometimes, you may have to reset the WinHTTP proxy, firewall or network settings to fix connectivity issues when using Windows Update, Microsoft Store, or other apps. WinHTTP provides the HTTP client APIs, which are used by desktop applications and Windows services.
This article tells you how to disable or reset the WinHTTP and WinINET proxy settings using Netsh.exe and Internet Options, respectively.
How to Reset the WinHTTP Proxy settings
If Windows Update, Microsoft Store, Xbox or other Store apps can’t access the internet, reset/disable your proxy settings. Use the methods below:
1) The Netsh.exe command
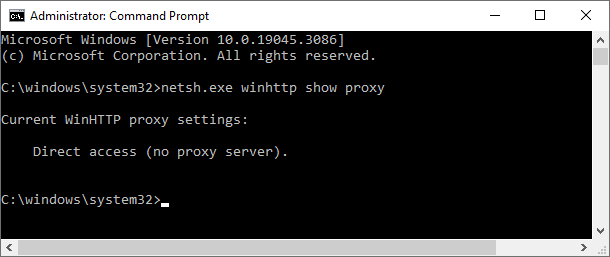
From admin Command Prompt, run:
netsh.exe winhttp reset proxy
The output should look like the following:
Current WinHTTP proxy settings:
Direct access (no proxy server).
Additionally, you may run the following command:
bitsadmin /util /setieproxy localsystem NO_PROXY RESET
The second command removes the proxy settings for transferring files using BITS. Its output should look like the following:
BITSADMIN version 3.0
BITS administration utility.
(C) Copyright Microsoft Corp.Internet proxy settings for account localsystem set to NO_PROXY.
(connection = default)
netsh.exe winhttp show proxy
Additional Info: The WinHTTP settings are stored in the following registry keys in a REG_BINARY value named WinHttpSettings.
HKEY_LOCAL_MACHINE\SOFTWARE\Microsoft\Windows\CurrentVersion\Internet Settings\Connections
HKEY_LOCAL_MACHINE\SOFTWARE\WOW6432Node\Microsoft\Windows\CurrentVersion\Internet Settings\Connections
2) Internet Options
This method and the registry method below are for applications (e.g., Internet Explorer) that use the WinINET library instead of WinHTTP. See WinINet vs. WinHTTP – Win32 apps | Microsoft Learn
To disable the WinINET proxy in Internet Explorer (changes will be effected in many other apps), do the following:
- Right-click Start, and click Run.
- Type inetcpl.cpl and click OK.
- Select the “Connections” tab.
- Click on LAN Settings.
- Check “Automatically detect settings”
- Uncheck the “Use a proxy server for your LAN.
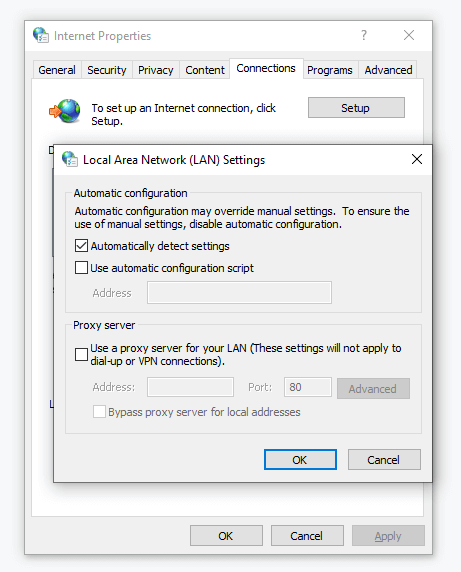
- Click OK, and click OK to close the dialog boxes.
Note: You can also configure the above by opening Settings > Network & Internet > Proxy on Windows 10 and 11.
3) Registry Editor
- Open Regedit.exe
- Go to the following key:
HKEY_CURRENT_USER\SOFTWARE\Microsoft\Windows\CurrentVersion\Internet Settings
- Double-click “ProxyEnable” and set its data to 0.
- Exit the Registry Editor.
- Restart Windows.
Other than the above, you should be able to enable or disable proxy server settings in the respective app — e.g., Firefox, Google Chrome, etc.
One small request: If you liked this post, please share this?
One "tiny" share from you would seriously help a lot with the growth of this blog. Some great suggestions:- Pin it!
- Share it to your favorite blog + Facebook, Reddit
- Tweet it!