File History automatically backs up files in your libraries, contacts, favorites, and on your desktop. You can also find different versions of your files from a specific point in time. You can add and remove custom folder locations from the backup. The customizations are stored in the two XML files, Config1.xml and Config2.xml, in the File History folder.
This article tells you how to reset the File History configuration in Windows 10 and 11 to the default settings if you wish to start over from scratch.
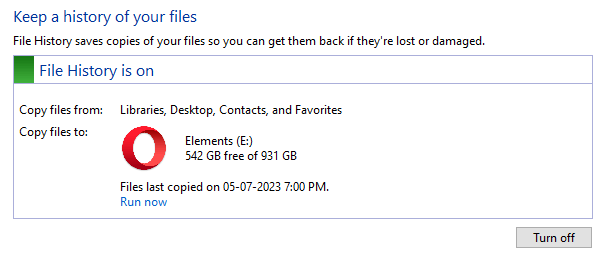
Reset File History settings to Default
To reset File History settings, do the following:
- Open Control Panel.
- Set the Control Panel view mode to small icons.
- Click “File History.”
- If File History is enabled, click “Turn off.”
- Right-click Start, and click Run.
- Type the following folder path and click OK.
%LocalAppData%\Microsoft\Windows\FileHistory
You’ll see two subfolders: “Configuration” and “Data.” The Configuration folder has the following database files and XML files.
- Catalog1.edb
- Catalog1.jfm
- Catalog2.edb
- Catalog2.jfm
- Config1.xml
- Config2.xml
The Data folder may be empty.
- Rename “Configuration” to “Configuration.Old”
- Rename “Data” to “Data.Old”
This resets the File History configuration. Your previously backed-up data (on the external hard drive or network location) will remain.
Reconfigure File History as required.
For detailed information on reconfiguring File History, see “Step 2: Reconfigure File History” in this article.
Skip the section below if you don’t plan to use the File History feature.
Setup File History
Before you start using File History to back up your files, you’ll need to set up a drive to save files to. You may use an external drive or network location to help protect your files against a crash or other PC problem.
File History only saves copies of files in your libraries, contacts, favorites, and desktop. If you have files or folders elsewhere that you want to be backed up, you can add them to one of your existing libraries or create a new library.
To set up a drive
- Connect an external drive.
- Tap or click to open File History.
- Tap or click Turn on.
To set up a network location
- Open File History.
- Click Select drive.
- On the Select a File History drive page, click Add network location.
- In the Select Folder dialog box, browse to or enter a location, tap or click Select folder, and then tap or click OK.
- If there aren’t any folders listed, and you see a message at the top of the dialog box saying that network computers and devices aren’t visible, tap or click it, then select Turn on network discovery and file sharing.To help avoid filling up your File History drive too fast, you can set how often files are copied and how long older versions of your files are kept. See also How to Cleanup Older File History Backups in Windows 10/11.
If you don’t want a folder backed up, you can exclude it from File History. Open File History via Control Panel, click Exclude folders, click Add, and select the folder you want to be excluded from backups.
One small request: If you liked this post, please share this?
One "tiny" share from you would seriously help a lot with the growth of this blog. Some great suggestions:- Pin it!
- Share it to your favorite blog + Facebook, Reddit
- Tweet it!