When you try to extend a volume in Disk Management, the Extend Volume option may be grayed out even though there is unallocated space on the disk.
Cause
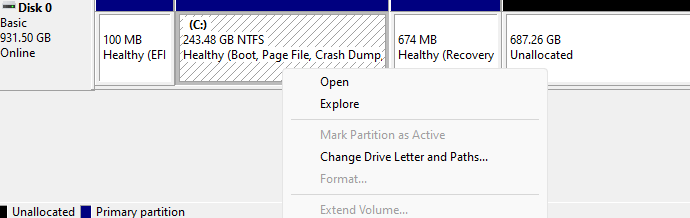
In screenshot 1 above, the Extend option is grayed out because a partition (i.e., Recovery) appears between C: and the Unallocated space. Disk Management doesn’t let you extend a partition if the free space is not adjacent to the volume. Importantly, the free space must be on the immediate right side of the drive you plan to extend.
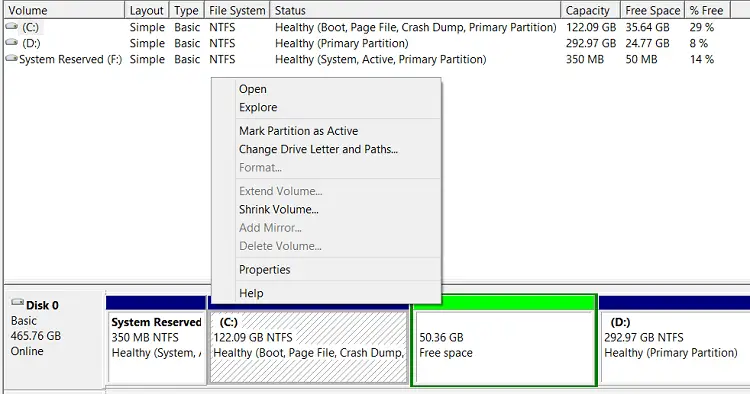
In screenshot 2, the Extend option is grayed out because the free space exists inside the Extended partition.
Resolution
Given the above situation, here are your options to extend the volume:
In Example #1 above, as the “Recovery” partition appears between C: and the unallocated space, disable Windows Recovery Environment using ReAgentC.exe.
Then, use Diskpart to delete the Recovery partition. Extend C: by occupying the unallocated space (minus 750 MB for the Recovery partition). Then, create a Recovery partition at the end of the disk and re-enable WinRE.
Alternatively, you can use a third-party tool like NIUBI Partition Editor or AOMEI to extend C into the non-contiguous unallocated space.
In Example #2 above, you can see that the “Free space” segment is inside the Extended partition (shown in a dark green outline). When a logical partition is deleted, it becomes “Free space” (which is different from “unallocated space”).
Note: To merge the logical partition into the primary partition, you must delete all logical drives and then delete the extended partition. This creates an “unallocated” space. You can now extend a primary partition into the unallocated space if the unallocated space is located adjacent to the primary partition.
In this case, there is only one logical drive that has been deleted already, resulting in “Free space”. You only need to right-click on the free space and choose Delete Volume from the context menu. The space will become unallocated, and you should be able to extend the C: drive.
One small request: If you liked this post, please share this?
One "tiny" share from you would seriously help a lot with the growth of this blog. Some great suggestions:- Pin it!
- Share it to your favorite blog + Facebook, Reddit
- Tweet it!