There are situations where you’ll need to activate and use the built-in Administrator account in Windows. The built-in Administrator account is disabled by default. If your existing admin user account profile gets corrupted (and you have no alternate user account with admin privileges), you’ll need to enable and use the built-in administrator account to fix things up or create a second administrator account.
This post applies only to the situations where the user remembers the password for his account, but cannot log into the account due to a corrupt user profile or per-user registry. Corrupt user profile causes the error “The user profile service failed the logon. User profile cannot be loaded” when logging in to the account.
Whereas, for the “lost password“ or “lost admin privileges” kind of situations, you need to follow the instructions in the article Windows 10/11 Password Reset Methods for Lost Password Scenario to reset the user account password or restore the admin rights for the user account.
This article tells you how to enable the built-in administrator account (named “Administrator“) in Windows 10 and 11.
Enable Built-in Administrator via Recovery Options
Enabling the built-in administrator (“Administrator”) account can be done through Windows Recovery Environment (aka “Recovery Options”) if you cannot log in to your user account.
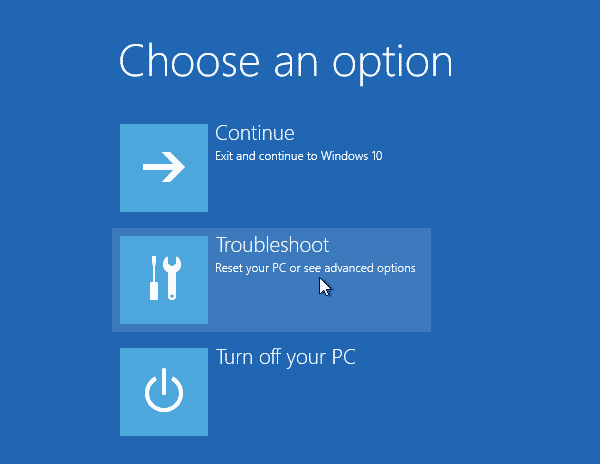
Step 1: Log in to Advanced Recovery Options (Windows RE)
- From the sign-in screen in Windows 10/11, press and hold the SHIFT key on the keyboard.
- With the SHIFT key still pressed, click the Power button and then click Restart.
- In the Recovery Options menu, click Troubleshoot, and then click Advanced Options.
.png)
Alternate Methods: If Windows doesn’t boot or WinRE doesn’t launch
Note: If Windows doesn’t boot, follow these steps to access the Recovery Options screen.
- Attempt to boot the system 2 or 3 times. After 3 failed tries, you’ll have the option to get into the Recovery Options directly, after going through the automatic repair (“Startup Repair”) process.
(Or use the USB Windows Setup disk to go to Windows RE.)
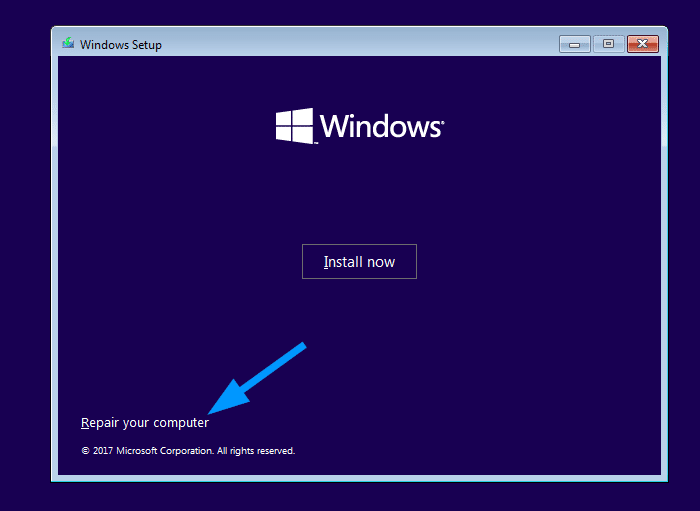
- Boot the system using your Windows installation media or Recovery drive if you’ve created one already. If you don’t have any, download the Windows 10 or 11 ISO and then create bootable media using another computer.
- On the Windows setup page, click Next.
(Tip: At this point, you can press
Shift+F10to open a Command Prompt window quickly, if you want. - Click Repair your computer.
- There we go. We have opened the recovery options.
Step 2: Enable the Built-in Administrator account from Windows RE
- In the Windows Recovery Options menu, click Troubleshoot → Advanced Options.
.png)
- Click Command Prompt.
.png) (This opens a Command Prompt window. We need to edit the
(This opens a Command Prompt window. We need to edit theSAMregistry hive offline to enable the built-in Administrator account.) - In the Command Prompt window, type the following command and press ENTER:
regedit.exe
- In the Registry Editor, select
HKEY_LOCAL_MACHINE - From the File menu, click Load Hive…
.png)
- In the browse dialog, locate and select the
\Windows\System32\Config\SAMhive file from your Windows installation — e.g., assumingC:\is your Windows drive letter. ThisSAMhive contains the user accounts information. See the section about finding the drive letter of your Windows installation in this article.
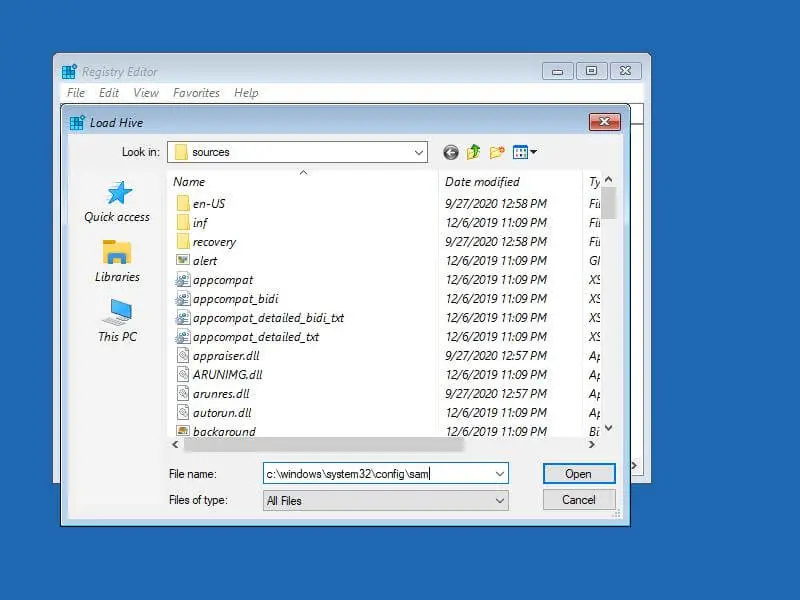
- Assign a name for the loaded hive — e.g.,
TEMPHIVE
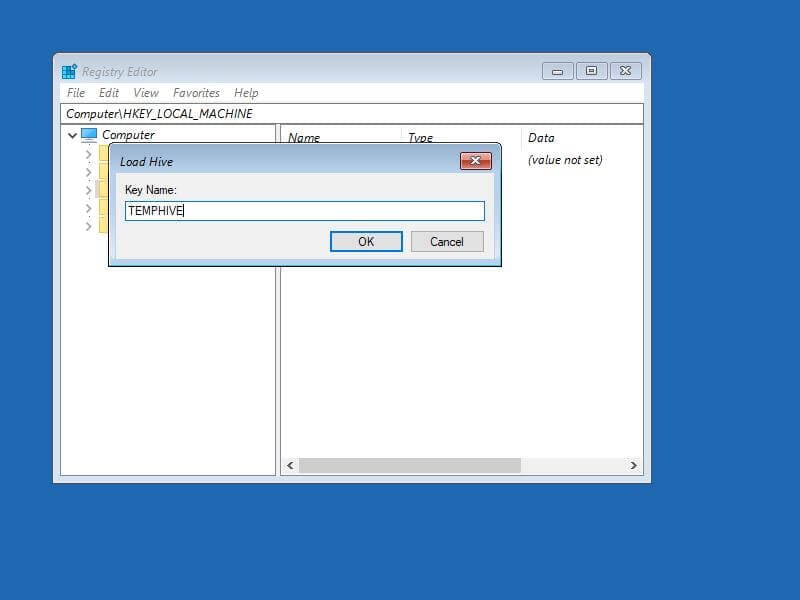
- Go to the following branch in the Registry Editor:
HKEY_LOCAL_MACHINE\TEMPHIVE\SAM\Domains\Account\Users\000001F4
- Double-click the REG_BINARY value named
F - In the 8th row, 1st column, modify the value
11to10
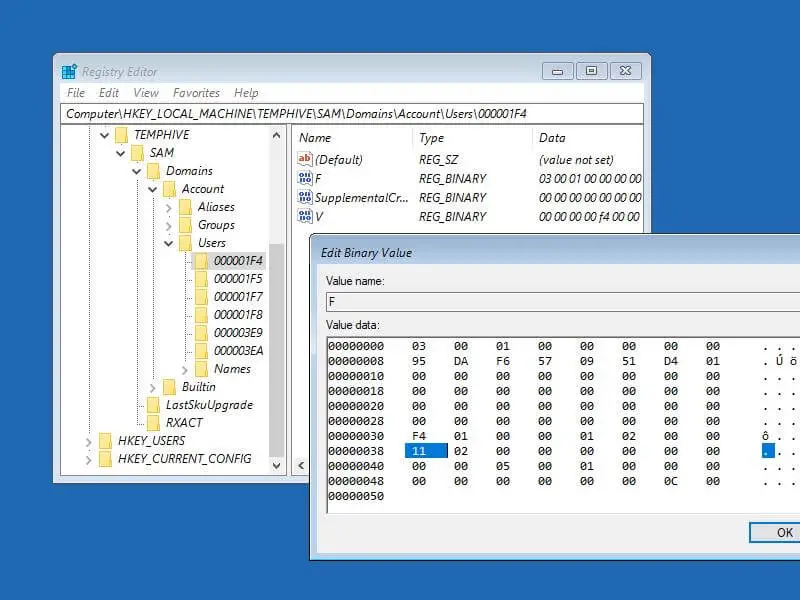 The value of
 11denotes that the built-in Administrator account is disabled. Setting it to10enables the built-in Administrator.
- Click OK to save the setting.
- Select the
TEMPHIVEkey. - From the File menu, click Unload Hive…
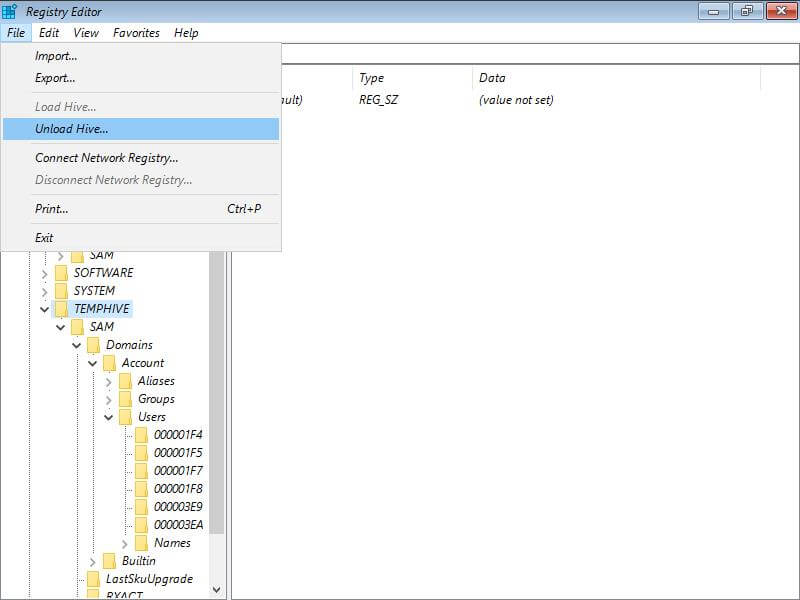
- Exit the Registry Editor.
- Type Exit in the Command Prompt window.
- In the Recovery Options window, click Continue (Exit and Continue to Windows.)
- When you get to the Windows sign-in screen, you’ll see the built-in Administrator account.
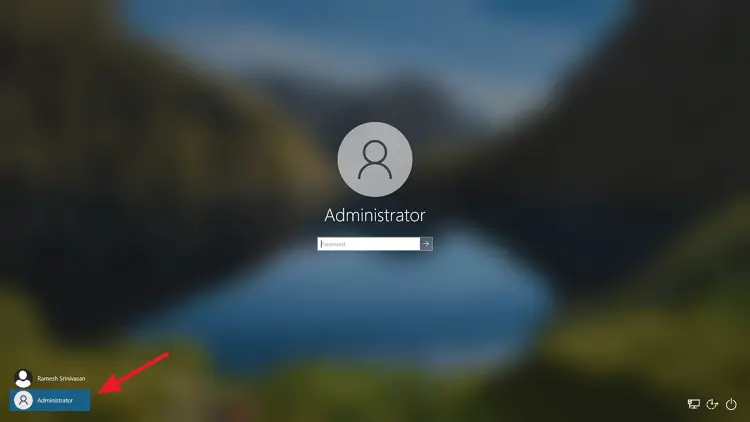
- Log in to the built-in Administrator. This account has a blank password by default.
Additional Notes
From the built-in “Administrator account, you can:
- Carry out the administration tasks using this account — e.g., creating a new administrator account, fixing the registry or file system permissions, etc.
- Once done, log off from the “Administrator” account and log in to your user account.
- For security reasons, it’s better to disable the built-in administrator. To disable the built-in Administrator account, open an elevated Command Prompt window and type:
net user administrator /active:no
You can check the status of the “Administrator” account by running the command “
net user administrator“. The “Account active” field tells if the account is active or not.
That’s it!
One small request: If you liked this post, please share this?
One "tiny" share from you would seriously help a lot with the growth of this blog. Some great suggestions:- Pin it!
- Share it to your favorite blog + Facebook, Reddit
- Tweet it!

built-in administrator account password is not blank
At step 7 attempting to name TEMPHIVE, it pops up telling me it “cannot load ……\SAM: The Process cannot access the file because it is being used by another process.”
I have restarted with a full power down, startup up, shift restart two time to get to this stage, and it’s not helping. Any input as to why I can’t get past step 7?
I too made the mistake of trusting Windows 11 to change account permissions/setting via command netplwiz so I’d have full access to mult accounts from each other like I used to when I did this in XP….Chose everything correctly…admin didn’t do it oddy.. Chg’d accts to Device Owner for full access, but Windows somehow made it a guest (despite everything appearing right and has hidden the other account…so now I have no admin ability. Trying to recover that.
@JP: Try using a USB setup disk to boot into WinRE and carry out the steps.
Use HIREN Boot from USB. Then follow from Step 5 above and you can load the hive without issue
I am on a Win 10 machine that is restricted. i have no internet access and i need ADMIN access so i can enable Ipv4, IPV6 on my standard account.. can i do anything as far as exploiting without software that i need to download? i have access to reboot and command X: just not from a recovery tool.