Do you own a Netbook or a small form-factor computer without a DVD drive, but want to install Windows (7, 8, 10, or 11) on it? This article explains the different methods to create a bootable USB Windows Setup disk.
Follow one of the three methods in this article to create a USB Windows Setup Disk from Windows ISO.
Create USB Bootable Windows Setup Disk from ISO:
- Using Rufus: An Advanced Tool to Create Bootable USB Drives (For both BIOS/UEFI systems)
- Using built-in Windows command-line — without 3rd party software
- Using the Windows USB/DVD Download Tool (Only for legacy BIOS/MBR-based systems)
- Media Creation Tool can download ISO and create a USB setup disk (opens another article page)
Create Bootable USB Flash Drive from ISO
Option 1: Rufus: An Advanced Tool to Create Bootable USB Drive
Also, look at an advanced ISO/DVD to USB tool named Rufus. This utility helps format and create bootable USB flash drives, such as USB keys/pen drives, memory sticks, etc.

For UEFI-based computers, choose GPT in the Partition scheme
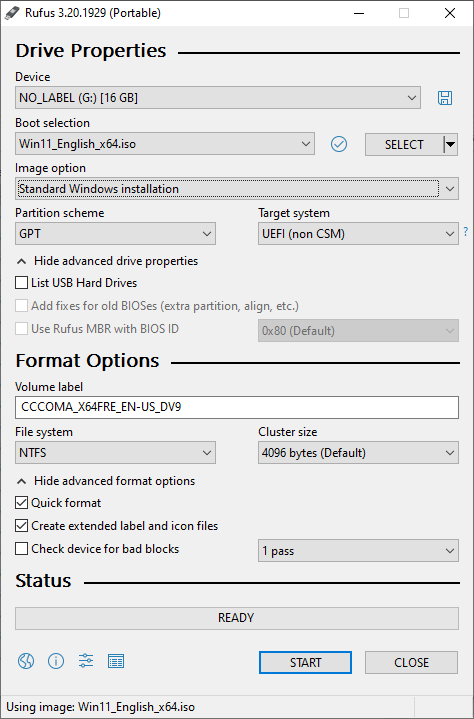
Rufus is extremely fast, and this tool can be especially useful for cases where:
- you need to create USB installation media from bootable ISOs (Windows, Linux, UEFI, etc.)
- you need to work on a system that doesn’t have an OS installed
- you need to flash a BIOS or other firmware from DOS
- you want to run a low-level utility
Option 2: Create USB Setup Disk without using any software
Before you begin, note that you don’t need any software to create bootable USB media for UEFI-based computers. For UEFI-based computers, all you need to do to make a USB Windows setup disk is to format the USB drive as FAT32 (instead of NTFS), mount the Windows Setup ISO to a drive, and copy the entire contents of the mounted drive to the USB drive.
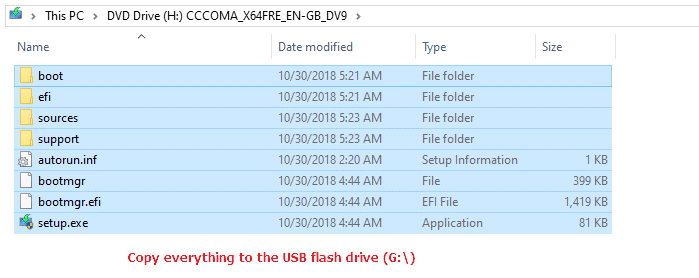
This is sufficient to make the drive bootable in UEFI-based computers.
For legacy (BIOS/MBR) systems, follow these instructions to create a Windows 10 Setup USB disk.
- Insert the USB flash disk into the drive.
- Open admin Command Prompt run the
diskpartcommand. - Run the
list diskcommand to see the list of drives. Carefully, note down the disk # for your USB media. It’s better to disconnect additional external drives before running this command, for easy identification of the USB drive. - In my case, disk 3 is the USB drive, so I type the following command to select the disk:
select disk 3
- Then, run the following command to completely erase the contents of the USB disk:
clean
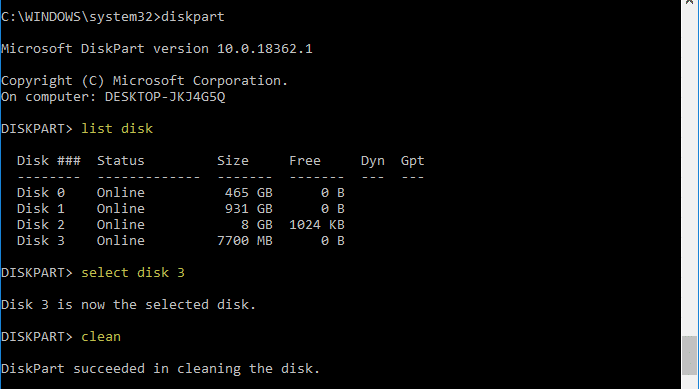
- Then run the following commands:
create partition primary
select partition 1
active
format fs=ntfs quick
Important note: If your computer supports Unified Extensible Firmware Interface (UEFI), you should format the USB flash drive as FAT32 rather than as NTFS. To format the partition as FAT32, type
format fs=fat32 quick, and then click ENTER.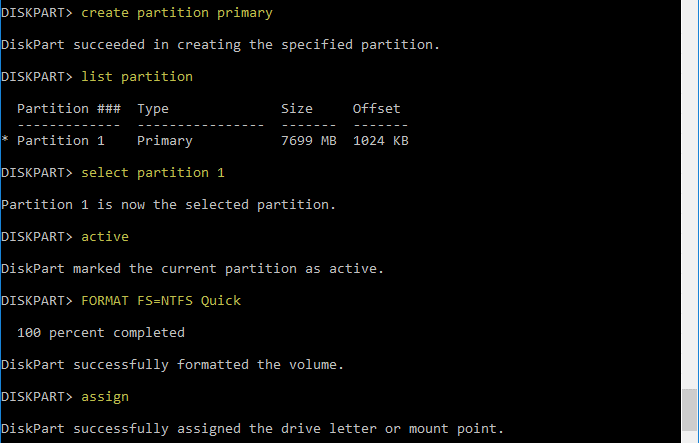
- Once done, run the
assigncommand, and then typeexitto come out of the Diskpart command environment. Now, Windows reassigns a drive letter (G:\in this example) for your USB drive. - Mount the Windows Setup ISO by double-clicking on it.

- Copy the entire contents of the mounted ISO drive (
H:\) to your USB flash drive (G:\)

- Switch to the admin Command Prompt window and run the following commands, where
H:\is the drive letter of the mounted Windows ISO andG:\is the USB drive letter:H: cd\boot bootsect.exe /nt60 G:
You’ll see the following output:
Target volumes will be updated with BOOTMGR compatible bootcode.

G: (\\?\Volume{589fd5fb-bd84-11e8-a90e-1866da06b846})

    Successfully updated FAT32 filesystem bootcode.

Bootcode was successfully updated on all targeted volumes.
The
bootsect.execommand-line builds the boot sector code in the specified partition.
That’s it! The USB drive is now bootable, and you should be able to install Windows from it.
Option 3: Using Windows USB/DVD Download Tool
Microsoft’s Windows USB/DVD Download Tool takes an ISO image and creates a bootable USB device that can be used to install Windows on legacy (BIOS/MBR-based) systems. The utility can create a Windows installation DVD from the ISO file as well.
Important: The Windows USB/DVD tool formats the disk as NTFS, which means that it will not work on UEFI-based systems. For UEFI-based systems, use Method 1 (Rufus), or format the disk as FAT32 and manually copy the Windows setup files (as in Method 2.)
Download the Windows USB/DVD Download Tool. To copy the ISO image to a USB flash drive, ensure that the drive has sufficient disk space. Different OSes have different ISO file sizes. Be sure to use a drive with a capacity of 8 GB minimum, as Windows 10/11 ISO file sizes grow every build/version; Windows 10 Fall Creators Update ISO size is 4.4 GB, and Windows 11 Build 10.0.22000 ISO is 5.12 GB.
Although the caption reads “Windows 7 USB/DVD Tool”, it works flawlessly on Windows 10/11.
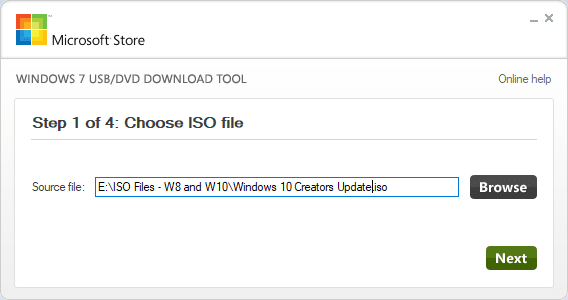
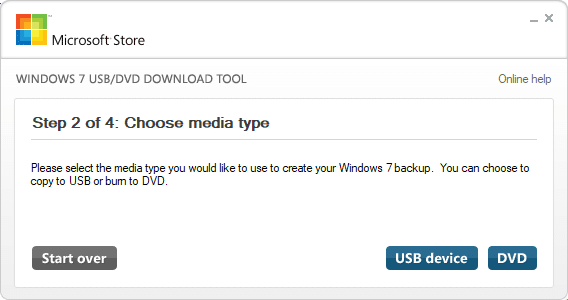
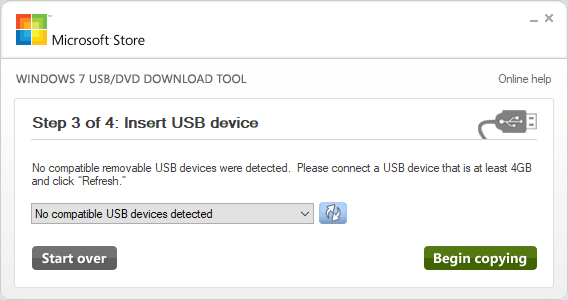
Please insert the USB flash drive (or DVD media) into the drive beforehand.
Alternate download link for the utility is here:
https://www.majorgeeks.com/files/details/microsoft_windows_7_usbdvd_download_tool.html
The tool works only for the Windows ISO image downloaded from Microsoft.
I hope this guide proved helpful in creating a bootable USB Windows Setup disk using various methods.
One small request: If you liked this post, please share this?
One "tiny" share from you would seriously help a lot with the growth of this blog. Some great suggestions:- Pin it!
- Share it to your favorite blog + Facebook, Reddit
- Tweet it!
Open the ISO using PowerISO .
Then go to the file-> Image Properties :
Now you click on Image Properties and then click on the UDF checkbox .
Now save the ISO file .
Again open the DVD USB tool and now you can create you bootable DVD or bootable pendrive easily .
Moeen – that worked! Thank you so much!
No need to stress your brains by following Rafael Rivera’s method which is not correctly explained and most of the times not working! MOEEN here gave the RIGHT SOLUTION!!! Thank you Moeen!!
One exception:
Windows 7 USB/DVD Tool formats the USB drive as NTFS and for that reason it may not be bootable on a UEFI machine which requires FAT32. (Some older PC’s may accept both, but the UEFI only machines only boot from FAT32 as for specification)
To make a USB windows installation media UEFI compliant you can format the USB device as FAT32 with windows 10, then open the windows.iso with file explorer and copy all files and folders from the mounted windows.iso directly to the USB flash drive.
Hi. There is one catch – the setup iso file contains install.wim file which is greater than 4GB so does not fit into fat32 filesystem.
and that is the very reason a genuine iso (not for testing purposes like using in virtual machines etc) is always below 4 gb in size
Thank you, it help me a lot.
The info was very helpful. Thanks alot