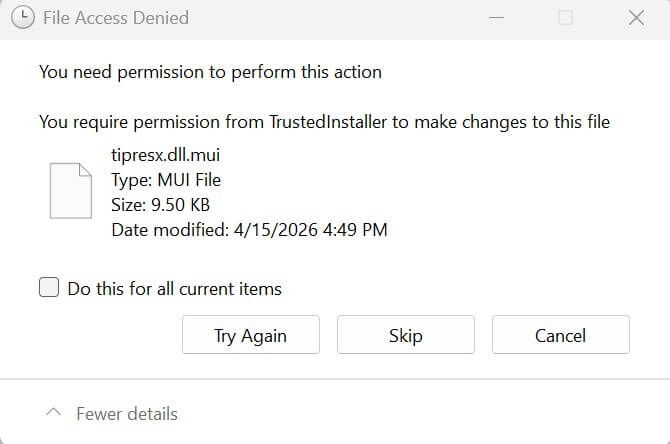
The Windows Setup procedure or the Media Creation Tool may fail to clear the temporary setup files in some cases. As a result, gigabytes of disk space will be occupied by those folders. When you manually delete the temporary setup folder $WINDOWS.~BT, you may receive an Access Denied error.
File Access Denied

You need permission to perform this action.

You need permission from TrustedInstaller to make changes to this file.
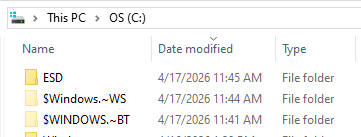
Let’s see how to clear the temporary setup folders, namely, $WINDOWS.~BT, $WINDOWS.~WS, and ESD.
Resolution
Method 1: Using Disk Cleanup
- Launch the Disk Cleanup (cleanmgr.exe) tool.
- Select the C: drive and click OK.
- Click Clean up system files. Disk Cleanup will now relaunch as administrator.
- Select the C: drive and click OK.
- Enable the Temporary Windows installation files checkbox, and click OK.
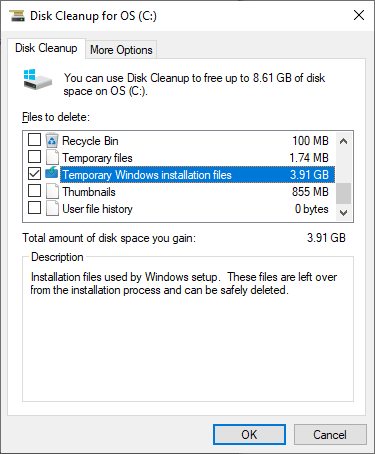
- Click the Delete Files button when you see the “Are you sure you want to permanently delete these files?” prompt.That’s it. The Disk Cleanup tool will now delete the following folders:
C:\ESD\Download

C:\$WINDOWS.~BT

C:\$WINDOWS.~WS
Method 2: Using Command Prompt
If the Disk Cleanup tool doesn’t show the Temporary Windows installation files checkbox or doesn’t clear the temporary setup folders, you can use the admin Command Prompt to delete those folders.
Open Command Prompt (admin) and run these commands:
del /s /f /q "C:\$WINDOWS.~BT"
del /s /f /q "C:\$WINDOWS.~WS"
del /s /f /q "C:\ESD\Download"

takeown /F "C:\$WINDOWS.~BT" /A /R /D Y
icacls "C:\$WINDOWS.~BT" /grant *S-1-5-32-544:F /T /C /Q
rd /s /q "C:\$WINDOWS.~BT"

takeown /F "C:\$WINDOWS.~WS" /A /R /D Y
icacls "C:\$WINDOWS.~WS" /grant *S-1-5-32-544:F /T /C /Q
rd /s /q "C:\$WINDOWS.~WS"
rd /s /q "C:\ESD\Download"
Method 3: Using the TrustedInstaller Command Prompt
Download the Advanced Run utility from Nirsoft and run it.
Using Advanced Run, launch CMD.exe as TrustedInstaller. Reference: How to Run Programs as TrustedInstaller
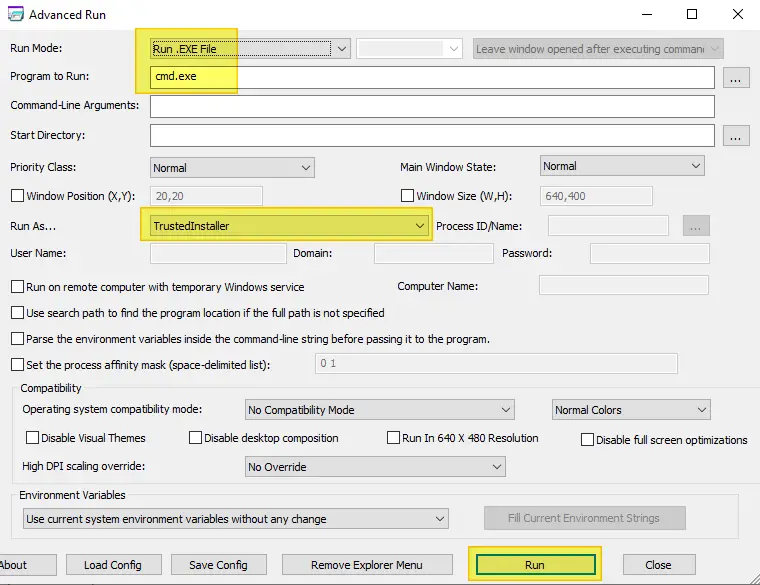
In the TrustedInstaller Command Prompt, run the following commands:
rd /s /q "C:\$WINDOWS.~BT"

rd /s /q "C:\$WINDOWS.~WS"

rd /s /q "C:\ESD\Download"
That’s it!
One small request: If you liked this post, please share this?
One "tiny" share from you would seriously help a lot with the growth of this blog. Some great suggestions:- Pin it!
- Share it to your favorite blog + Facebook, Reddit
- Tweet it!