Using the WinKey and PrintScreen keystroke is probably the fastest way to take a screenshot (and automatically save it to a file) of the entire screen in Windows 8 and Windows 10. When using this method, the screenshot image contains your entire screen, including the Taskbar and everything. And in most cases, you may have to crop the image before sending or sharing it with someone, so that only the relevant portion is shown.
This article tells you how to take a screenshot of your entire screen and open the saved image in the editor — both operations in a single click.
The Alt + PrintScreen keystroke can capture the current window but doesn’t save to a file automatically, and it can’t capture context menus — so it’s not always the desired option.
Automatically Take a Screenshot and Open it in Editor
1] Using a VBScript
My script at GitHub automates the task of taking a full screenshot using NirCmd and opening the saved PNG file in an image editor (Paint). The script below takes a screenshot of your entire screen and opens the saved file using the image editor. Personally, I prefer the following script method to Alt + PrintScreen or Snipping Tool or a 3rd party screenshot software.
'File: screenshot_and_edit.vbs
'Ramesh Srinivasan, Winhelponline.com
'Take a screenshot and open it in image editor
'Requires NirCmd.exe (from www.nirsoft.net) to automate Win + PrntScrn
'For Windows 8 and Windows 10.

Set WshShell = CreateObject("WScript.Shell")
Set fso = CreateObject("Scripting.FileSystemObject")

'Sleep for 2 seconds until the user sets the active Window or menu
WScript.Sleep 2000

'Take full screenshot
WshShell.Run "nircmd.exe " & "sendkeypress rwin+printscreen"

'Sleep again for half a second - wait until the PNG file is written
WScript.Sleep 500

Dim fNewest

'Find the latest PNG file in Screenshots folder and Open it in editor.
SShots = WshShell.ExpandEnvironmentStrings("%userprofile%")
SShots = SShots & "\Pictures\Screenshots"
If Not fso.FolderExists(SShots) Then WScript.Quit
For Each f In fso.GetFolder(SShots).Files
   If UCase(fso.GetExtensionName(f)) = "PNG" Then
      If fNewest = "" Then
         Set fNewest = f
      ElseIf fNewest.DateLastModified < f.DateLastModified Then
         Set fNewest = f
      End If
   End If
Next
If fNewest <> "" Then WshShell.Run "mspaint.exe " & Chr(34) & fNewest & Chr(34)
Usage
- Download NirCmd (from NirSoft) and move the executable to your Windows folder.
- Download the above Vbscript.
(Or manually copy the above script code to Notepad and save the file with .vbs extension. Be sure to save the file inANSIencoding instead ofUTF-8.) - Create a desktop shortcut to the .vbs (script file)
- Optionally, change the shortcut icon. Pin it to the taskbar if required.
When a script is used to trigger WinKey and PrintScreen key sequence, the window focus will change (which is not the case when pressing WinKey and PrintScreen manually).
Due to this, your program window would show up with inactive title bar color in the screenshot. To avoid that, the script is set to wait for 2 seconds after it’s being launched and then simulates the keypress event. In the meantime, the user can set the focus back to the appropriate window. The timeout can also be useful if you want to capture a context menu.
2] Using ShareX, GreenShot, or Other Utilities
ShareX is a handy screenshot utility with some advanced options such as uploading the captured image to your cloud storage account or sharing the link on social networking sites etc. In ShareX, you can configure “after capture” tasks and create task actions that would be carried out automatically.
Set the After capture tasks to “Perform actions.”
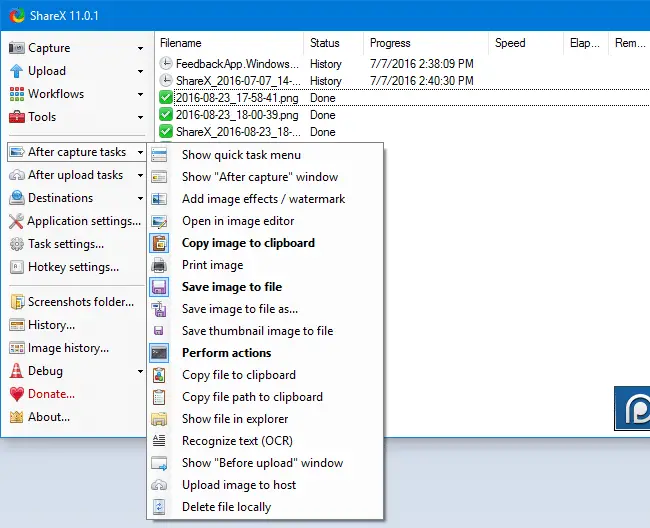
And in the Task Settings, enable the checkbox for Paint or any image editor you use. If your image editor isn’t listed, you can add one manually.

Third-party screenshot programs like ShareX, GreenShot, PicPick include a nice editor with which you can crop, add text/annotation, and do other image processing tasks.
One small request: If you liked this post, please share this?
One "tiny" share from you would seriously help a lot with the growth of this blog. Some great suggestions:- Pin it!
- Share it to your favorite blog + Facebook, Reddit
- Tweet it!