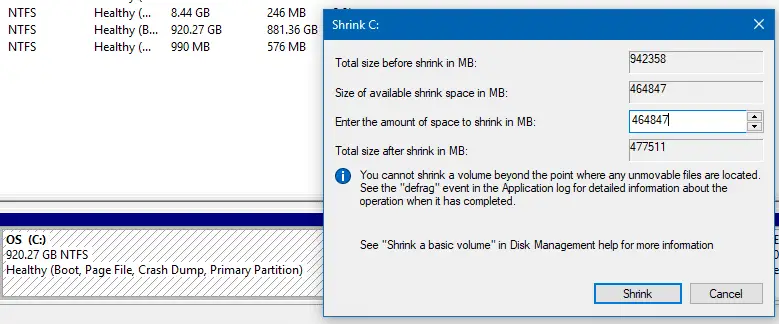
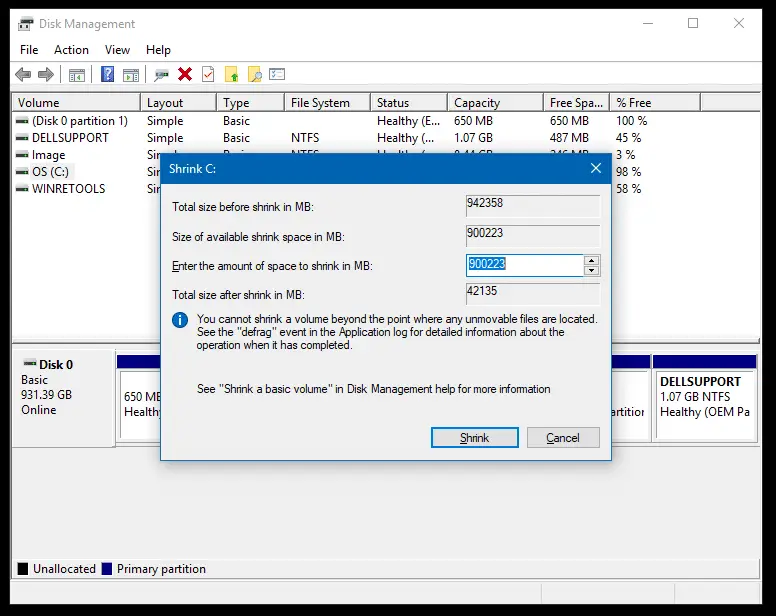
When you use the Disk Management console to shrink the volume in which the Operation System is installed, you’re unable to choose a value (to shrink) beyond a limit. In the shrink volume dialog, the following message is displayed:
You cannot shrink a volume beyond the point where any unmovable files are located. See the "defrag" event in the Application log for detailed information about the operation when it has completed.
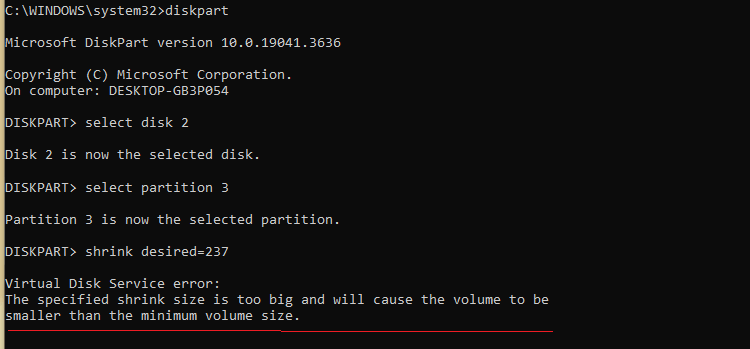
If you use the diskpart’s “shrink desired” command-line to shrink the partition via Command Prompt, the following error may be shown even though the partition has ample disk space:
Virtual Disk Service error:
The specified shrink size is too big and will cause the volume to be
smaller than the minimum volume size.
When you look at the Application event log, Event ID: 259 “defrag” event may show something this:
Event ID: 259 – Examples
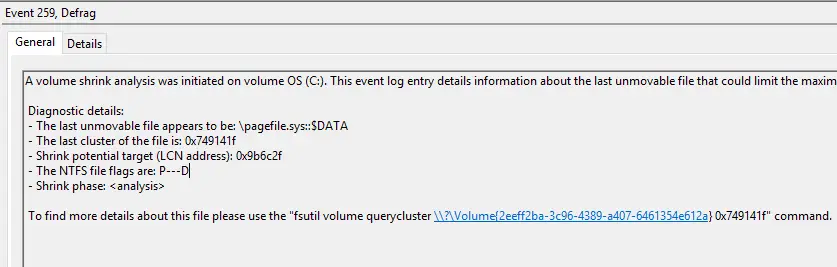
A volume shrink analysis was initiated on volume OS (C:). This event log entry details information about the last unmovable file that could limit the maximum number of reclaimable bytes.

 Diagnostic details:
 - The last unmovable file appears to be: \pagefile.sys::$DATA
 - The last cluster of the file is: 0x749141f
 - Shrink potential target (LCN address): 0x9b6c2f
 - The NTFS file flags are: P---D
 - Shrink phase:

 To find more details about this file please use the "fsutil volume querycluster \\?\Volume{2eeff2ba-3c96-4389-a407-6461354e612a} 0x749141f" command.
(or)
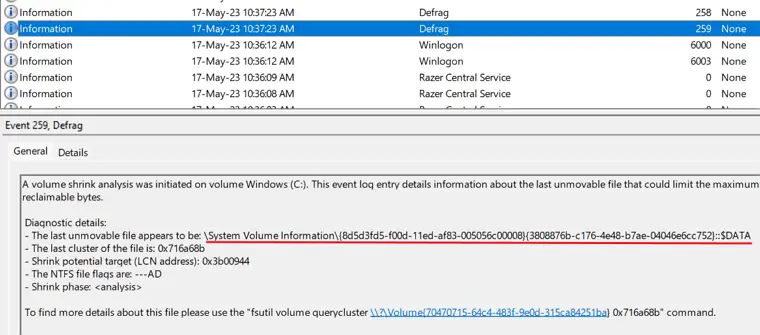
A volume shrink analysis was initiated on volume OS (C:). This event log entry details information about the last unmovable file that could limit the maximum number of reclaimable bytes.

 Diagnostic details:
 - The last unmovable file appears to be: \System Volume Information\{cead75c9-21e3-11ef-b9e4-cc96e535c78c}{3808876b-c176-4e48-b7ae-04046e6cc752}::$DATA
 - The last cluster of the file is: 0x189ac13
 - Shrink potential target (LCN address): 0x1231a79
 - The NTFS file flags are: ---AD
 - Shrink phase:

 To find more details about this file please use the "fsutil volume querycluster \\?\Volume{73033618-7179-458a-b854-bf5c6244b858} 0x189ac13" command.
Event ID: 261 – Examples
Error: a file blocked volume shrink on volume (C:). Diagnostic details: - The last unmovable file appears to be: \pagefile.sys::$DATA - The last cluster of the file is: 0x74488cb - Shrink potential target (LCN address): 0x743a7be - The NTFS file flags are: P---D - Shrink phase:To find more details about this file please use the "fsutil volume querycluster \\?\Volume{2eeff2ba-3c96-4389-a407-6461354e612a} 0x749141f" command.
The last unmovable file appears to be: \$Extend\$UsnJrnl:$J:$DATA
 - The last cluster of the file is: 0xe635f87
 - Shrink potential target (LCN address): 0xafd8c74
 - The NTFS file flags are: P---D
 - Shrink phase:
Event ID: 264 – Example
The storage optimizer couldn't complete shrink on (C:) because: This shrink size specified is too big. (0x89000021)
(Go to the Solution directly.)
Cause
It’s usually pagefile.sys that prevents Disk Management from shrinking the volume beyond a point, as pagefile.sys is an unmovable file. Other unmovable files include hiberfil.sys hibernation file.
There may be a large free space area before pagefile.sys and after it. For example, the disk map for C: drive is such as the one below:
[50 GB occupied by data] | [50 GB free space] | [pagefile.sys (unmovable)] | [10 GB free space]
When you attempt to shrink the disk, only the 10 GB at the end of the partition will be shrunk, no matter how well your disk defragmenter has optimized the disk; It’s because the unmovable file (such as pagefile.sys) sits between the two separate free space blocks. You can’t decrease the allocated space beyond the point where the unmovable files are located.
To avoid this issue, disable the paging file so that the free space will be be contiguous, for maximum shrinkage. Alternatively, boot into Windows RE, delete the hidden pagefile.sys from the OS partition, and shrink the volume using DiskPart, which is very effective. For more information on shrinking a volume using DiskPart, see these articles:
The System Volume Information folder used by the System Restore feature can prevent you from shrinking the drive beyond a point. In some systems, you’ll see this in the event log — “defrag” Event ID 259:
The unmovable shadow copy files in the SVI folder cause this issue. Deleting all the restore points/shadow copies will resolve the issue.
NTFS metadata
The last unmovable file appears to be: \$BitMap::$DATA
If the event log notifies you about the $BitMap::$DATA as the last unmovable file, you may try running Contig (from Microsoft SysInternals) first before partitioning the volume using Disk Management. Alternately, you can use third-party software (e.g., AOMEI Partition Assistant Free) to partition the system drive to overcome the limitation of Microsoft technology.
The last unmovable file appears to be: \$Extend\$UsnJrnl
Scroll down and see Defrag or Reset the UsnJrnl in this article for the fix.
This article tells you how to shrink your system partition to your preferred size.
Resolution
My Dell Vostro computer comes with a single partition. When I attempted to shrink the partition so that I can create a second partition out of the free or unallocated space, I could shrink the 940 GB drive only by 50% approximately. Here is the max possible shrink size the Disk Management dialog offered me:
The fix is to temporarily disable hibernation, the Paging file, as well as the System Restore feature. Once disabled these features, restart Windows and resize (shrink) the volume using Disk Management.
Disable System Restore
- Launch systempropertiesprotection.exe from the Run dialog
- Select the system drive and click Configure
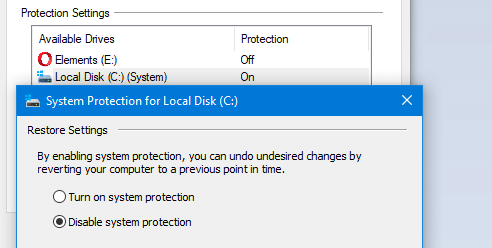
- Click Disable system protection.
- Click “Delete“.
- Click Continue when you see the prompt:
System Protection

You will not be able to undo unwanted system changes on this drive. Are you sure you want to continue?

This will delete all restore points on this drive. This might include older system image backups.

[Continue] [Cancel]
- click OK, OK to close the dialogs.
This turns off System Restore and also erases all the restore points.
Disable the hibernation feature
- Open Command Prompt as administrator
- Run the following command:
powercfg /hibernate off
This turns off the hibernate feature and clears the hiberfil.sys from the system drive.
Disable the Paging file
- Launch systempropertiesadvanced.exe from the Run dialog.
- Under Performance, click Settings, click Advanced button
- Click the Change button.
- Uncheck Automatically manage paging file size for all drives
- Select No paging file, and click Set
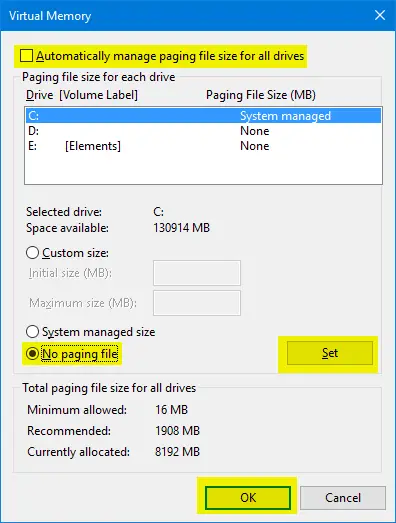
- Click OK.
- You’ll see the following warning message after you click OK.
If you disable the paging file or set the initial size to less than 200 megabytes and a system error occurs, Windows might not record details that could help identify the problem. Do you want to continue?
Click Yes to continue.
- Restart Windows
- Open Disk Management and attempt to shrink the system volume. Now you should be able to shrink the drive to the required size as you want.
 After disabling paging, hibernation and System Restore, I’m now able to shrink the drive by 95% as seen in the above screenshot. The remaining 5% disk space is consumed by the OS, your personal data and other overheads. I could successfully partition the C: drive, reducing its size to 150 GB which is what I wanted.
Re-enable System Restore, Paging file and Hibernate features
After you shrink the volume, be sure to re-enable the Paging file and System Restore and Hibernate options by reversing the earlier steps.
Enable System Restore
- Launch systempropertiesprotection.exe from the Run dialog
- Select the system drive and click Configure
- Click Turn on system protection, click OK, OK.
This turns on System Restore.
Enable Hibernation
- Open Command Prompt as administrator
- Run the following command:
powercfg /hibernate on
This turns on the hibernate feature. As a side note, Fast Startup depends upon the Hibernate feature to work.
Note: If you run the command from a normal (non-elevated) Command Prompt, you’ll see the error Unable to perform operation. An unexpected error (0x65b) has occurred: Function failed during execution when turning off/on hibernation.
Enable the Paging file
- Launch systempropertiesadvanced.exe from the Run dialog.
- Under Performance, click Settings, click Advanced button
- Click the Change button.
- Select the system drive, click System managed size, and click Set
- Enable Automatically manage paging file size for all drives
- Click OK.
- Restart Windows
Defrag or Reset the UsnJrnl
Defragment the UsnJrnl using Contig.exe or rebuild the UsnJrnl if you see the following error in the Event log.
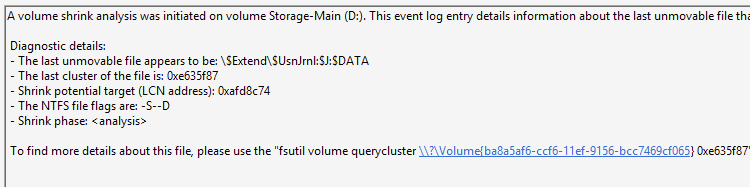
The last unmovable file appears to be: \$Extend\$UsnJrnl
- Download Contig: https://learn.microsoft.com/en-us/sysinternals/downloads/contig
- Move Contig.exe to a folder — e.g., C:\Tools.
- Run this from admin Command Prompt:
For example, to defrag the UsnJrnl on Drive D, run:
C:\Tools\contig -v -s D:\$Extend
See if that increases the shrink space on volume D.
If that doesn’t help, delete the UsnJrnl and rebuild it. To do so, run these commands:
Delete and rebuild UsnJrnl
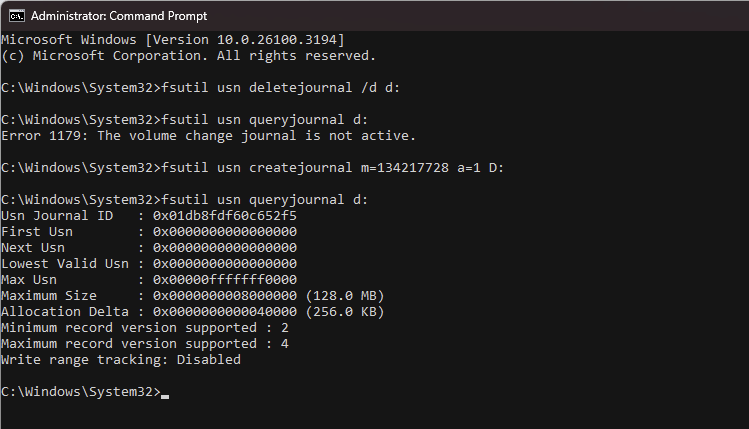
fsutil usn deletejournal /d
Example:
fsutil usn deletejournal /d d:

fsutil usn queryjournal d:
From the official documentation – fsutil usn | Microsoft Learn
* * *
Deleting or disabling an active change journal is very time consuming, because the system must access all the records in the master file table (MFT) and set the last USN attribute to 0 (zero). This process can take several minutes, and it can continue after the system restarts, if a restart is necessary. During this process, the change journal is not considered active, nor is it disabled. While the system is disabling the journal, it cannot be accessed, and all journal operations return errors. You should use extreme care when disabling an active journal, because it adversely affects other applications that are using the journal.
* * *
So, restart the system after issuing the delete command. You may have to rebuild the index if Windows Search reports stale data.
To rebuild the UsnJournal on the D drive after restarting Windows, run:
fsutil usn createjournal d:
Alternatively, you may try AOMEI or another third-party tool to shrink the partition.
I hope this article helped you shrink your system volume as required.
One small request: If you liked this post, please share this?
One "tiny" share from you would seriously help a lot with the growth of this blog. Some great suggestions:- Pin it!
- Share it to your favorite blog + Facebook, Reddit
- Tweet it!
I get “An unexpected error has occurred : function failed during execution” when turning on the hibernation off through the command prompt . Help
Please
@Marcus: You need to run the command from an admin Command Prompt window.
Great article, worked like a charm for me.
However there are a few mistakes in the last section “Re-enable System Restore, Paging file and Hibernate features”, that could cause problems to inexperienced users.
For example, System Restore step 3 should be “Turn on system protection”, not “Disable system protection” (obvious to most, but you never know).
Also some of the steps under Enable the Paging file are not in correct order.
@Jay: Thanks for pointing out the mistakes. They’re now corrected.
Fantastic!. Worked like a charm. Thanks
Thank you. This guide is very useful. This is the only guide that covers everything about regaining shrinkable space.
Thank you again.
I only had to implement the removal/reenable of the swapfile setting to be able to shrink the disk space on the C drive I was shrinking. Thank you so much! Great step by step information!
Worked like a charm!
i didnt worked in my pc hp- 15 bs
It worked brother, thank you!
Thank you!!
It worked for too, thank you!
Whoever you are, where ever you are, God bless you!
nice tutorial brother
It worked for me. But sometimes you need to do the procedure a couple of times, until the page file step requires to restart the system. Thank you very much for your help!
I followed all the steps and now my system is not booting.
Need Help: I have problem with some sort of Windows Defender File
Diagnostic details:
– The last unmovable file appears to be: \ProgramData\Microsoft\Windows Defender\Scans\mpenginedb.db-wal::$DATA
– The last cluster of the file is: 0x314b5cc
@Kiran: Disable Windows Defender temporarily.
Then delete or rename
mpenginedb.db-walRestart Windows Defender.
I followed this guide until the restart. Then when I tried to shrink the volume it gave me less space I could shrink than before. Then I run the defrag again and waited for 8 passes to complete and show me 0% fragmentation and then suddenly I had lots of shrinkable space.
Thanks, this work very well.
My system get stuck on:
Diagnostic details:
– The last unmovable file appears to be: \System Volume Information\$CBT2::$DATA
What gets past that one?
Worked perfectly on my system. Thanks a lot
Its work for me.
Thank you
BIGGEST THANKS TO YOU MAN !!!!!
This very helpful and straightforward, thank you man.
God richly bless you sir. It did work
I’ve got 512GB SSD. I couldn’t shrink it beyond 100GB while having 340GB of free space. I actioned all three points as described in this article and it brought 100GB down to 84GB! That’s unexpected as the article had the opposite of an effect!
went from 0 mb to 9206mb… perfect….
Thanks for the help, I appreciate it
I am a retired college instructor and intermediate level IT assistant. I recognize good teaching and you, my friend, have this God-given talent. Your tutorial is excellent, and helped me to reclaim the space I needed. Many thanks for taking the time to carefully craft this post, and share it.
@Dale: I’m glad you found the guide helpful. Thank you for sharing the feedback 🙂
Regards,
I followed your steps from start to finish, but the problem hasn’t been solved. I am trying to shrink a 292GB disk, which currently has 106GB free, to 50GB, but the shrinking option shows only 92MB.
@Gauresh.
Post the latest “defrag” event entry here.