Image or video dimensions are quoted as width × height, with the units in pixels: for example, 1920 × 1080 means the width is 1920 pixels and the height is 1080 pixels. 1080p is 1920 × 1080 Full HD resolution. The higher the resolution, the higher the video file size.
Often times, you may want to send a low or medium resolution version of a video to someone via email or WhatsApp. To resize or downscale a video to lower its resolution, you’ll need to use a software encoder.
This article explains various methods to resize or change the resolution of a video file in Windows.
Resize or Change the Resolution of a Video
Using Handbrake
HandBrake is a free and open-source transcoder for digital video files. We’ve earlier seen how to encode videos for sharing on Twitter. Here are the steps to resize a video using Handbrake:
Start Handbrake and open the video file you want to resize or downscale. Handbrake offers many presets for you to choose from. If you don’t want to use any of the presets, you can choose the custom dimensions or resolution by clicking on the Dimensions tab.
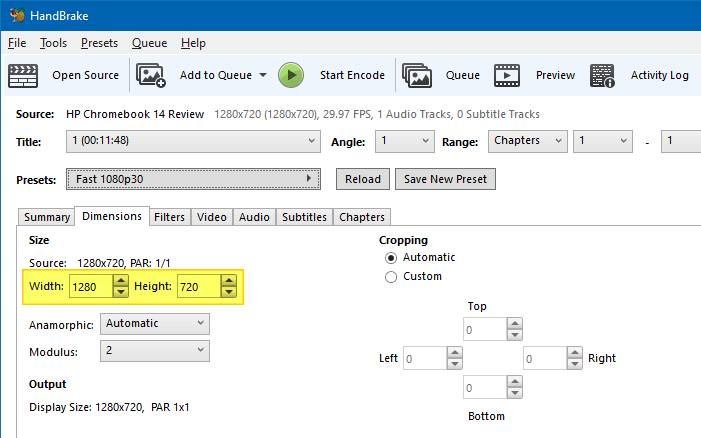
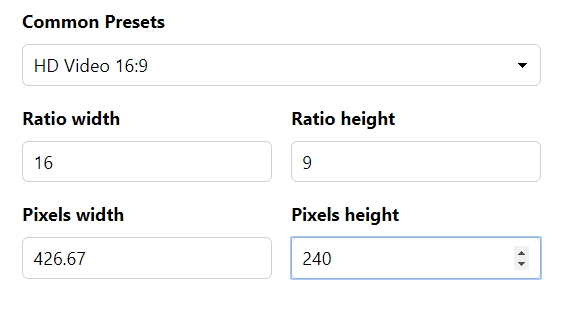
Input the desired width and height values, making sure that you maintain the aspect ratio so that the resulting video is not stretched or skewed. To calculate the dimensions while maintaining the aspect ratio, you can visit https://calculateaspectratio.com
Here is a screenshot from https://calculateaspectratio.com
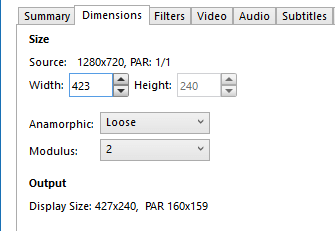
Another option is to change the Anamorphic setting in Handbrake to Loose, and then input the width (pixels) so that the height field is automatically adjusted.
Optionally, you can adjust the video frame rate and other settings in the Video tab.
Once done, type in the output file name and click the Start Encode button.
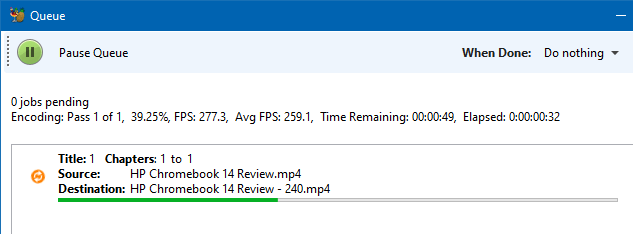
The 720p video is now downscaled to 240p.

Handbrake presets
Handbrake also offers the following General presets. HandBrake’s General Presets use the MP4 container and are intended to be broadly compatible across a wide range of software and devices.
A Preset is a group of settings specifically tailored for the software or device you want your videos to play on. Selecting a Preset can go a long way toward ensuring your video works where you want it to.
General presets
| Preset | Type | Video | Audio | Picture Quality | Encoding Speed | File Size |
|---|---|---|---|---|---|---|
| Very Fast 1080p30 | MP4 | H.264 | AAC stereo | Average | Very fast | Small |
| Very Fast 720p30 | MP4 | H.264 | AAC stereo | Average | Very fast | Small |
| Very Fast 576p25 | MP4 | H.264 | AAC stereo | Average | Very fast | Small |
| Very Fast 480p30 | MP4 | H.264 | AAC stereo | Average | Very fast | Small |
| Fast 1080p30 | MP4 | H.264 | AAC stereo | Standard | Fast | Average |
| Fast 720p30 | MP4 | H.264 | AAC stereo | Standard | Fast | Average |
| Fast 576p25 | MP4 | H.264 | AAC stereo | Standard | Fast | Average |
| Fast 480p30 | MP4 | H.264 | AAC stereo | Standard | Fast | Average |
| HQ 1080p30 Surround | MP4 | H.264 | AAC stereo; Dolby Digital (AC-3) | High | Slow | Large |
| HQ 720p30 Surround | MP4 | H.264 | AAC stereo; Dolby Digital (AC-3) | High | Slow | Large |
| HQ 576p25 Surround | MP4 | H.264 | AAC stereo; Dolby Digital (AC-3) | High | Slow | Large |
| HQ 480p30 Surround | MP4 | H.264 | AAC stereo; Dolby Digital (AC-3) | High | Slow | Large |
| Super HQ 1080p30 Surround | MP4 | H.264 | AAC stereo; Dolby Digital (AC-3) | Super high | Very slow | Very large |
| Super HQ 720p30 Surround | MP4 | H.264 | AAC stereo; Dolby Digital (AC-3) | Super high | Very slow | Very large |
| Super HQ 576p25 Surround | MP4 | H.264 | AAC stereo; Dolby Digital (AC-3) | Super high | Very slow | Very large |
| Super HQ 480p30 Surround | MP4 | H.264 | AAC stereo; Dolby Digital (AC-3) | Super high | Very slow | Very large |
Web presets
HandBrake’s Web Presets use MP4 and are designed for sharing videos on the internet, email, and social media.
For instance, the Gmail Presets are designed to guarantee video up to a certain duration will produce a file less than 25 MB for attaching to an email. The preset name also contains the duration — e.g., GMail large 3 minutes 720p30. The media quality may be slightly reduced in order to achieve the target file size.
Other presets
Other than the above two preset types, there are 3 more preset types, namely: Devices, Matroska (.MKV), and Production.
- The Devices Presets target specific devices and classes of devices, such as mobile phones, tablets, TV media players, and game consoles.
- The Matroska Presets target software and devices supporting the Matroska Multimedia Container (MKV format).
- The Production Presets create mastering grade, short GOP, constant frame rate video with high bit rate audio, suited for professional video editing workflows.
Handbrake also has a command-line version of their tool (Handbrakecli.exe) that you may want to check out. Here is the command-line syntax to use for the above task:
handbrakecli -i "D:\Videos\HP Chromebook 14 Review.mp4" --width 424 --height 240 --auto-anamorphic -o "D:\Videos\HP Chromebook 14 Review - 240p handbrake cli.mp4"
See HandBrake Documentation — CLI Options for more information.
Using FFmpeg
FFmpeg is a free and open-source project consisting of a software suite of libraries and programs for handling video, audio, and other multimedia files and streams. You can do pretty much any media conversion/encoding task using this console tool. There are many third-party programs such as Screen to Gif, File Converter, etc. that are bundled with FFmpeg.exe. [Download FFmpeg]
To resize a video using FFMpeg.exe, here is the command-line syntax to use:
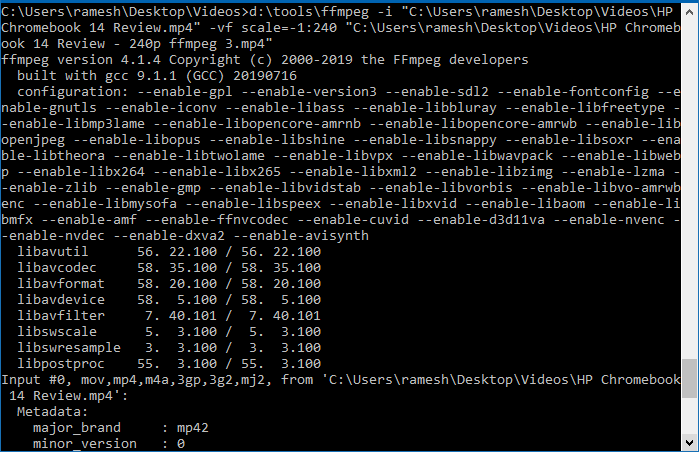
ffmpeg -i "D:\Videos\HP Chromebook 14 Review.mp4" -vf scale=424:240 "D:\Videos\HP Chromebook 14 Review - 240p ffmpeg.mp4"
The scale= parameter you input the output video’s dimension. As always, make sure you compute the dimensions while preserving the aspect ratio.
Preserve aspect ratio – auto adjust height or width
If you don’t want to calculate the aspect ratio and want FFMpeg.exe to do it automatically, specify only one component (either width or height), and set the other component to -1. For example, here is the command-line syntax:
ffmpeg -i "D:\Videos\HP Chromebook 14 Review.mp4" -vf scale=-1:240 "D:\Videos\HP Chromebook 14 Review - 240p ffmpeg.mp4"
Sometimes, you may see the following error depending upon the resolution used.
Error initializing output stream 0:0 — Error while opening encoder for output stream #0:0 – maybe incorrect parameters such as bit_rate, rate, width or height
Conversion failed!
In that case, with the scale parameter, use -2 instead of -1, as below:
ffmpeg -i "D:\Videos\HP Chromebook 14 Review.mp4" -vf scale=-2:240 "D:\Videos\HP Chromebook 14 Review - 240p ffmpeg.mp4"
FFmpeg’s automatic keeping of the aspect ratio is especially helpful for bulk downscaling of videos in a folder to a specified resolution — 240p, 360p, etc.
Using Avidemux
We’ve covered the freeware decoder software Avidemux before. Here is how to resize/downscale a video using Avidemux.
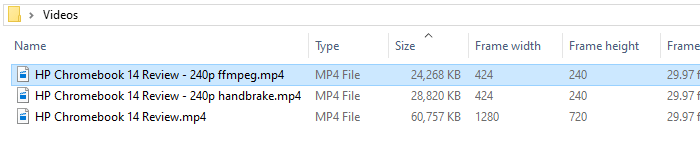
The original video is a Chromebook review video which is 720p which we’ll now covert to 240p using Avidemux.
Download Avidemux and run it. Open the video you want to resize using Avidemux.
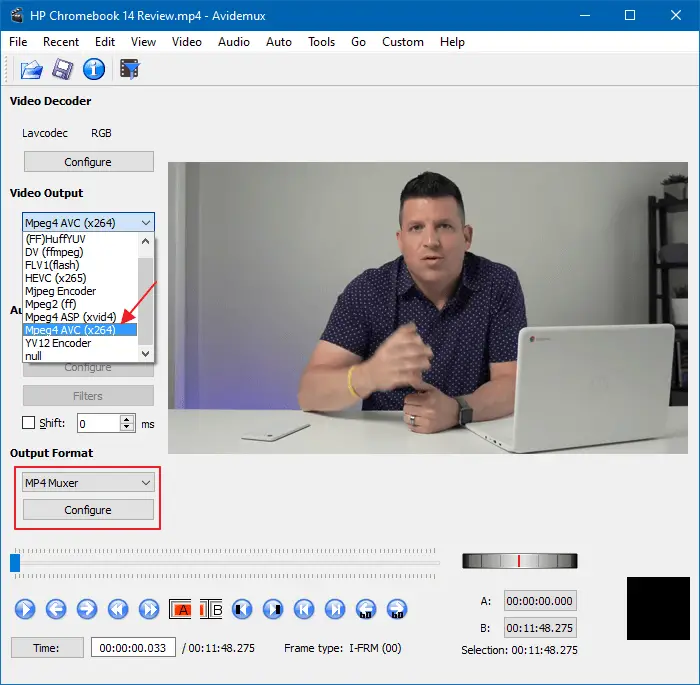
Select Mpeg 4 AVC (x264) or Mpeg4 ASP (xvid4). However, with the latter codec, the output video size was bigger when I tested.
Set MP4 Muxer as the Output Format.
From the Video menu click Filters, and add swsResize filter to the list of Active Filters.

The swsResize configuration box opens. With the Lock Aspect Ratio box checked, input one of the dimensions (Width or Height) so that the other is automatically adjusted while maintaining the aspect ratio. Alternately, you can use the slider at the bottom to downscale or upscale the video by a certain percentage.
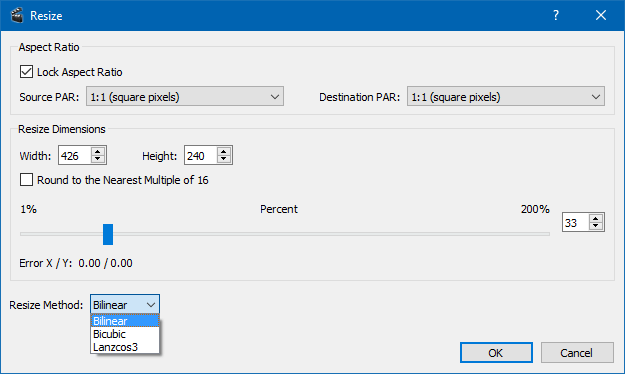
Three resize methods are offered. Here is the official explanation of the three resize methods.
- Bilinear: Tends to smooth the picture, but makes the video easier to encode. Appropriate for downsizing.
- Bicubic: Keeps sharpness and thus makes the video harder to encode (leads more easily to blocking-artifacts). Recommended for enlarging.
- Lanczos: Produces a very sharp picture and keeps a lot of details. Use it for HQ encodings at high bitrates.
Click OK to close the Resize dialog and click Close to exit the Video Filter Manager dialog.
Now, click on the Save button in the toolbar or File menu to save the output.
Note: In our test, the Bilinear method produced the output with lower file size, Bicubic a bit higher, and the Lanczos method the highest. The output file sizes are given below. You may be able to further reduce the output file size by changing the quality settings by clicking the Configure button under the Video Output section in the main screen.
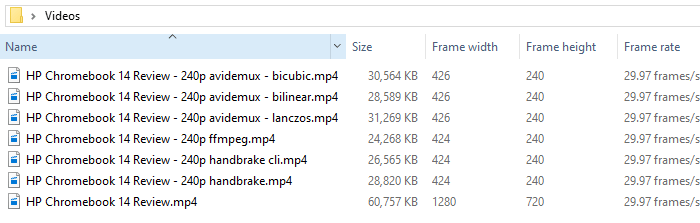
Of all the four methods, the smallest file size was achieved using FFmpeg.exe. However, as each software has different default (quality) settings, you should be able to adjust them in the respective software to get the optimal output file size as you require. And, as a side note, the swScale functionality in Avidemux may be using the FFmpeg library in the background.
Hope the article helped you resize or downscale a video easily using GUI or batch rescale using command-line.
One small request: If you liked this post, please share this?
One "tiny" share from you would seriously help a lot with the growth of this blog. Some great suggestions:- Pin it!
- Share it to your favorite blog + Facebook, Reddit
- Tweet it!
It helped me a lot. Thank you!