Using the the built-in options in Windows 8 and Windows 10, you can view or change the password only for the active Wi-Fi connection. This post explains how to view stored passwords for all Wi-Fi profiles in the system.
View Wi-Fi Password for the Active Wi-Fi Profile
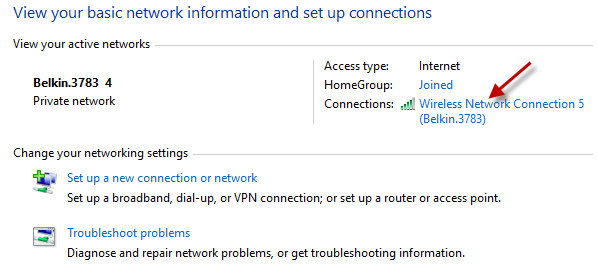
To view the Wi-Fi password or security key for the active connection, open Network and Sharing Center in the Control Panel.
Click the Wireless Network Connection
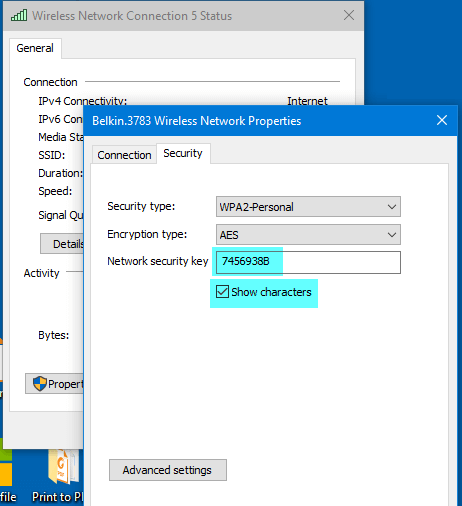
Click Wireless Properties, and click the Show characters check box.
Note: If you’re using Windows Vista or 7, the Manage Wireless Networks option can be used to view or maintain your Wi-Fi profiles. Since this feature was removed in Windows 8 and higher, you need to use the Netsh command-line tool or a 3rd party tool to accomplish the same.
Recover Stored Passwords from All Wi-Fi Profiles
If you have multiple Wi-Fi profiles, you can use one of these methods to get the Wi-Fi passwords for all the profiles.
Using NirSoft’s WirelessKeyView
WirelessKeyView utility from NirSoft recovers all wireless network security keys/passwords (WEP/WPA) stored in your computer, and allows you to easily save all keys to text/html/xml file.

You can also export your wireless keys into a file and import these keys into another computer. Key (Ascii) is the field you should be looking at, which contains the passwords in clear-text.
Using Netsh Command-Line
If you want to manage your Wi-Fi connections without using a 3rd party tool, use the Netsh command-line utility.
Open a Command Prompt window. In Windows 8 and 10, press WinKey + X to access the Power User menu, and click Command Prompt.
Type the following command and press ENTER:
netsh wlan show profiles

This shows the list of Wi-Fi profiles. To view the settings and password for the profile named "Belkin.3783" in the above example:
netsh wlan show profile name="Belkin.3783" key=clear

Look for the line "Key Content" which shows the password in clear-text.
Similarly run the command for every other Wi-Fi profile you want to view the stored password.
Classic Shell Users
If you’re using the excellent Classic Start Menu (Classic Shell) to replace Windows 8 & 10 Start menu, you can add Manage Wireless Networks to the Start menu and display it as a menu. Although the Manage Wireless Networks has been phased out in Windows 8 and higher, it works fine when added as a menu in Classic Start Menu.
Open Classic Start Menu settings, and add a custom menu item with the following target:
shell:::{1fa9085f-25a2-489b-85d4-86326eedcd87}
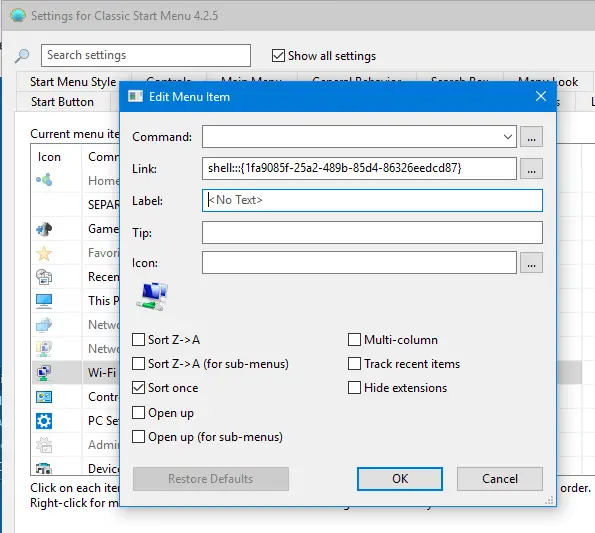
Configure it to Display as a menu.
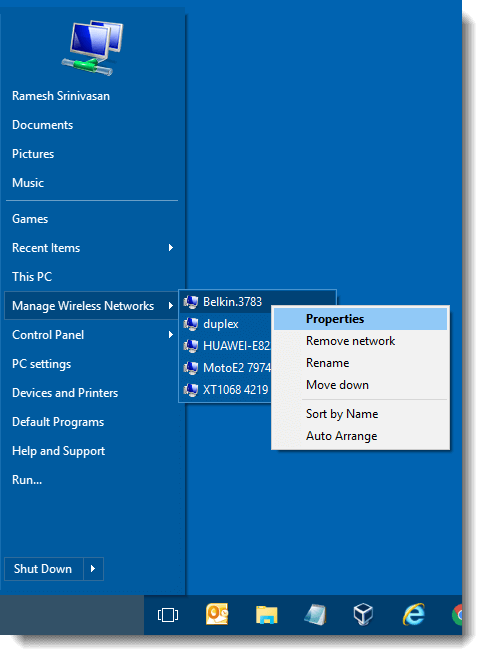
Right-click a connection and click Properties. This opens the Wireless network Properties page of that connection (ref: Fig 2).
Thanks to Gaurav for the excellent Classic Start Menu tip!
One small request: If you liked this post, please share this?
One "tiny" share from you would seriously help a lot with the growth of this blog. Some great suggestions:- Pin it!
- Share it to your favorite blog + Facebook, Reddit
- Tweet it!