When importing photos from your camera or SD card via AutoPlay dialog using the Photos app, many sub-folders (month and year-wise) are created in the destination folder, which may not be what you wanted. Here is a step-by-step guide that explains how to move all files recursively from multiple subfolders to a single folder of your choice.
For example, here is how it gets imported when using the Photos app.
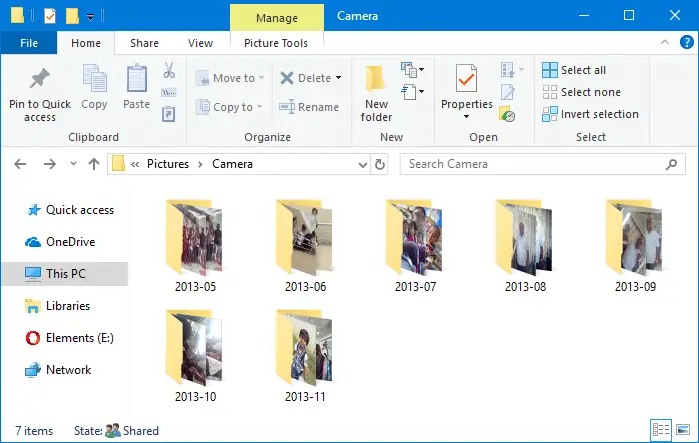
The mobile phones and cameras also may store your photos in many subfolders under the DCIM folder.
For instance, in Apple iPhone, your photos and videos are stored in the 100APPLE folder under DCIM. The 100APPLE folder contains IMG_0001.JPG to IMG_0999.JPG. If you have more images or videos, then they’re stored in 101APPLE , 102APPLE directory, and so forth. If you’re using iCloud to store photos and videos, you’ll also see the folders namely, 100CLOUD, 101CLOUD, and so on.
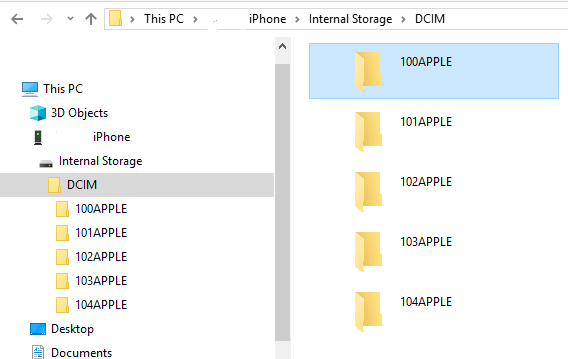
Copying the files from each subfolder to a single folder on your hard disk manually can be a tiresome task, especially if you have a large number of folders. However, you don’t need to dig into every folder to do that, as there are several ways to quickly copy or move files from all the subfolders to a single folder — i.e., flatten a directory structure.
Flattening a directory structure
Move or Copy Files in Subfolders to a Single Folder
You can copy or move files from sub-folders to a single folder using at least three different built-in ways in Windows. This procedure is also known as flattening a directory structure. Follow one of the three methods, whichever one you find easy.
Method 1: Using Command-line
Scenario: Let’s copy all files from the d:\vacation snaps\2016 folder and sub-folders to the d:\all snaps folder recursively.
- Open a Command Prompt window.
- Run the following commands, one by one and press ENTER after each line:
md "d:\all snaps"
cd /d "d:\vacation snaps\2016"
for /r %d in (*) do copy "%d" "d:\all snaps\"
This recursively copies all files in the
d:\vacation snaps\2016\folder to thed:\all snaps\folder. To move the files, replacecopywithmove
If a file of the same name exists in the destination, you’ll be asked if you want to overwrite or skip the file.
Note: It’s always safe to include the trailing backslash (\) after the destination folder path, as in the above example. Because, without the trailing slash, if the destination path is missing and you run the command, then the files in the folder and subfolders are copied and combined into one single file named all snaps to D:\ drive.
Method 2: Using the Libraries feature in Windows
The Libraries feature, first introduced in Windows 7, is also available in subsequent versions, including Windows 10. Libraries are virtual containers for users’ content. A library can contain files and folders stored on the local computer or in a remote storage location. Windows libraries are similar to “Saved Search” and are backed by full content search and rich metadata.
You can aggregate content from multiple storage locations into a single, unified view using Libraries. Let’s use the Libraries feature in Windows to flatten a directory structure.
Let’s say we have a folder structure like this:
D:\PHOTOS
└───Camera
    ├───2018-01
    ├───2018-02
    ├───2018-04
    ├───2018-05
    └───2018-07
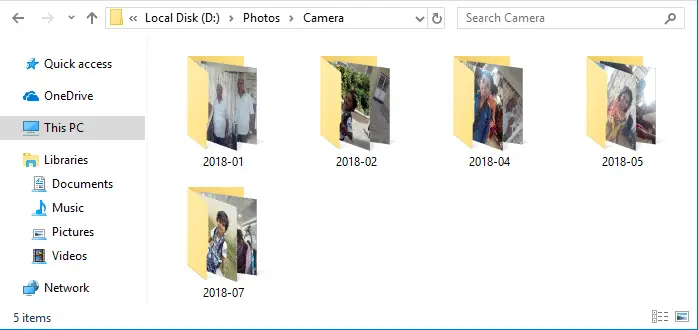
Under each folder, we have several photos imported from the camera. To flatten the Camera directory structure and consolidate all images in a single folder, follow these steps:
- Open the top-most folder (i.e., Photos) whose structure you want to flatten.
- From the File menu, click Options. Click the View tab
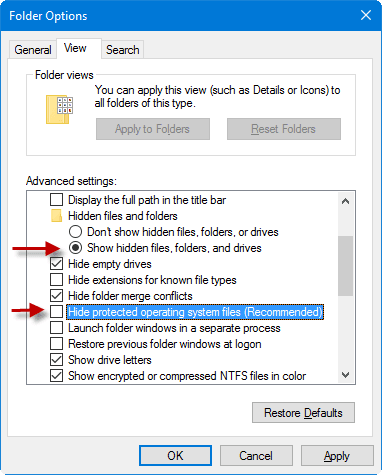
- Enable Show hidden files, folders, and drives
- Uncheck Hide protected operating system files (Recommended)
- Click OK.
- Right-click on the parent directory (i.e., Camera in this example), and click Include in library → Create new library.
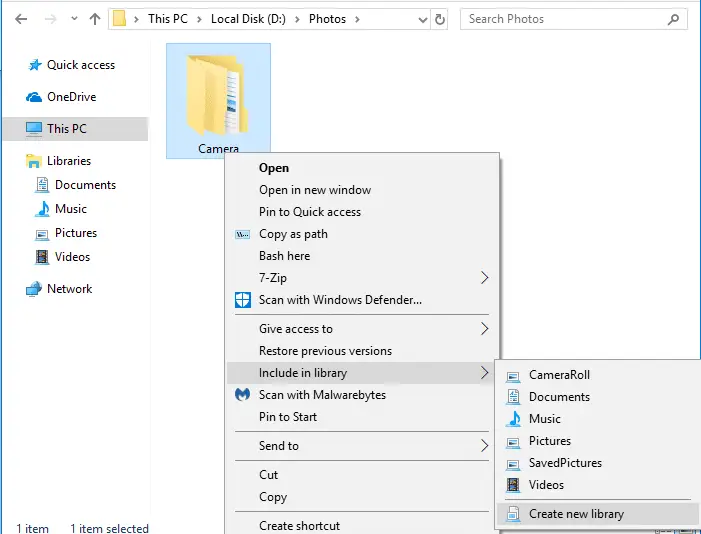
A new library is created with the same name as the folder. - In the left pane of File Explorer, expand Libraries and select the newly created library.
- By default, the items in libraries are arranged by Folders. To have an aggregated view of files in that directory structure (and hide the folders), right-click an empty area in the library and click Arrange by → Name
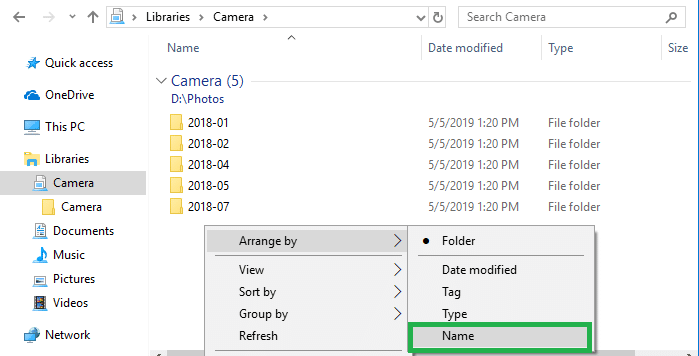
- Select the Home tab.
- Click Select all in the ribbon, or press Ctrl + A to select all the files in the library view.
- Click on the Move To or the Copy To button, as per your requirement.
- Select the destination folder to copy/move the files to, and click Move (or Copy)
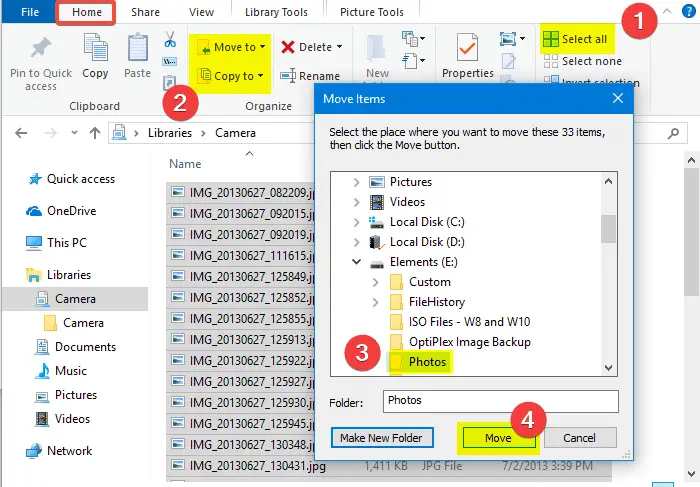
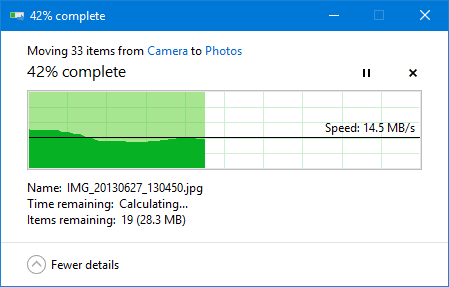
The files in the Camera folder and its subfolders are now copied/moved to the destination; the folders remain.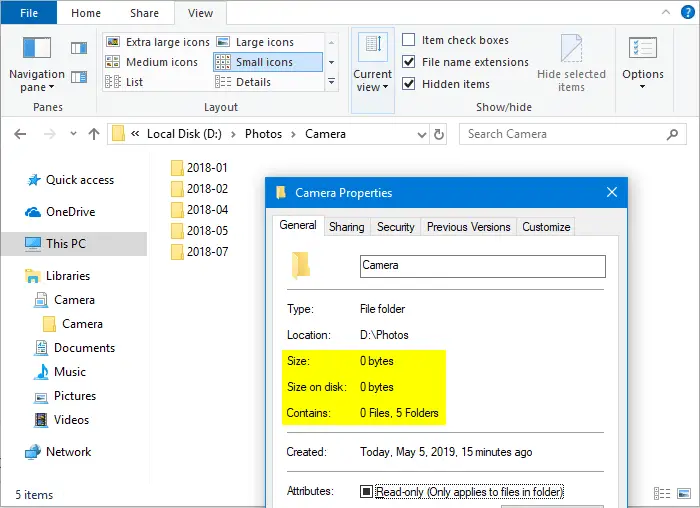
- Delete the Camera library if you no longer need it.
Next, we’ll see how to accomplish the same using Windows Search in Method 3 below.
Method 3: Using Windows Search
Using Windows Search is another easy way to flatten a directory structure if you don’t prefer the command-line.
- Open the parent folder (the top-level folder), which contains many sub-folders.

- From the File menu, click Options. Click the View tab

- Enable Show hidden files, folders, and drives
- Uncheck Hide protected operating system files (Recommended)
- Click OK.
- In the Search box, type the following search query, exactly as below:
*.* NOT type:"file folder"
A note about the above search query:
We’re using theNOToperator to prevent Windows search from listing the file-system folders (directories) — as we’re only going to copy or move the files and not the folders themselves.- The search query
*.* NOT "file folder"works only on indexed locations. If your source folder location is not indexed, then use*.*
Yes. You can use
*.*(which will list folders in search results). If so, when you reach Step 8, you’ll need to select all files leaving out the folders shown.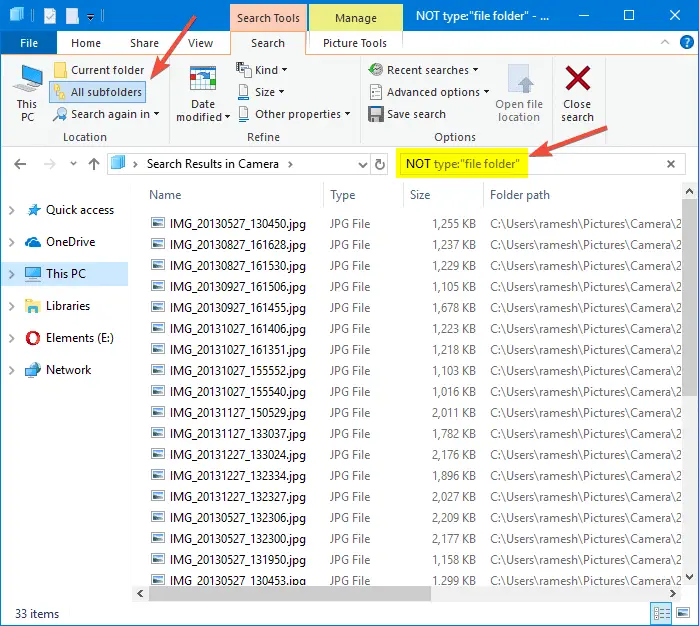
- The search query
- With the All subfolders search option enabled by default, Windows Search starts searching for all matching items in all sub-folders, recursively. It lists all matching files, including those with System or Hidden (or both) attributes.
- Wait until the search is completed, and then select all search results by pressing Ctrl + A.
- Select the Home tab.
- In the Home tab, click on the Copy To button. To move the files instead of copying, click the Move to button instead. Click the Choose location… option in the Move To dropdown menu.
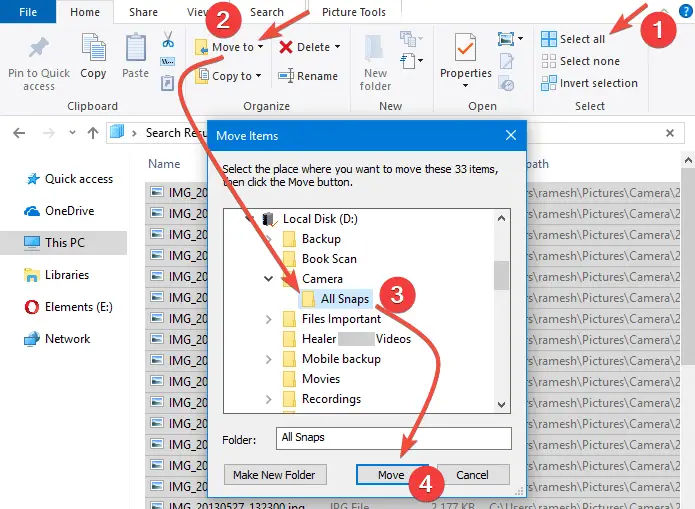
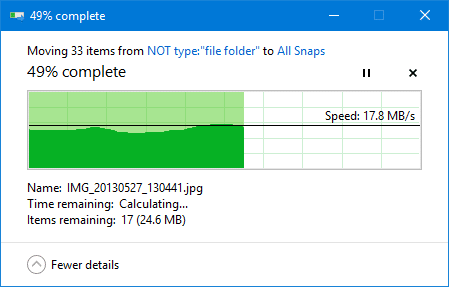
- In the Move Items dialog, select the folder where you want to move all the files. To create a new folder, click the Make New Folder button and give the folder name accordingly. Once selected the folder, click Move. This moves all the files recursively from the multiple sub-folders to the destination folder chosen.
Method 4: Using 7-Zip
7-Zip is not just a compression utility, but it also has file management capabilities that can be useful for other purposes. 7-Zip supports the “Flat View” feature that can help us quickly locate files in multiple subfolders, or copy them to a different location.
- Launch 7-Zip and browse the parent folder.
- From the View menu, enable Flat View.

- Select all the files, leaving out the folders.
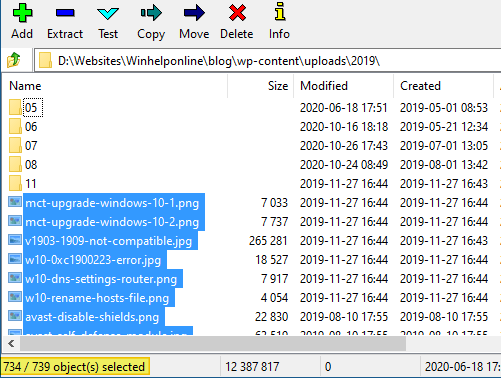
- Right-click on the selection and select Copy To…
- Mention the target folder path, and click OK.
That’s it. The selected files are copied to the selected folder (flattened.)
Note that you can also enable the “2 Panels” view via 7-Zip’s View menu and copy the files by dragging to the desired folder in the right pane. You must make sure to press the Ctrl key while dragging. Or else, the files will be moved to the target location instead. Pressing the Ctrl key ensures the drag operation is “copy.“
Method 4: Using Total Commander
If you’re using the Total Commander file manager software, you can flatten a directory structure easily.
- Launch Total Commander and open the folder that you want to flatten.
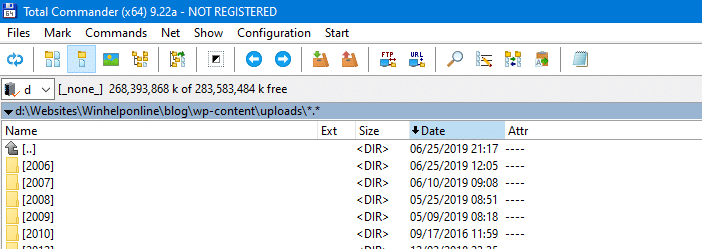
- Press Ctrl + B to change the mode to Branch view. Alternatively, you can enable Branch View (With Subdirs) via the Commands menu. The Branch View is a view mode where files from the folder and subfolders (recursively) are listed, and the folders are not displayed.
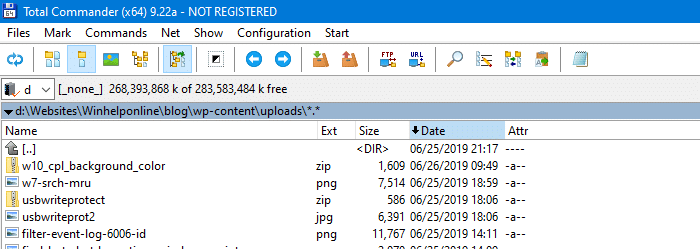
- Select all files in the list, and click the Copy button (F5) at the bottom. To move the files, click the Move button (F6).
- Select the target directory, uncheck Keep relative paths and click OK.
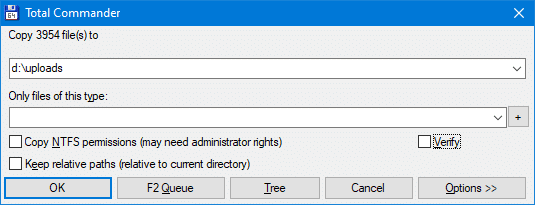
That’s it. This copies or moves all the files in the source directory tree to the target folder (flattened).
Making sure every file has been moved successfully
Important: Windows Search may not list every file in search results in some cases, either due to indexing issues or if the “Temporary” attribute is set for a file. It’s prudent to ensure that there are no files left behind at the source location, before clearing out those folders.
RELATED: Windows Search Not Finding Google Drive Files and Folders
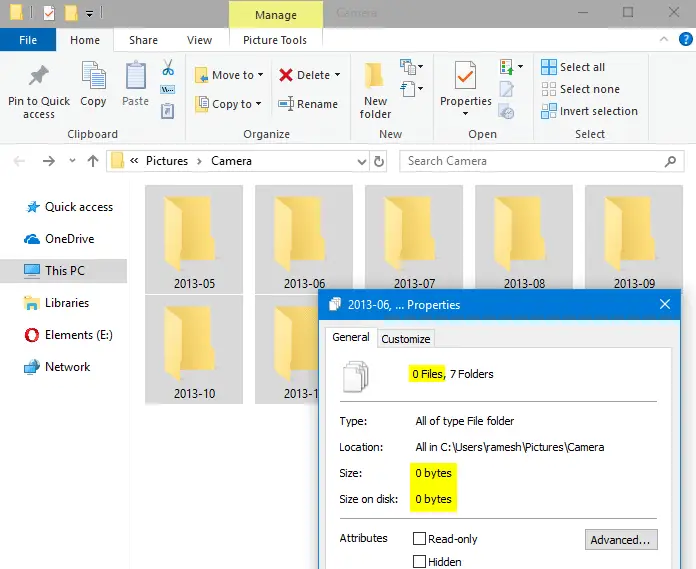
To verify that, right-click the parent folder (or select all sub-folders and right-click) in the source location, and click Properties. If you had moved the items instead of copying, the Properties tab should say “0 Files“. That means every file has been successfully moved to the new location.
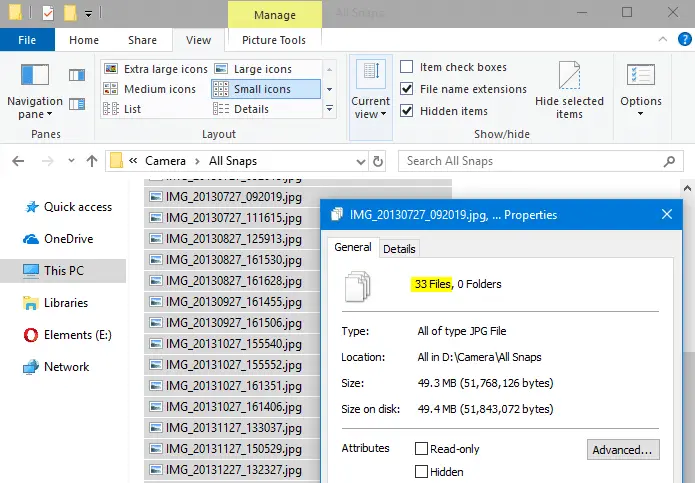
Alternately, you can check the Properties tab in the destination path and make sure the number of files is the same (total 33 files, as seen in the image under Step #6 above).
Once you ensure every file has been moved, the folders in the old location can be deleted.
This post takes the case of photos imported from a camera. But the procedure to move or copy all files from multiple sub-folders to a separate folder (aka “flattening a directory structure”) is the same for all other situations.
One small request: If you liked this post, please share this?
One "tiny" share from you would seriously help a lot with the growth of this blog. Some great suggestions:- Pin it!
- Share it to your favorite blog + Facebook, Reddit
- Tweet it!
Thank you so much. You saved so much time of mine. I was coping my music list, folder by folder and pasting the content into one folder.
Thank you for your help. Saved buying unneeded software by know ing how to fully utilize Windows.
Thanks a Tonne! It worked, it helped me to move photos from 100+ Folders. Thanks Again.
That’s cool. Thankyou very much….
How can i run this in a batch file?
Because the following code is not working when I put it in batch file and execute.
md “d:\all snaps”
cd /d “d:\vacation snaps\2016”
for /r %d in (*) do copy “%d” “d:\all snaps\”
use %% rather than % if in a batch file
Nice one, massive help!
I wanted to just copy the (*.wma)s from multiple directories under a main directory, which had other files, into one directory for simple sharing. This was perfect! Thank you for saving me time now and in the future!
example: open Command prompt and type
cd /d “/path/to/originating-folder”
for /r %d in (*.wma) do copy “%d” “/path/to/destination-folder”
@MP Ramkumar (and anyone else, like me, who had this question:)
In a batch file, use %% where you use % from the command line:
for /r %%d in (*) do copy “%%d” “d:\all snaps\”
This article was so helpful!! Thank you for taking the time to write it
Hi,
Thanks for the tip. I used the option with Total Commander and it speeds things up a lot.
Thank you so very much for all the time and careful thinking you put into this. This is the 6th place I looked and was by far the best.
This is really nice, Thanks a ton.
thanks a lot for you
i earn a lot of time with this script
What about duplicate file names (with different images) or de-duplicating images? Can this be done as well?
Thank you – Superb Guide – Shared to FB
Use the windows search. Select all the folders and search in the file extensions of the photos i.e. *.jpg or *.png and when it comes up with all the files listed with those extensions in those folders, select all of them, cut and paste into another folder. Do this once with all the file extensions – jpg, png, mov, whatever until those folders are empty. This, I’ve found, is the easiest and quickest way to do it, and then when all the folders are empty, just delete the empty folders.
Thank you so much. It was very helpful. 🙂
Amazing. Thank you
Thanks for your TIP
Very Nice info and too easy to use
This was invaluable and “Total Commander” shareware was my preferred-visual/GUI method that avoided having to code. Now finally 10 years of scattered pics on multiple harddrives in one location (centralised and backup-able); now time to use DigiKam and organise those memories…Thanks a million 🙂
@eedjut: Excellent to hear. Thanks for the feedback. 🙂
Great and easy explanation! Very helpful. Save hours of manual transfer! Thank you!
How can one reverse this? I forgot to go into the main folder and was up one level. Now I have files I have no idea where they came from. LOL. So I cancelled the command prompt window to stop it from continuing but I can’t figure out where the files came from.
I can’t edit my question… I changed ‘copy’ to ‘move’ and thus my problem. I think I figured out where the files came from but before I move them, there’s no magical command to undo the move right?
@ColtonYYZ: I think the Windows shell offers you the “Undo move” command (in the folder background context menu) if you access it immediately after the wrong move operation.
The 7zip option is by far the fastest and more efficient! Thanks.
Thank you so much .. god bless you man u saved my hours of work.. Kudos to you man
Brilliant! I use the cmd and it does the exact job I want. Thank you so much!
thanks a lot for great help.
It will be great if Over right all you can give with the last copy command for this line “for /r %d in (*) do copy “%d” “d:\all snaps\”
actual same name file command is asking again and again for over right