When you open Windows Security → Virus and Threat Protection → Manage Settings → Add or remove exclusions, you may be able to delete the exclusions by clicking on the “Remove” button.
Also, the Remove-MpPreference PowerShell command may not help.
Cause
The exclusion may have been added as a policy setting. The policy setting needs to be removed using the Registry Editor or the Group Policy Editor.
Resolution
To remove the exclusions (policy), follow one of these methods:
Option 1: Remove Microsoft Defender Policies
- Download defender-policies-remove.reg (zipped).
- Unzip and run the enclosed REG file. After running it, you may want to open the Registry Editor to ensure the “Windows Defender” Policies key doesn’t exist.
- Once done, restart Windows for the changes to take effect.
If you’re unable to apply the above registry file, launch Windows in Safe Mode and try merging the file again.
This removes all the Defender-related policies from the registry.
(For more information, see the article Microsoft Defender: “Managed by your administrator” or “Your IT administrator has limited access”)
Option 2: Delete the “Exclusions” manually
- Start Regedit.exe and go to the following key:
HKEY_LOCAL_MACHINE\SOFTWARE\Policies\Microsoft\Windows Defender
- Expand the “Windows Defender” key.
- Right-click on the “Exclusions” subkey and choose Delete.
- Exit the Registry Editor.
reg delete "HKLM\SOFTWARE\Policies\Microsoft\Windows Defender\Exclusions" /f
Press Enter.
Equivalent Group Policy setting
Computer Configuration → Windows Components → Microsoft Defender Antivirus → Exclusions
Set “Extension Exclusions”, “Path Exclusions”, and “Process Exclusions” to Not configured.
Option 3: Delete the “Exclusions” via Windows RE
If the exclusions can’t be removed when Windows is running, you can boot into Windows RE and delete the exclusions.
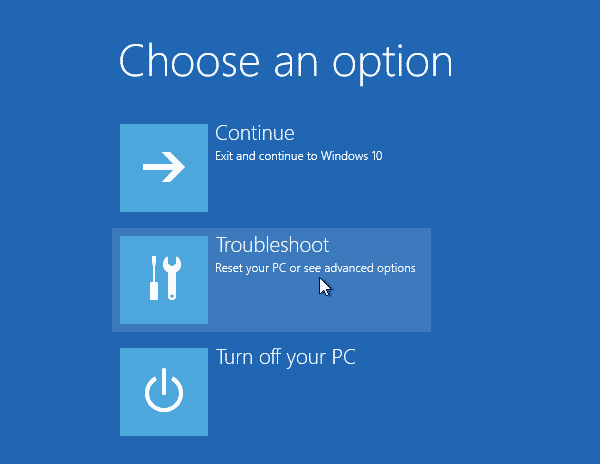
- From the sign-in screen in Windows 10/11, press and hold the SHIFT key on the keyboard.
- With the SHIFT key still pressed, click the Power button and then click Restart.
- In the Recovery Options menu, click Troubleshoot, and then click Advanced Options.
.png)
- Click Command Prompt.
.png)
- Find out the drive letter of your Windows installation by typing
bcdedit. If Windows was installed on C:\ drive, it might be assigned D:\ in Windows RE. The output of thebcdeditcommand shows the Windows drive letter, as seen from Windows RE.Note: On my EFI-based system, the bcdedit output stated that the OS drive-letter is (E:\)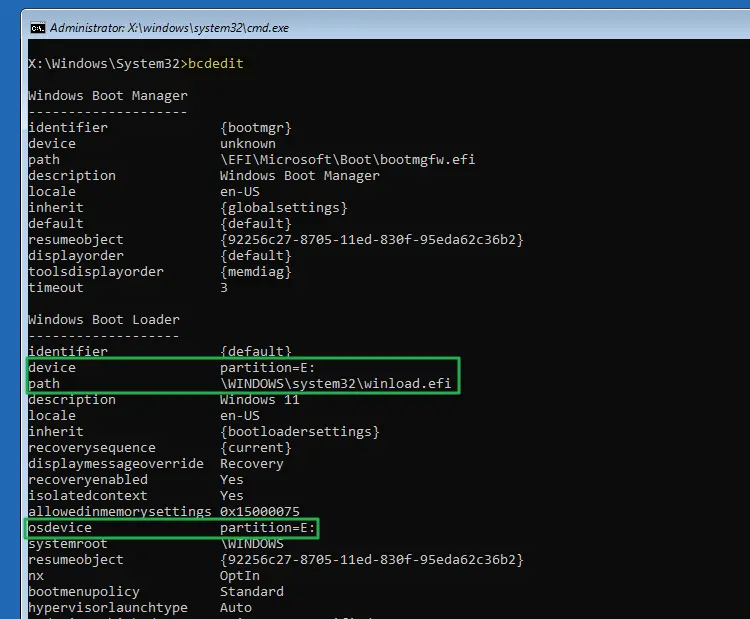
- Once you got the drive letter of your Windows installation (e.g.,
E:\), run the following commands:REG LOAD HKLM\S2 E:\windows\system32\config\SOFTWARE
REG DELETE "HKLM\S2\Microsoft\Windows Defender\Exclusions" /F
REG UNLOAD HKLM\S2
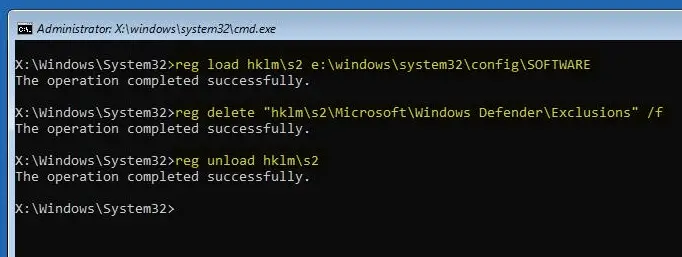
Important: For each command, you should see the output “The operation completed successfully.”
Option 4: Install Malwarebytes and set it as the default AV provider (temporarily)
- Install Malwarebytes from
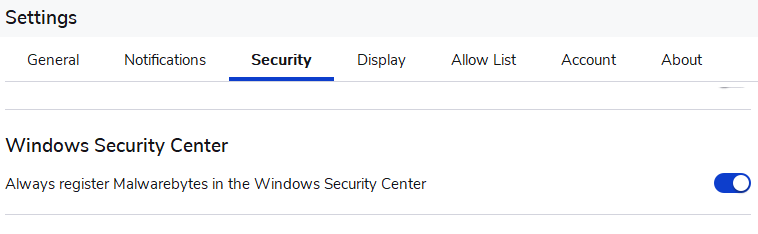
https://www.malwarebytes.com/and run it. - In the Malwarebytes Settings dialog, click “Security.”
- Enable “Always register Malwarebytes in the Windows Security Center” and wait 15 seconds or so. This turns off Defender real-time protection and sets Malwarebytes as the default antivirus provider.
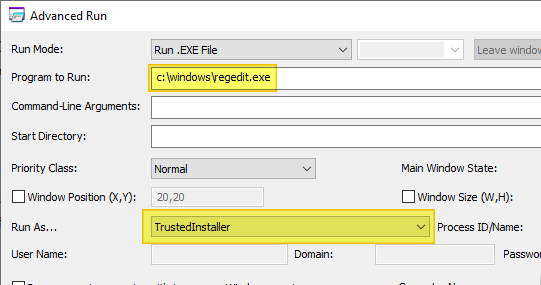
- Download “AdvancedRun” from Nirsoft.net, and run it.
- From the AdvancedRun window, start C:\Windows\Regedit.exe as TrustedInstaller. See this article for more information.
- From the Registry Editor window, delete the following key.
HKEY_LOCAL_MACHINE\SOFTWARE\Microsoft\Windows Defender\Exclusions\Paths
- Close Regedit.exe
- Disable “Always register Malwarebytes in the Windows Security Center.”
- Uninstall Malwarebytes (optional).
That’s it! The Defender exclusions policies are now removed. Exit Windows RE and boot into Windows.
One small request: If you liked this post, please share this?
One "tiny" share from you would seriously help a lot with the growth of this blog. Some great suggestions:- Pin it!
- Share it to your favorite blog + Facebook, Reddit
- Tweet it!
Thanks! My issue got resolved just by completing the first step. I had downloaded a software that seemed fine but actually contained a bunch of malware(and miner viruses). It added a bunch of script executing exclusions which I could not remove, I asked ChatGpt, it was unable to solve it, I searched on youtube, somehow no videos on this topic. But this managed to save my Laptop, thanks!
this is so helpful hope it gets more growth thanks!
единственная статья которая помогла, решение AdvancedRun, автору респект