Have you ever wondered how some of your mp3 files show up with the album art icon instead of the standard mp3 icon when browsing through the mp3 collection on the hard disk? Also, does the cover image appear in the background when playing an mp3 file using Windows Media Player or any other music player?

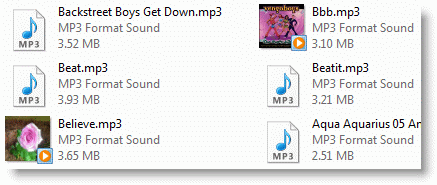
Thumbnail image of the mp3 files as seen in Windows Explorer.
Remove Album Art from MP3 Files
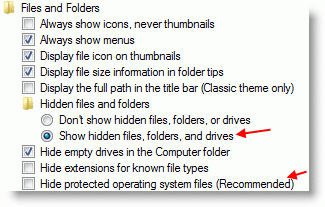
The thumbnail image can come from JPG album art images (super-hidden) within that folder or pictures embedded into each mp3 file. If you need to remove the mp3 album art/images for some reason, first configure Windows Explorer to show hidden and protected Operating System files. Use these steps:
- Press Win + R to launch the Run dialog.
- Type
control foldersand hit Enter. - Click the View tab
- Enable “Show hidden files, folders, and drives.”
- Uncheck Hide protected operating system files (Recommended)
- Click OK.
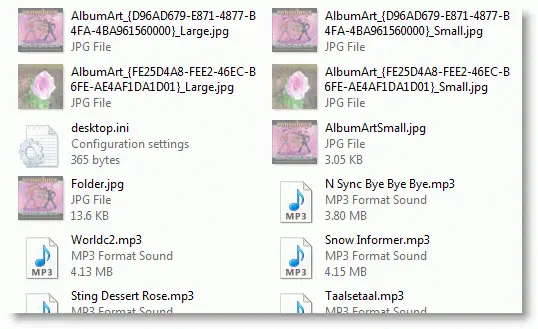
- Open the folder that contains the mp3 album, and delete the AlbumArt_{GUID}_Large.jpg, AlbumArt_{GUID}_Small.jpg and Folder.jpg images.
Does the Album art still appear?
If the album art still appears for an mp3 file or album, that could be coming from the pictures embedded into the mp3 file, and you need an ID3 tag editor to remove them. There are several freeware products available; I used Mp3tag, which supports Windows 7 through Windows 10.
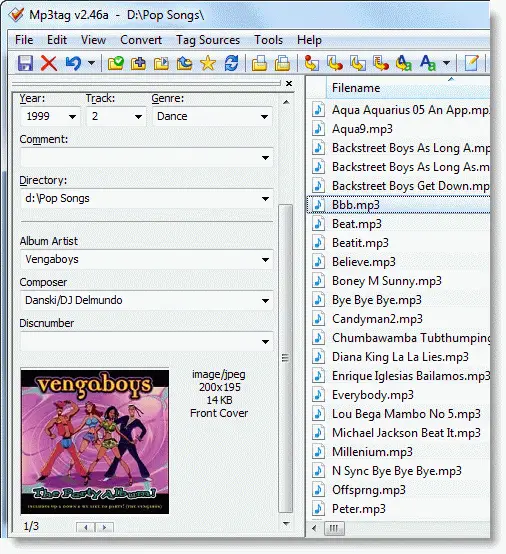
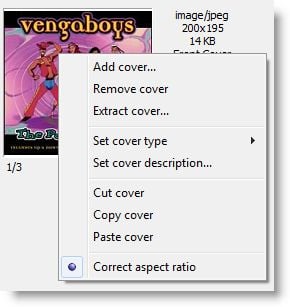
Select one or multiple mp3 files in Mp3tag.
Right-click on the image and click Remove cover.
Note: There can be more than one image for each mp3 file. Do this for every image if you’ve selected an individual mp3 file. However, if you’ve selected multiple files and clicked on the Remove cover option, it removes all the cover art images from all the mp3 files. This bulk removal method is very handy!
From the File menu, click Save tag.
That should remove all the album art images from the mp3 file.
Note that using Mp3Tag, you can also add additional album art images or change the “picture type” (cf. Picture Types ID3) for the image that’s already embedded onto the mp3 file.
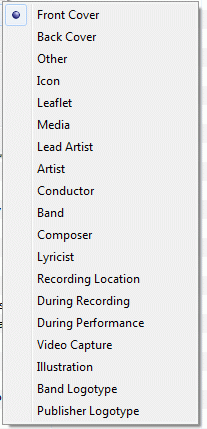
The above are the available options.
One small request: If you liked this post, please share this?
One "tiny" share from you would seriously help a lot with the growth of this blog. Some great suggestions:- Pin it!
- Share it to your favorite blog + Facebook, Reddit
- Tweet it!
that was extremely helpful , thank you so so much 😀
Does not work for me. I once added artwork in iTunes, and now it’s buried deeper than the MP3tag program can go. What to do next?
@Hercules: Check this link if that helps. https://forums.mp3tag.de/index.php?showtopic=17200
Interestingly enough, when I go into ITunes and import the folder, then I right click the song in iTunes, and select “convert ID3 tag” and under that “reverse Unicode” it comes out in all Chinese letters. So something happened here someplace, not sure where or when, got to do this and get rid of the reverse Unicode version I suspect, is where these artworks showing over the top of my self installed custom AlbumArtSmall.jpg files I put in the folder.
Sorry for yet another comment, but I have solved this issue in the only way I can. This is by going back into iTunes, locating the old mp3 entry to its new location, and updating the new artwork to the new AlbumArtSmall.jpg I created to the folder…this appears to remove the old batch mp3 image it had, and include the new custom image. Unfortunately there is no batch way currently available to me to do this. Which is part of the whole custom process. This works if you have embedded mp3 artwork, and can’t override with simply creating an albumartsmall.jpg to the folder it’s in.
@Hercules: Great. thanks for letting know. I’ll try what you said in iTunes later this week.
Excellent … It works – thanks 🙂
It worked perfectly, thank you guys!! Keep it up!
Great help! The art was interfering with mp3’s I use in my marathon running. I almost felt like I hit a brick wall when J had to stop to skip through the album art! Now I can enjoy the run the whole way through! Thank you!
Thanks so much for sharing this. it works, but when playing the mp3 the cover images is still shown what can cause this
If the album art is still appearing in Windows Media Player do the following:
WINDOWS KEY + R
Type: control folders
Press Enter
Click “View”
Click the dot for “Show hidden files, folder, and drives
Uncheck the box for “Hide protected operating system files (Recommended)
Next on the bottom right pres “Apply” then “OK”
Next click on your (C:) drive if that is where your user account is located and click the following in order to get to the album art cache:
Users
YOUR ACCOUNT NAME
AppData
Local
Microsoft
Media Player
Art Cache
LocalMLS (this is where the album art cache is)
Next delete the album art you don’t want and delete it from the Recycle Bin, refresh the folder or restart your computer if it still isn’t disappearing when you go to play the mp3 and it should be gone. If not, make sure you have deleted all the hidden album art files in the folder where the mp3 is located.
How I use MP3TAG to remove two or more thumbnail images from an mp3 music. I do the following exactly to have perfect result. In your folder of mp3 files, click to select all mp3 files you want to work on. Some mp3 files may not have thumbnail or cover art, you can still drag them over as they will not have any effect. Again Select all music files by highlight them or by Ctrl+A then drag onto MP3TAG WORK SPACE . Again, drag selected files onto work space.
Then with cursor in workspace hit Ctrl-A to select all files on workspace then notice that square bottom left turns blank with a blank disc image.
Then, put cursor over that image then right click on that Disc image in large SQUARE in lower left corner, to see when you RIGHT CLICK popup with option to REMOVE COVER (means thumbnail) so click Remove Cover.
After that while leaving cursor over the disc square, you MUST HIT ctrl – S to SAVE and see popup showing progress of removing covers.
Then to clear mp3s from workspace as changes made to actual files in their folder, click a blank area in workspace then select all again or Ctrl A then hit Delete key.
Note – assure you select Remove Cover and press Ctrl+S to Save result – and – SEE A POPUP showing progress of removing cover thumbnail art. Then as mp3s still on workspace, do Select all using Ctl-A, then click Delete key to clear workspace.
Sorry if any typos as english not my first language.
Awesome my friend. This solved a pesky image problem embedded in some of the tracks in my music collections. Appreciate your help.
Thanks! Mp3tag worked for me.
Thank you, Thank you, Thank you,
Awesome! I’ve been looking for a program like Mp3Tag for years! Thanks a million for recommending it.
Like I have 30,000 Mp3s doing it one at a time doesnt cut it
This is fantastic, I have 2500+ unique tracks in a folder in the car, the family keep changing the source when I’m not in the car, I changed all the cover art to a picture of my car, now I just glance at the in car screen to see if it’s my stuff playing, as we share a few tracks across several folders I dontt always know right away if it’s my folder playing, but now I do, and the bonus is the never changing art work drives the kids mad, hey it’s my job, I’m a dad !!
Awesome. I’ve FINALLY removed those pesky MP3 covers that some Music Apps refuse to display correctly. Thank you very much.
Thank you. Mediamonkey failed to remove the cover picture. I have uninstalled it. MP3Tag is the best.