The HomeGroup feature in Windows made it possible for novice users to share file and printer quickly. You could share pictures, music, videos, documents, and printers with other people in your home network. However, starting with this build (April 2018 – Version 1803), the HomeGroup service is no longer operational in Windows 10. So, what’s the alternate for HomeGroup?
This post explains how to share files and printers on your home network, without using the HomeGroup feature. The HomeGroup alternate file and printer sharing Instructions in this article apply to Windows 7 through Windows 10.
Why was HomeGroup Removed?
 Here is the official (Microsoft) explanation of why the HomeGroup feature was retired.
HomeGroup was terrific for the pre-cloud and pre-mobile era, but today this functionality is built right into Windows 10 and apps. The user profile used for sharing and the file/folder/printer shares will continue to work. Here are recommended alternatives to HomeGroup for you to get the best file-sharing experience in Windows 10 going forward:
- File Storage: OneDrive is a cloud-first, cross-device storage and collaboration platform for all of the pieces of data that matter most in your life – like your files, your photos, your videos, and more. OneDrive Files On-Demand takes cloud file storage a step further, allowing you to access all your files in the cloud without having to download them and use storage space on your device.
- Share Functionality: For those who prefer not to use the Cloud to connect their devices, the Share functionality for folders and printers allows you to see the available devices and connect them to and from other PCs on your home network.
- Easier Connection: No more remembering cryptic HomeGroup passwords in order to connect to another PC. You can now simply connect through your Microsoft Account email address across devices.”
Regardless of this Microsoft decision, shared network folders will still be available. You can open them in File Explorer by typing the name of the PC and the shared folder name in this format: \\homePC\SharedFolderName
How to Share Files without HomeGroup?
Step 1: Enable File & Printer Sharing and Network Discovery
- Click Start, click Settings (or press WinKey + i)
- Type “sharing” in the search box, and then select “Manage Advanced sharing settings” from search results. This opens the Network and Sharing Center -> Advanced sharing settings in the classic Control Panel.
- Click “Private” to expand the option.
- Enable “Turn on network discovery” and its sub-option “Turn on automatic setup of networked connected devices”
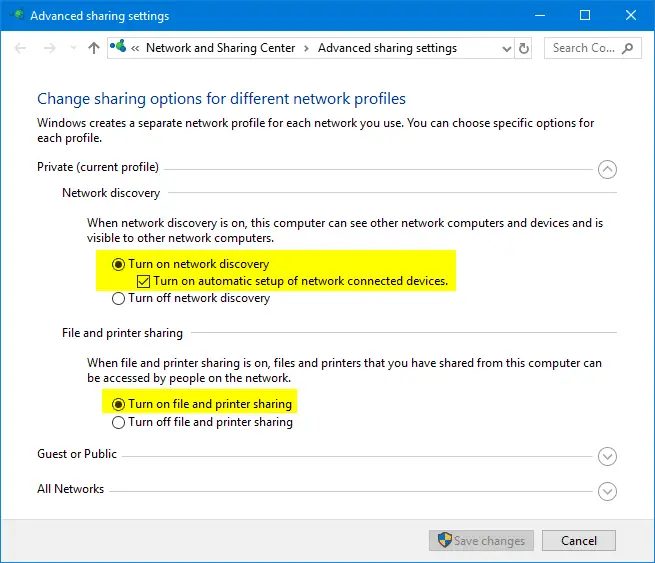
- Click “Turn on file and printer sharing” if it’s not already enabled.
- Now, expand the “All Networks” section.
- You can choose to turn on “Public folder sharing” (optional) or have it turned off, depending upon your requirement.
The Public folders are located at
C:\Users\Public, and these are the Windows default Public folders:C:\users\Public\Documents C:\users\Public\Downloads C:\users\Public\Music C:\users\Public\Pictures C:\users\Public\Videos
If Public folder sharing (disabled by default) is turned on, anyone who has access to your home network can read and write to the above Public folders on your computer.
- Expand “Password protected sharing”
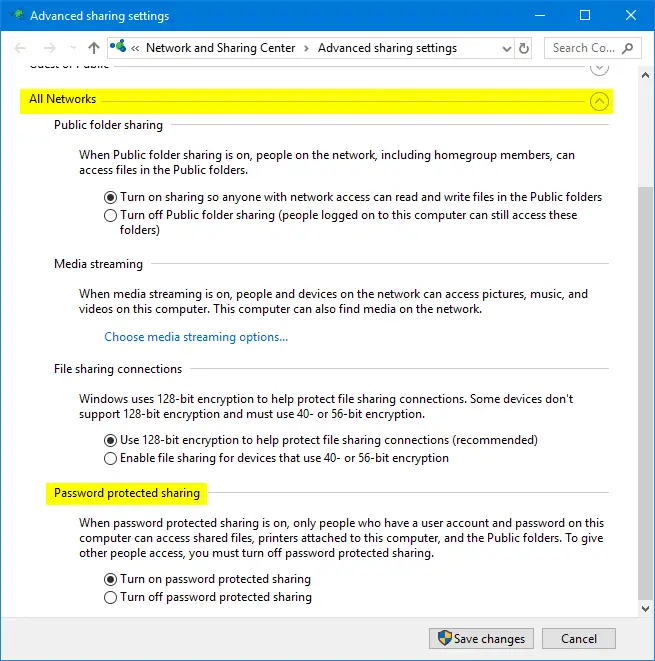
- In this section, you can choose to enable or disable password protected sharing.
Password protected sharing
If you turn on password protected sharing, only people who have a user account and password on this computer can access Public folders, shared files, printers attached to your computer. Some people create a dedicated user account on all of their home computers just for the purpose of sharing files and printers. To give other people access, turn off password protected sharing. By doing this, you don’t need to create that dedicated user account for sharing files and printers.
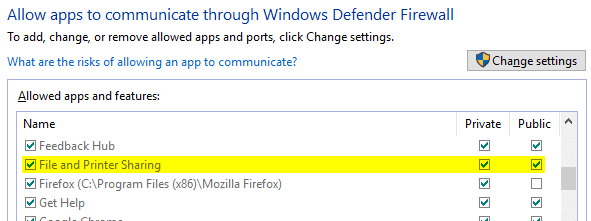
- Save your settings and close the Advanced Network Sharing applet. It configures Windows Firewall to add an exception for File and Printer sharing for the network you selected (private/public). Also, the network visibility or discovery is enabled automatically by the Advanced Network Sharing dialog.
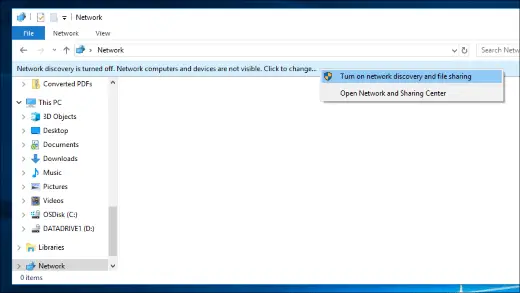
If you forgot to enable Network discovery, Network (File Explorer) will anyway prompt you to turn on network discovery and file sharing.
There are the services that shouldn’t be disabled if you want the network discovery to work correctly.
- Function Discovery Provider Host (Manual)
- Function Discovery Resource Publication (Manual)
- SSDP Discovery (Manual)
- UPnP Device Host (Manual)
- Configure the Advanced Network Sharing settings on each computer on your home network. After you do so, the list of computers will show up correctly under the Network (in This PC.)
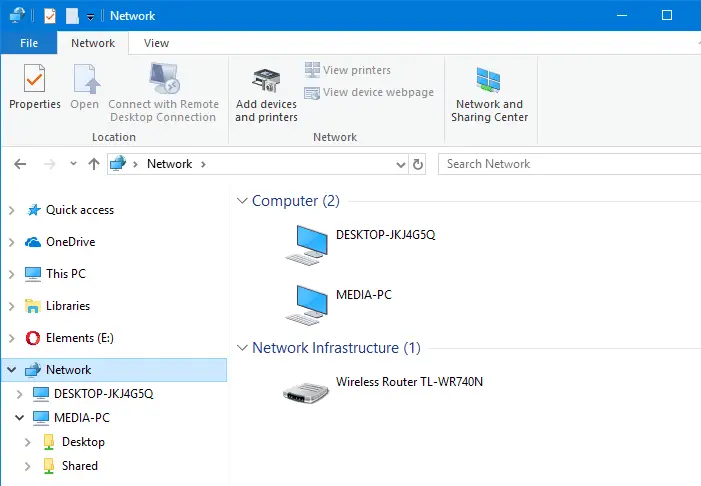
For each computer or resource displayed in the Network (Neighborhood), list of shares will be displayed. Note that if you had shared folders previously, they would still be available even after you upgrade to Windows 10 v1803 and above.
Step 2: Creating File/Folder Shares & Accessing Shared Resources
Creating File/Folder Shares
Now that network discovery and file and printer sharing settings are turned On, and the next step is to share files, folders or printers if not already done. Follow these steps:
- Right-click the file or folder you want to share, select Give access to, and click “Specific people.”
- In the “Network access” dialog that appears, select the users you want to share the folder (along with the files and subfolders):
Specific user — If you select an existing user account, the user must provide username and password to access the resources. In SOHO environments, admins usually create an account on each device that with the same username and password, and use it for file sharing purposes.Everyone — Allows to share content with anyone in your home network without the need to enter a password to access the files.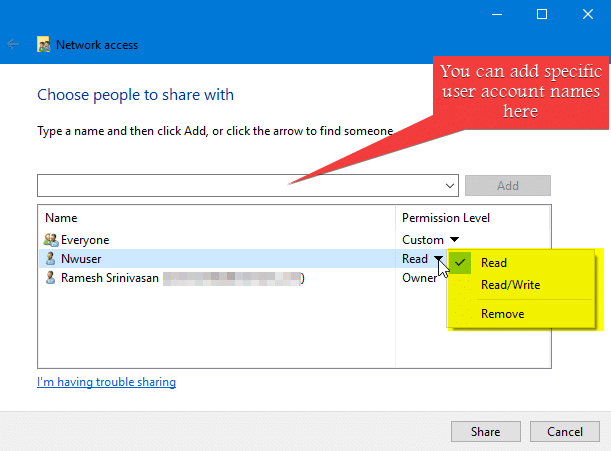
- Choose the desired Permission Level (Read or Read/Write) for the chosen user account or group, and click Share.
The file/folder is now shared on the home network.
Accessing a Shared Resource
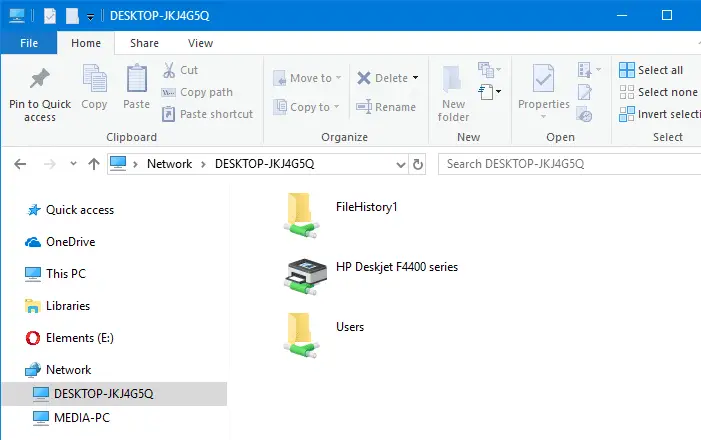
To access the shared resource from another computer, all you need to do is open This PC and select Network in the left pane. If network discovery is enabled, you’ll see the list of devices and the shares under each device.
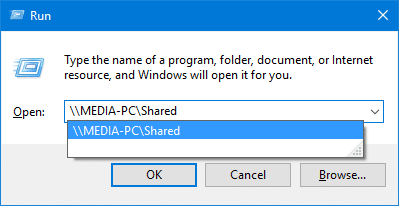
Alternately, if you know the device name and share path, you can open them directly in File Explorer by typing the name of the computer and the shared folder name in this format:
\\ComputerName\SharedFolderName
How to Share Printers?
- Open Printer & Scanner page in Settings
- Select your printer from the list, and click Manage
- Click Printer Properties
- In the printer properties dialog that opens, click on the Sharing tab.
- Enable “Share this printer”.
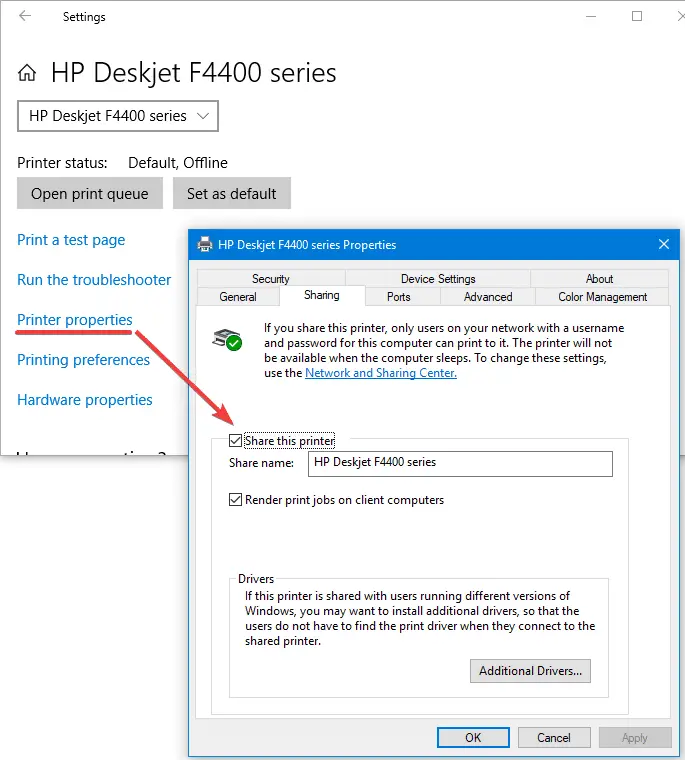
- Click OK.This makes available your printer on your entire home network.
That’s it! Hope the above guide helped you share files and printers on your home network without ever requiring the HomeGroup feature (deprecated since the Windows 10 April update.) Let’s know your comments!
One small request: If you liked this post, please share this?
One "tiny" share from you would seriously help a lot with the growth of this blog. Some great suggestions:- Pin it!
- Share it to your favorite blog + Facebook, Reddit
- Tweet it!
For Step 2, on the machine with shared resources, I had to go to Control Panel > Administrative Tools > Computer Management.
In the lefthand panel, open Local Users and Groups. Then open Users, and create a user account and password that the other machine will use for getting access to the resources.
It’s counter-intuitive that another machine needs a “local” account, but it works.
What you have not covered is credentials which is a pain