Do you find the Windows lock screen inconvenient and unnecessary? This post explains how to disable the lock screen in Windows 10 and 11.
The lock screen although conceals the login screen with a nice looking wallpaper, it takes an extra mouse click, touch, or keypress to go to the login screen where you input your credentials. This is not just during the first login, but every time you need to unlock a workstation – locked either due to screensaver or power options timeout, when resuming from sleep or hibernate mode, or the user has locked the workstation earlier.
How to disable the Lock Screen
You can disable the lock screen using the Do not display the lock screen Group Policy setting or its equivalent NoLockScreen registry-based policy setting.
Method 1: Using the Group Policy Editor
In Windows 10/11 Pro and higher, you can use the Group Policy Editor to disable the lock screen.
- Launch gpedit.msc and go to:
Computer Configuration > Administrative Templates > Control Panel > Personalization
- Double-click the Do not display the Lock Screen.
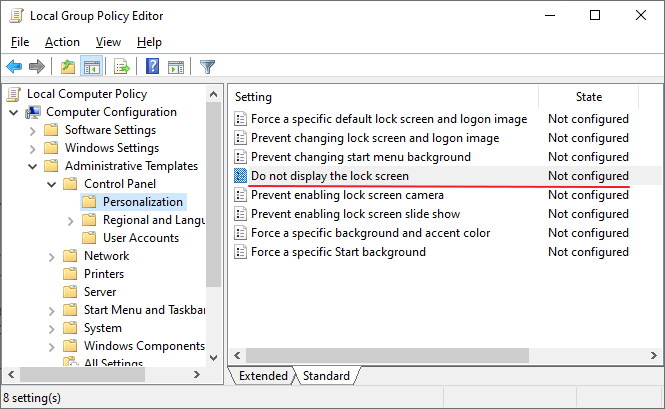
- Set it to Enabled.
- Exit the Local Group Policy Editor.
Method 2: Using the Registry Editor
In Windows 10/11 Home, you don’t have the Group Policy Editor. You can disable the lock screen using the registry. The registry edit is the equivalent of the above GPO setting, and applies to all Windows 10/11 Editions.
- Start the Registry Editor (
regedit.exe) - Go to the following branch:
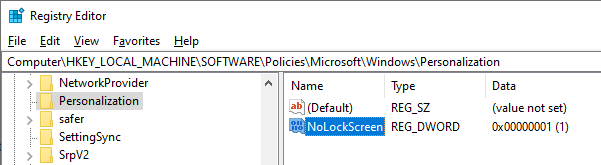
HKEY_LOCAL_MACHINE\SOFTWARE\Policies\Microsoft\Windows
- Create a subkey named Personalization
- Select Personalization and create a new DWORD (32-bit) value named NoLockScreen.
- Double-click NoLockScreen and set its value data to 1.
- Exit the Registry Editor.
(This article has been last reviewed in April 2024 and the above methods were verified to work on Windows 10 v22H2 and Windows 11 23H2.)
One small request: If you liked this post, please share this?
One "tiny" share from you would seriously help a lot with the growth of this blog. Some great suggestions:- Pin it!
- Share it to your favorite blog + Facebook, Reddit
- Tweet it!