The Windows Recovery Environment is powered by the Winre.wim image, usually located in the Recovery partition or, in some cases, in the OS partition itself.
You may have to back up your Winre.wim image in some situations, e.g., before or after servicing Winre.wim, or when you want to resize the Recovery partition.
This article tells you how to backup your winre.wim image using two methods.
How to Backup Winre.wim
Method 1: Without disabling Windows RE
Open an admin Command Prompt and run the following command:
reagentc /info
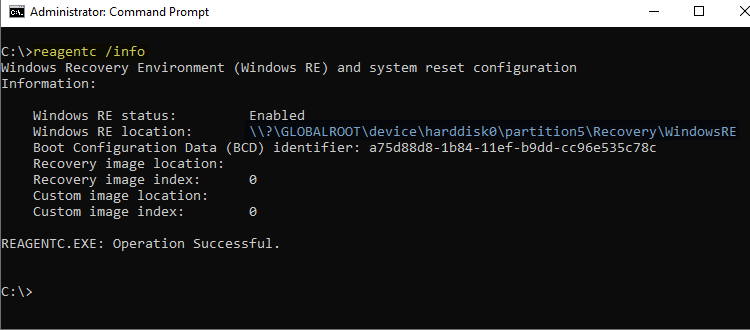
Note the Windows RE location from the output, which, in this example, is:
\\?\GLOBALROOT\device\harddisk0\partition5\Recovery\WindowsRE
Now, type the following commands to backup Winre.wim from the above location to a backup folder — e.g., C:\WinRE.
md C:\WinRE

attrib -s -h -r \\?\GLOBALROOT\device\harddisk0\partition5\Recovery\WindowsRE\winre.wim

cd /d C:\WinRE

copy \\?\GLOBALROOT\device\harddisk0\partition5\Recovery\WindowsRE\winre.wim
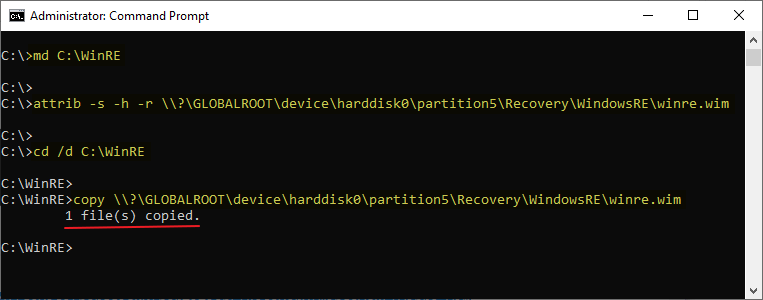
The WinRE image is now backed up to the “C:\WinRE” folder.
Method 2: By disabling Windows RE
Another way to backup Winre.wim is to disable Windows RE using the Reagentc.exe command-line. Doing so moves Winre.wim to the staging area — i.e., the “C:\Windows\System32\Recovery” folder.
To disable Windows RE, run the following command:
reagentc /disable
Now, see if Winre.wim is moved to the staging folder. To do so, run:
dir C:\Windows\System32\Recovery /a
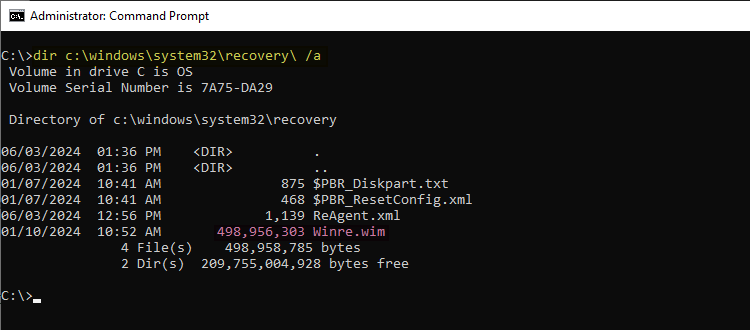
If you see Winre.wim in that folder, backup the file to a safe location. You may need to remove the file’s hidden and system attributes to see the file in File Explorer. To do so, run the following command:
attrib -s -h C:\Windows\System32\Recovery\Winre.wim
(The attrib command doesn’t produce any output if it is successful.)
That’s it. You should be able to copy the file using File Explorer to your desired backup destination.
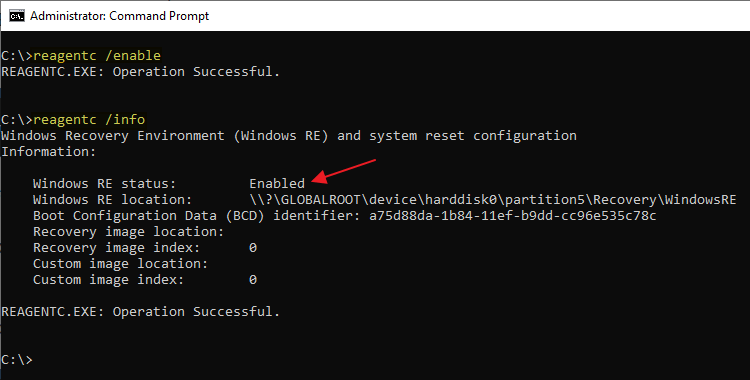
Once done, re-enable Windows RE using the following commands:
reagentc /enable

reagentc /info
Editor’s note
- In some configurations, for reasons unknown, disabling Windows RE doesn’t move the Winre.wim image to the staging folder. In that case, you must use Method 1 in this article to backup the file.
- If Windows RE can’t be enabled on the computer and you get the error “REAGENTC.EXE: The Windows RE image was not found.“, follow the steps in the article How to Extract Specific Files from Windows 10/11 ISO to extract Winre.wim from the ISO. Copy the file to the staging folder (“C:\Windows\System32\Recovery”) and reenable Windows RE.
I hope you found this article helpful.
One small request: If you liked this post, please share this?
One "tiny" share from you would seriously help a lot with the growth of this blog. Some great suggestions:- Pin it!
- Share it to your favorite blog + Facebook, Reddit
- Tweet it!