When you run the System File Checker (Sfc.exe) using the /scannow parameter to restore missing or corrupt system files, the following error may occur.
Windows Resource Protection could not start the repair service.
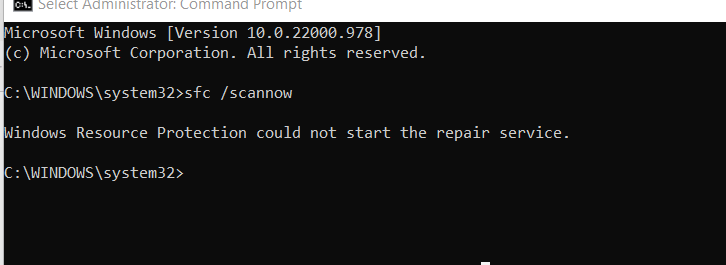
Additionally, you may experience problems running Windows Installer Setup files and installing fixes from Windows Update.
Cause
The above error occurs due to one or more of the following reasons:
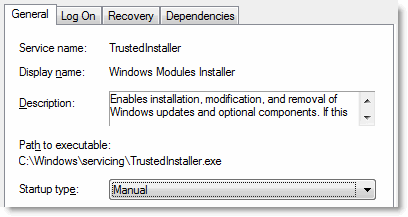
- The TrustedInstaller (Windows Modules Installer) service is disabled. The TrustedInstaller service has full access to Windows Resource Protection (WRP) files and registry keys. This service needs to be running to restore missing or corrupted WRP resources. The TrustedInstaller service starts on-demand when running the System File Checker.
- The supporting DLL files required to run Sfc.exe may be missing. Some of the modules needed are wrpint.dll and wrpintapi.dll. The missing module names will be reported in the
CBS.loglocated in theC:\Windows\System32\CBS\folder. - There is file system corruption on the system drive. This will be evident if DISM reports the error 1392 (“File or directory is corrupted”).
Solution
1) Start the Trusted Installer Service
To resolve the “Windows Resource Protection could not start the repair service” error, set the startup type of the Windows Modules Installer (“TrustedInstaller”) service to manual.
- Right-click Start, and click Run to launch the Run dialog.
- Type services.msc, and click OK.
- Double-click Windows Modules Installer.
- Set its Startup type to Manual
- Click OK.
Using Command-line
To accomplish the same using command-line, open Command Prompt as administrator. Run the following commands.
sc config trustedinstaller start= demand
net start trustedinstaller
That should fix the problem. Another option would be to run Sfc /scannow in offline mode (Windows Recovery Environment).
2) Restore Missing DLL files
Open the C:\Windows\Logs\CBS\CBS.log file and see if you find entries like the ones below:
Info CBS TiWorker: Client requests SFP repair object.
Info CBS Failed to load sfp DLL from path: C:\WINDOWS\winsxs\amd64_microsoft-windows-servicingstack_31bf3856ad364e35_10.0.22000.975_none_0493932d4c9bedcc\\wrpint.dll [HRESULT = 0x8007007e - ERROR_MOD_NOT_FOUND]
Info CBS Failed to initialize WRP integrity check and repair. [HRESULT = 0x8007007e - ERROR_MOD_NOT_FOUND]
Info CBS Failed to get class factory for service: 1 [HRESULT = 0x8007007e]
Info CBS Trusted Installer is shutting down because: SHUTDOWN_REASON_AUTOSTOP
[Scroll horizontally to see the missing file name(s) and the version]
If you find those errors in the log file, download the exact version (which, in this case, is 10.0.22000.975) of the file wrpint.dll from Microsoft via WinBIndex.
Also, check if the file C:\Windows\Servicing\wrpintapi.dll exists. If it’s missing, you need to download the appropriate version of the file via WinBIndex.
Instructions for copying those files
- Copy the downloaded DLLs to “C:\DLLs\”
- Start Command Prompt as TrustedInstaller by downloading AdvancedRun (More Information).
- Close AdvancedRun.
- Run these commands from the Command Prompt (TrustedInstaller) window:
(Note: The winsxs subfolder name below corresponds to the above CBS.log entries. Please change the path accordingly in your case.)cd /d C:\DLLs copy wrpint.dll "C:\WINDOWS\winsxs\amd64_microsoft-windows-servicingstack_31bf3856ad364e35_10.0.22000.975_none_0493932d4c9bedcc\" copy wrpintapi.dll C:\Windows\Servicing\ exit
- Open admin Command Prompt, and try running
SFC /SCANNOWnow. It should run fine.
3) Repair disk errors using Chkdsk
Open an admin Command Prompt and run the following command:
chkdsk c: /r
Press Y when you’re prompted to schedule the volume fixed by Chkdsk upon the next restart.
Let Chkdsk complete the repairs on the next startup.
After loading Windows, try running “Sfc /scannow” again.
Please see the article DISM Error 1392 – File or directory is corrupted for detailed information.
(Information in this article applies to all versions of Windows, including Windows 11.)
One small request: If you liked this post, please share this?
One "tiny" share from you would seriously help a lot with the growth of this blog. Some great suggestions:- Pin it!
- Share it to your favorite blog + Facebook, Reddit
- Tweet it!