The Safe mode is used to troubleshoot problems on your PC. It is a mode wherein Windows starts in a basic state, using a limited set of drivers. For example, if the problem doesn’t happen in safe mode, you’ll know default settings and basic device drivers aren’t causing the issue. Here is how to start Windows in Safe mode.
Sometimes you may find that Windows gets stuck in Safe Mode, and every restart leads you to Safe mode by default. Here is how to fix the issue and boot into normal mode.
Fix: Windows Defaults to Safe mode
Method 1: Using MSCONFIG
- Right-click Start, and click Run.
- Type
msconfigand click OK. - This starts the System Configuration Utility. In the System Configuration Utility, select the Boot tab.
- If you have a multi-boot setup, select your Windows installation from the list. Under Boot options, uncheck “Safe boot”.
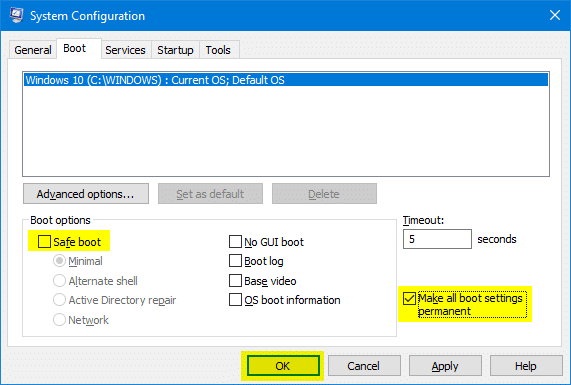
- Enable the “Make all boot settings permanent” checkbox.
- Click Apply, and click OK. Click Yes when you see the following prompt:
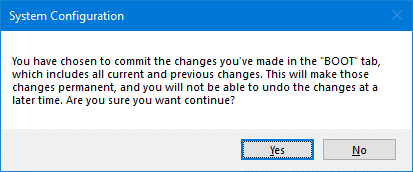 You have chosen to commit the changes you’ve made in the “BOOT” tab, which includes all current and previous changes. This will make those changes permanent, and you will not be able to undo the changes at a later time. Are you sure you want continue?
Method 2: Using Command Prompt
Alternately, open an elevated Command Prompt window and then type:
bcdedit /deletevalue {current} safeboot
This removes Safeboot: Minimal boot loader configuration. After running the command, restart Windows. Windows should boot into normal mode again.
Method 3: Using Windows Recovery Options
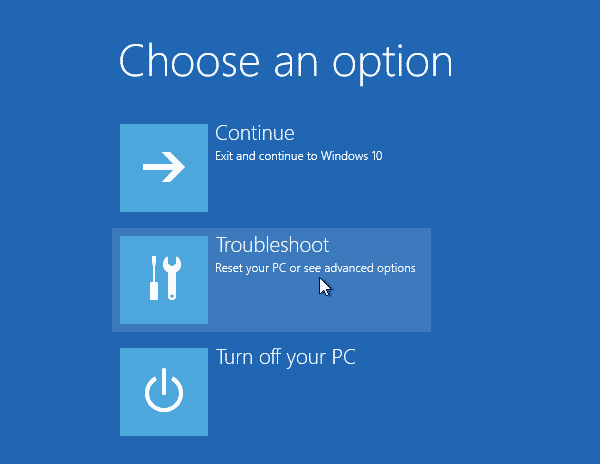
If you cannot sign in to your account via Safe mode, boot into Windows RE.
- From the login screen, click Shutdown, then hold down the Shift key while selecting Restart.
- Click Troubleshoot → Advanced → Command Prompt.
What if Command Prompt is missing in Windows RE?
If the “Command Prompt” option is missing in Windows RE, Windows RE may have been disabled on your computer. In that case, you’ll need to create a Windows 10/11 USB setup disk.
Create a USB setup disk from another computer. Download Windows 11 MCT
Connect the USB setup disk to the subject computer and boot from it.
Enter Windows Recovery Environment by clicking “Repair your computer” on the initial screen.
- In the Command Prompt window, type the following command:
bcdedit /deletevalue {default} safeboot
That should resolve the issue.
One small request: If you liked this post, please share this?
One "tiny" share from you would seriously help a lot with the growth of this blog. Some great suggestions:- Pin it!
- Share it to your favorite blog + Facebook, Reddit
- Tweet it!