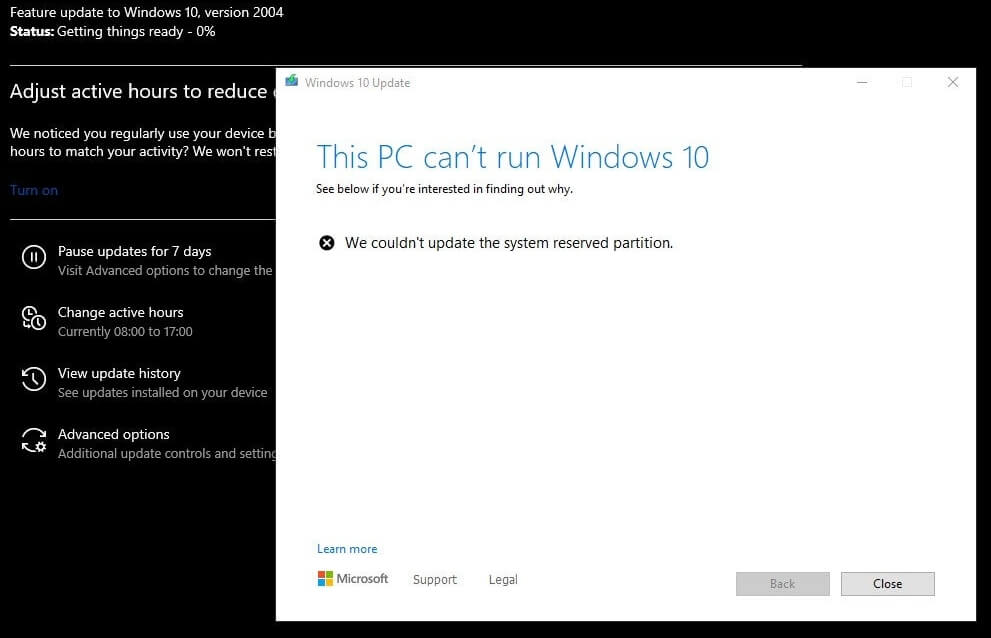
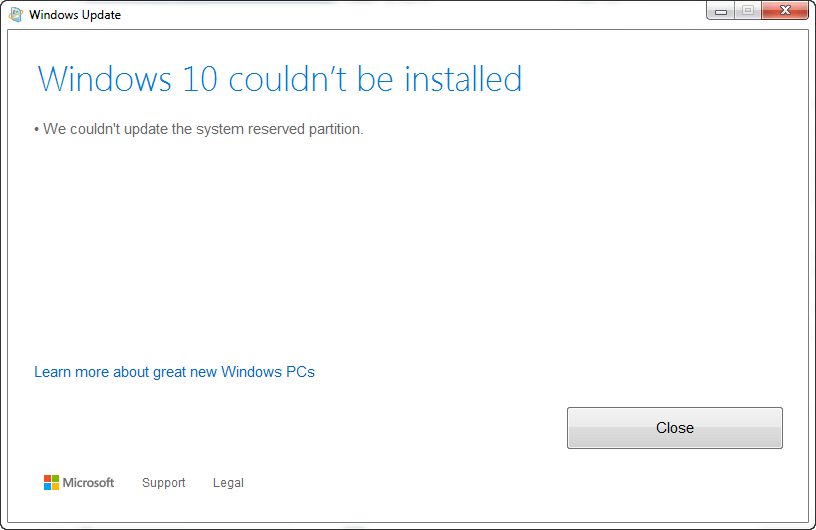
When upgrading to Windows 10 from Windows 7, 8, or 8.1, or updating Windows 10, you might encounter the error We couldn’t update system reserved partition, or error 0xc1900104, or error code 0x800f0922.
This happens if the System Reserved Partition (SRP) is full. The System Reserve Partition is a small partition on your hard drive that stores boot information for Windows. Some third-party anti-virus and security apps write to the SRP, and can fill it up.
According to Microsoft, to upgrade your device, you’ll need to free up 15MB of space on the SRP using the appropriate method below. And then try the upgrade again. If you’re updating Windows 10, you need to free up 13MB.
Contents
[Fix] “We couldn’t update system reserved partition” error
As per Microsoft, the errors 0x800F0922 and We couldn't update system reserved partition can occur if the System Reserved Partition (SRP) is full. The System Reserved Partition is a small partition on your hard drive that stores boot information for Windows.
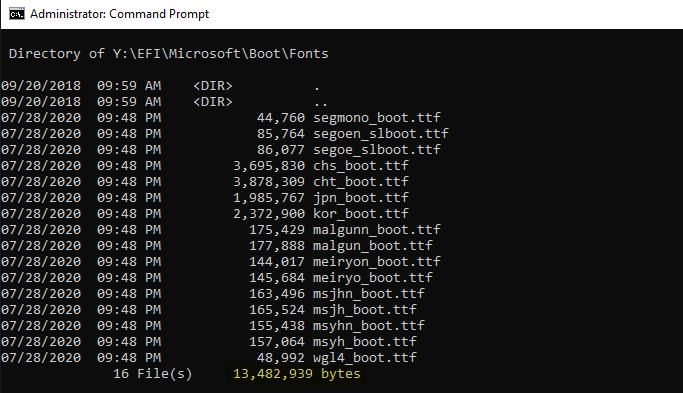
We can free up approximately 13 MB of disk space by deleting unused font (TTF) files in the System Reserved partition. Follow the steps below:
Caution: As the following steps are complicated, and carry some risk, make sure you backup your data or make a complete image backup, before proceeding. If you make an error in entering these commands, you could put your device in a no-boot situation, and possibly lose data you have stored on the device.
Some third-party anti-virus and security apps write to the SRP and can fill it up. Also, there are many unused font (*.ttf) files inside the SRP that you can remove to free up disk space.
The System Reserved partition doesn’t have a drive letter assigned by default. If you have an MBR partition, you can use Disk Management to assign a drive letter for the System Reserved partition and browse the contents with File Explorer. For GPT disks, you need to use the mountvol command to assign a drive letter.
Let’s now access the SRP and delete the unused font files from the Boot\Fonts directory inside SRP.
Find if the disk is MBR or GPT
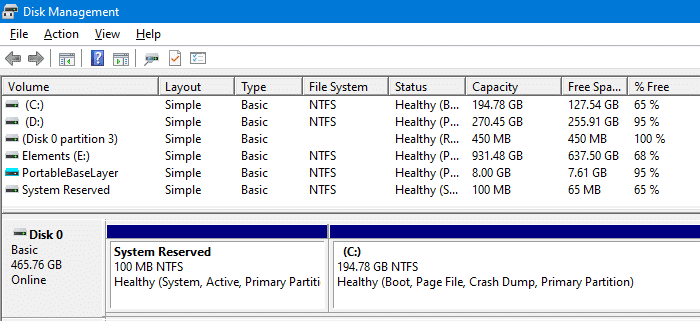
- Right-click Start, and click Disk Management.
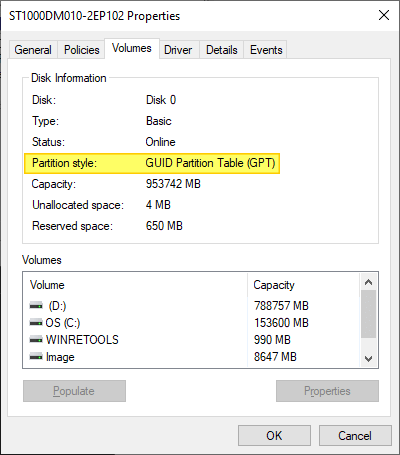
- Right-click on the Disk (such as Disk 0) that contains the System Reserved partition, and select Properties.
 Note that you’ll need to right-click on the Disk # on the left. Instead, if you right-click on the SRP partition itself, you won’t see the Properties option.
 - In the Volumes tab, you can determine the Partition Style. It may either be GUID Partition Table (GPT) or Master Boot Record.
Free up System Reserved partition disk space
Second, choose which method you need. If you’re facing issues upgrading to Windows 10 from Windows 7 or Windows 8, follow the instructions for Windows 7 or Windows 8, respectively. If you’re updating Windows 10 (Feature Update or Cumulative Update) and facing the System Reserved partition error, then follow the instructions for Windows 10.
Windows 10 Instructions for GPT disk:
- For UEFI/GPT disks, you’ll need to open an admin Command Prompt window and mount the System Reserved partition to a drive letter using
mountvolcommand.mountvol y: /s
The above command mounts the System Reserved partition to Y:\ drive letter. You can’t explore the drive using File Explorer, though.
- Switch to the Y drive by typing the following, and press Enter.
Y:
- Then, navigate to the Fonts folder by typing:
cd EFI\Microsoft\Boot\Fonts
- Once there, type the following to delete font files.
del *.*
(when the system asks you for confirmation, press Y and then Enter to continue.)
The above command deletes all the files from the Fonts folder and frees up disk space to the tune of 13 MB approximately.
Windows 10 Instructions for MBR disk:
- Right-click Start, and click Disk Management.
- Select the partition marked System Reserved.
- Right-click on it, and select Change Drive Letter and Paths.
- Choose Add.
- Enter Y for the drive letter.
- Click OK.
- Open a Command Prompt window under
TrustedInstallerrights. To see how to open Command Prompt under Ti rights, see the article How to Run Programs as TrustedInstaller.Note that the files inside the System Reserved partition are owned by TrustedInstaller. - In the command prompt, type
Y:and hit enter to switch to that drive. - Then, navigate to the Fonts folder by typing:
cd Boot\Fonts
- Make sure you are located in
Fontslocation (Y:\Boot\Fonts). Then, type the following command to delete font files.del *.*
(The system would ask you if you are sure to continue, press Y and then Enter to continue.)
- Go back to Disk Management and Refresh the data to confirm if the SRP now has a greater percentage of free space. If so, the drive letter can be removed at this point.
- Right-click the System Reserved Partition.
- Select Change Drive Letter and Paths.
- Choose the
Y:drive. - Select Remove.
- Click OK.
Editor’s note: Other than the font files, some applications (or the service technicians) may have placed some troubleshooting tools into the System Reserved partition. It’s advisable to remove those extra files from the System Reserved partition and move it somewhere else.
A Windows user named Martha says:
By adding a drive letter I was able to view contents in File Explorer. In this way, I discovered that at some point in June a computer help person had for some reason stored some backup data files on my System Reserve Partition and so I was able to free up space by moving the data somewhere else. Then I could also remove the drive letter once I was done to avoid confusion.
Windows 7 or 8/8.1 with GPT partition
- Open Command Prompt as administrator.
- At the command prompt, type
mountvol y: /sand then hit Enter. This will add theY:drive letter in order to access the System Partition. - Type
taskkill /im explorer.exe /fand press Enter. Then typeexplorer.exeand press Enter to restart explorer in Admin mode.Note While in this mode, some apps (such as OneNote) will not run. - Open File Explorer and put
Y:\EFI\Microsoft\Boot\in the address bar and press enter. - Select the language folders you want to remove and permanently delete them. They will be indicated by a set of four letters, split with a hyphen. For example, en-US means U.S. English; de-DE means German.
- Optional: Remove unused font files at
Y:\EFI\Microsoft\Boot\Fonts. - After removing the files, reboot the device. This will remove the drive letter, and return explorer.exe to a normal mode.
Windows 7 with MBR partition
This makes a permanent, but small, increase in the available space of the SRP.
- Remove language folders
- Press the Windows key + R. In the Run window that comes up, type diskmgmt.msc and press Enter.
- Select the partition marked System Reserve. Press-and-hold or right-click on it.
- Select Change Drive Letter and Paths.
- Choose Add.
- Enter Y for the drive letter.
- Tap or click OK.
- From the Start menu, search for cmd. Right-click Command Prompt from the search results, and select Run as administrator.
- In the command prompt, type Y: and hit enter to switch to that drive.
- Type the following and press Enter:
takeown /d y /r /f .
Note: You must include the space and the period after the “f”, or the command will not work properly.
- Back up the permission to the drive by typing the following and press Enter:
icacls Y:\* /save %systemdrive%\NTFSp.txt /c /t
Note: Make sure that all files are showed as successful and none as failed.
- Type whoami and press Enter, and then record the user name. Type the following command and press Enter:
icacls . /grant <username you got from whoami>:F /t
Note: Do not put a space between the username and “
:F“, or the command won’t work. - Open the SRP drive in File Explorer and access the Boot folder, select the language folders you want to remove and permanently delete them. They will be indicated by a set of four letters, split with a hyphen. For example, en-US means U.S. English; de-DE means German.
- Truncate the NTFS Log
- Check the size of the NTFS Log first. From the Command Prompt, type the following and press Enter:
chkdsk /L Y:
If the size is less than 5000KB, you do not need to truncate the file.
- To truncate the file, type the following and press Enter:
chkdsk /L:5000 /X /F
- Go back to the Disk Management window. Tap or click the Action menu, and select Refresh. Confirm if the SRP has now a greater percentage of free space. If so, press-and-hold or right-click the System Reserve Partition, and select Change Drive Letter and Paths. Select Y: and choose Remove.
- Resize the USN journal, if truncating the NTFS Log doesn’t increase the free space in the SRP. From the Command Prompt, type the following and press Enter:
fsutil usn queryjournal Y:
This will display the size in hex value. Convert the value to decimal and divide by 1048576, the result will be in MB. (To convert Hex to Decimal: Open the Calculator in Windows, select the View menu, and then choose Programmer. Select Hex, enter the Hex value, and then select Dec)
- If the journal is 30MB or more, continue with truncating it.
- Delete the journal by typing the following command and pressing Enter:
fsutil usn deletejournal /D /N Y:
- Recreate the journal with a new log size value:
fsutil usn createjournal m=1500 a=1 Y:
- Check the size of the NTFS Log first. From the Command Prompt, type the following and press Enter:
- Restore permissions
- Type the following command and press Enter:
icacls Y:\ /restore %systemdrive%\NTFSp.txt /c /t
A message may display indicating some files failed while processing – this is normal as these files have been deleted subsequent to backing them up.
If the amount of successful files is none, then the command was executed incorrectly; you must have some files successfully processed before continuing.
- Adjust the ACL back to System by typing the following and press Enter:
icacls . /grant system:f /t
- Set the owner of the drive back to
Systemby typing the following command and pressing Enter:icacls Y: /setowner "SYSTEM" /t /c
- Go back to Disk Management and Refresh the data to confirm if the SRP now has a greater percentage of free space. If so, the drive letter can be removed at this point.
- Right-click the System Reserved Partition.
- Select Change Drive Letter and Paths.
- Choose the Y: drive.
- Select Remove.
- Click OK.
- Type the following command and press Enter:
Windows 8/8.1 with MBR partition
This creates a larger, but temporary, increase in the available space of the SRP.
- Make sure you have an external drive, formatted as NTFS, with at least 250MB of free space.
- Press the Windows key + R. In the Run window that comes up, type diskmgmt.msc and press Enter.
- Select the Recovery Partition. Press-and-hold or right-click on it.
- Select Change Drive Letter and Paths.
- Choose Add.
- Enter
Yfor the drive letter. - Tap or click OK.
- From the Start screen, swipe in from the right and select the Search charm, or just start typing to search for cmd. Press-and-hold or right-click Command Prompt from the search results, and select Run as administrator.
- In the command prompt, type Y: and hit enter to switch to that drive.
- Type the following and press Enter:
takeown /d y /r /f .
Note You must include the space and the period after the “f”, or the command will not work properly.
- Type whoami and press Enter, and then record the user name. Type the following command and press Enter:
icacls . /grant <username from whoami>:F /t
Note: Do not put a space between the username and “
:F“, or the command won’t work. - When that command completes, type or paste the following and then press Enter:
attrib -s -r -h Y:\Recovery\WindowsRE\winre.wim
- Open File Explorer, and note the drive letter of the external drive you are using (for the rest of these instructions, we will use the example F: – wherever you see F: in these steps, it really means the drive letter of the external drive).
- In the Command Prompt, type the following and press Enter:
mkdir F:\Recovery\WindowsRE
- Next, type the following and press Enter:
xcopy Y:\Recovery\WindowsRE\winre.wim F:\Recovery\WindowsRE\winre.wim /h
- Map the new path by inputting the following command and then pressing Enter:
C:\Windows\System32\Reagentc /SetREImage /Path F:\Recovery\WindowsRE /Target C:\Windows
- Once verified the copy was made successfully, type the following and press Enter:
del Y:\Recovery\WindowsRE\winre.wim /F
- Go back to the Disk Management window. Tap or click the Action menu, and select Refresh. Confirm if the SRP has now a greater percentage of free space. If so, continue with the upgrade.
- Once the upgrade has completed, move the wim file back to the Recovery Partition and re-map the location:
- From the Command Prompt, type the following and press Enter:
xcopy F:\Recovery\WindowsRE\winre.wim Y:\Recovery\WindowsRE\winre.wim /h
- Re-map to the original path. Type the following and press Enter:
C:\Windows\System32\Reagentc /SetREImage /Path Y:\Recovery\WindowsRE /Target C:\Windows
- Go back to the Disk Management window. Press-and-hold or right-click the Recovery Partition, and select Change Drive Letter and Paths. Select Y: and choose Remove.
Hope you were now able to upgrade to, or update Windows 10 without getting the error “We couldn’t update system reserved partition”.
One small request: If you liked this post, please share this?
One "tiny" share from you would seriously help a lot with the growth of this blog. Some great suggestions:- Pin it!
- Share it to your favorite blog + Facebook, Reddit
- Tweet it!
Use PowerShell to assign a letter to the recovery partition:
1) diskpart
2) list disk
3) select disk 0
4) list partition
5) select partition 1
6) assign letter=X
7) Now you can navigate to drive letter X using My Computer / Explorer and delete all the files located in the “Boot\Fonts” folder.
8) remove letter=X
9) Windows Upgrade / Installation should now work.