Managing startup entries was possible using the System Configuration Utility (msconfig.exe), in Windows 7 and earlier. This functionality is now provided by the Task Manager in Windows 8, Windows 10, and Windows 11, which features a new “Startup” tab that lists all auto-start entries in the system.
You can either enable or disable items listed in the Task Manager Startup tab, but no option is provided to delete the obsolete entries. Over time, old entries may accumulate in the Startup tab as and when you uninstall programs that you no longer use.
Here is an example where the OneDrive entry exists in the Startup tab even after uninstalling the OneDrive client.
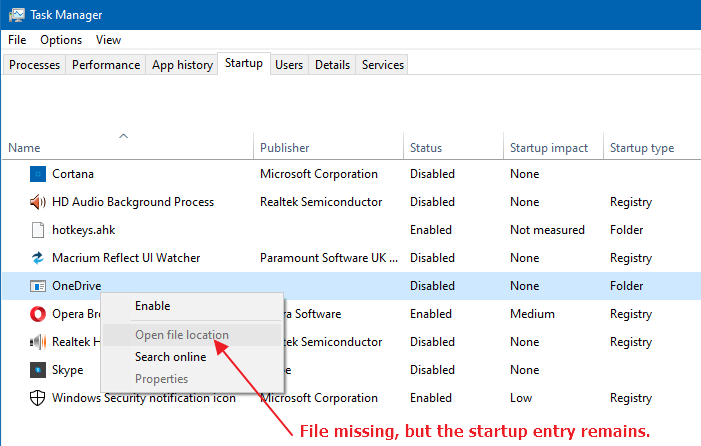
When you right-click on it, the Open file location option would be grayed out if the executable doesn’t exist in the specified location.
This post tells you how to remove the leftover or invalid entries in the Task Manager Startup tab in Windows 8, Windows 10 & Windows 11. Also, see the note included at the end of the article for Store apps.
Remove invalid entries from Task Manager Startup tab
The invalid startup entries can be removed via the registry or using a specialized program like Autoruns.
Method 1: Using Autoruns
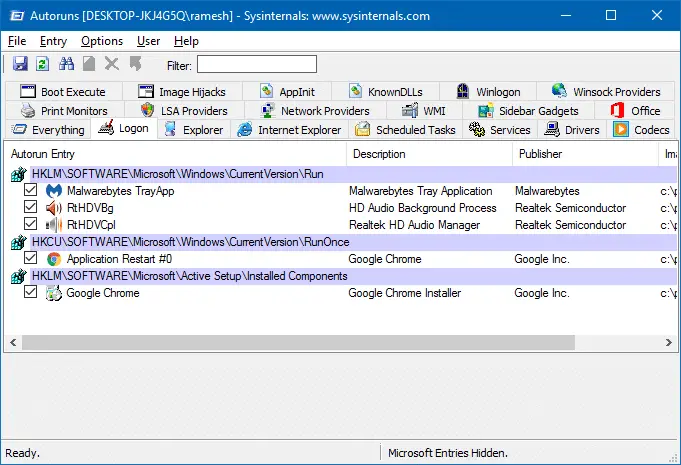
Using Task Manager you can manage startup entries only from the above auto-start launch points. However, there are many other launch points in obscure registry locations from where programs can run. And to manage most, if not all, of them, Autoruns is the tool you need. Autoruns, as they say, is like MSCONFIG on steroids.
![]() Important: Autoruns won’t display entries that are disabled in the Task Manager’s Startup tab because they are stored in a different registry location. If you want to delete a “Disabled” startup item, make sure you enable the item first in Task Manager. To do so, right-click on the startup item, and choose “Enable”.
Important: Autoruns won’t display entries that are disabled in the Task Manager’s Startup tab because they are stored in a different registry location. If you want to delete a “Disabled” startup item, make sure you enable the item first in Task Manager. To do so, right-click on the startup item, and choose “Enable”.
- Download Autoruns from Microsoft.
- Unzip and run the tool elevated (“Run as administrator”).
- Click the “Logon” tab
- Remove unwanted startup entries there. It’s important to make sure you don’t remove Microsoft entries there, especially the
Userinitentry.
Tip: Autoruns allows you to hide Microsoft and Windows entries via the Options menu so that you don’t accidentally remove important auto-start programs needed by Windows. - After you’ve cleaned up the dead startup entries, proceed to delete the invalid shortcuts in the Startup folders. Follow the instructions in “Step 2” (under Method 2) below.
Method 2: Using the Registry Editor
The auto-start programs listed in the Task Manager Startup tab can load from the registry or from the Startup folders. Follow these steps to clean the invalid entries from the registry as well as from the two Startup folders manually.
Step 1: Clean up the “Run” keys in the registry
- Create a System Restore Point or take a complete registry backup first.
- Start the Registry Editor (regedit.exe) and go to the following location:
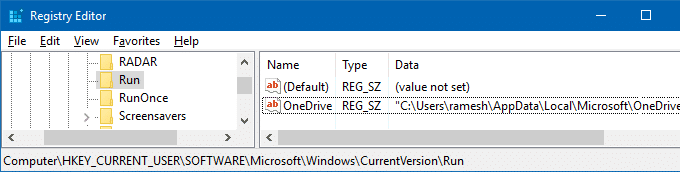
HKEY_CURRENT_USER\SOFTWARE\Microsoft\Windows\CurrentVersion\Run
- Each value in the right-pane is an auto-start entry added by programs. Right-click on an unwanted entry in the right pane, and choose Delete.
- Repeat the same in the Run key under
HKEY_LOCAL_MACHINEroot key (applies to all users) mentioned below.
Hint: While you’re in the previous registry location, you can right-click on the “Run” key and chooseGo to HKEY_LOCAL_MACHINEoption in the right-click menu, which automatically gets you to the following path:HKEY_LOCAL_MACHINE\SOFTWARE\Microsoft\Windows\CurrentVersion\Run
- 32-bit programs on a 64-bit Windows computer use the following
WOW6432Node\...\Runregistry locations. You need to follow the same procedure here, as well:HKEY_CURRENT_USER\SOFTWARE\WOW6432Node\Microsoft\Windows\CurrentVersion\Run HKEY_LOCAL_MACHINE\SOFTWARE\WOW6432Node\Microsoft\Windows\CurrentVersion\Run
- Additionally, cleanup the corresponding entries (for each item removed from the above locations) under the following keys.
HKEY_CURRENT_USER\SOFTWARE\Microsoft\Windows\CurrentVersion\Explorer\StartupApproved\Run

HKEY_LOCAL_MACHINE\SOFTWARE\Microsoft\Windows\CurrentVersion\Explorer\StartupApproved\Run

HKEY_LOCAL_MACHINE\SOFTWARE\Microsoft\Windows\CurrentVersion\Explorer\StartupApproved\Run32
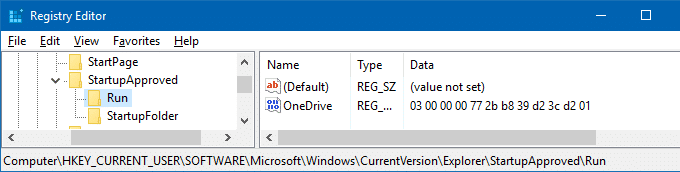
(Note: The disabled items in the Task Manager startup tab are stored in the
StartupApprovedregistry locations.) - Exit the Registry Editor.
Step 2: Cleanup the items in the Startup folders (per-user & common startup)
- Open this folder by typing the path in the File Explorer address bar:
%ProgramData%\Microsoft\Windows\Start Menu\Programs\Startup
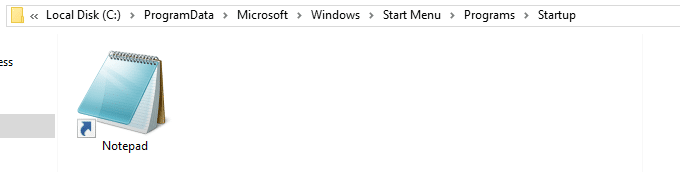
- Delete the unwanted shortcuts there.
- Open this folder by typing the path in the File Explorer address bar. This opens the per-user Startup folder (shell:startup)
%Appdata%\Microsoft\Windows\Start Menu\Programs\Startup
- Delete the unwanted shortcuts from the above folder.
Hope you were able to get rid of dead or invalid entries in the Task Manager Startup tab using one of the above two methods!
What about startup entries of Store apps?
Note that the above methods are to remove only the classic desktop (win32) apps from Startup. The modern Universal Web Apps or Store app startup entries can’t be removed using the registry or Autoruns.
For classic desktop apps, you’ll either see the words Registry or Folder in the “Startup type” column, denoting whether the entry is originating from the Startup folder or from one of the Run keys in the registry.

For Store apps (e.g., ShareX, Skype, Cortana, Your Phone apps) the Startup Type column would be blank. That’s because, for UWP apps, the startup entries are coming from the manifest file included at the time of compilation. The only way to remove the Store app startup entry is to uninstall the software.
Last reviewed on 11-July-2023.
One small request: If you liked this post, please share this?
One "tiny" share from you would seriously help a lot with the growth of this blog. Some great suggestions:- Pin it!
- Share it to your favorite blog + Facebook, Reddit
- Tweet it!
very very helpful:::::
Method 1 helped me track down all left-overs after a spywere/trojan I removed
Thank you so much!!!
Thanks a lot !!! 🙂
I noticed that with iTunes there are installed some iTunesHelper.exe and AppleMobileDeviceProcess.exe (mobile iTunes Helper). These could not be found under any key noted and also Autoruns does not list them.
@Jirka: Can you enable the “Startup type” and “Command-line” columns in Task Manager Startup tab? After doing so, please upload a screenshot of it.
Would be really nice if you included some context for “Export the key to a REG file first.” “Keys” are not mentioned This is showing us how to remove old entries, so why are we exporting something before deleting it?
@DK: Exporting before deleting is a good habit anyway, just in case you’re sitting in a wrong registry branch and nuke something else accidentally.
Method 1 worked for me! Had a TEAMS service running under the name PROGRAM and removed it sucesfully! Thanks!
same
thanks very helpfull
This was extremely helpful, damn. Thank you!
I just couldn’t stand the clutter on my Startup Tab.
Bless you!
Very helpful. I did reset my PC thinking it will delete the ‘programs’. Alas! Upon boot up the suckers are staring at me again. Thanks to you, now I know how to solve the issue, despite of losing many softs.
thank you, very helpful,
but unfortunatly it didn’t work for me:
I am unable to find my 2 dead entries neither in Autorun nor in regisrty
I try to delete Skype and Ear Trumpet entries from task manager’s startup tab after having disabled them.
in “startup type” there is nothing and in”command line” tab I have:
Skype\Skype.exe
EarTrumpet\EarTrumpet.exe
I will try to uninstall EarTrumpet as it was me who installed it but Skype I didn’t even use it at all; it started alone and create this entry; would prefer to not uninstall it but if nother way why not even if I’m not sur it will delete this entry in task manager
Any other help would be highly appreciated
thanks again
@Umair, The disabled entries are present in these registry keys. Checked there?
HKEY_CURRENT_USER\SOFTWARE\Microsoft\Windows\CurrentVersion\Explorer\StartupApproved\Run
HKEY_LOCAL_MACHINE\SOFTWARE\Microsoft\Windows\CurrentVersion\Explorer\StartupApproved\Run
just use autoruns it worked for me
Why not tell there is a program that does this at first? Making people read and do it manually and then oh, hey, there was this program that could do it all for you!
sad times.
@esat: Changed the order now. Thanks for the feedback.
the autoruns method worked for me noice helpful article have a noice day keep playing minecraft lolll
First method AutoRuns was very easier to solve my problem thanks.
Thank you very much for your help.
Thanks Man ….Helped !
Thanks it worked well!
Thank You.
HKEY_LOCAL_MACHINE\SOFTWARE\Microsoft\Windows\CurrentVersion\Explorer\StartupApproved\Run32
I also found the unwanted program entry in this key as well. Maybe you should update the blog.
Thank you for your help.
Thanks for the tip, @Nemesis. Will include that info.
Thanks a ton man. Autoruns is soooo good! it directly highlighted the 3 files I had to delete. i didn’t even had to search or do anything.
Thank you, this worked for me. I didn’t know that there were other locations were start-up programs were added. I thought they were only located where the .exe folder was based on shell:startup
Thank you so much it worked for me on step 2 of method 2. It was driving me insase!!
finally a solution that worked, many thanks
Thanks a lot bro. Method 2 helped me to remove an invalid startup program that came from a non-existent application. Good game and well played bro! ^_^
This is very usefull, my ocd can calm down now . However, Does removing items by using method 2 break the app or software or does it simply just stop it appearing in “startup” under taskmanager?
Thanks a lot!! I have managed to remove a startup path: C:\Program” Files (x86)\… which is not even existed lol. Method 1 was super useful!!
I done second method but the regestry entry revives again and again whenever I start task manager..
@Sid: Some program may be adding the entry again? Please post a screenshot of the Task Manager Startup tab as well as the Registry Editor window showing the Run key.
Thanks a lot for sharing how to remove the startup invalid entries. Autoruns worked for me too
Excellent helpful article. Thank you.
Very helpful, I got reed of spies and unwanted programs. Thanks
10/10
I Tried Registry one & it Totally solved my Issue, nice comprehensive, to the point article Ramesh
I was not able to delete “Send to OneNote.Ink” in C:\Program Files (x86)\Microsoft Office\root\Office16\ONENOTEM.exe.
I found OneNote in the following folder: HKEY_CURRENT_USER\SOFTWARE\Microsoft\Windows\CurrentVersion\Explorer\StartupApproved\StartupFolder
@momakid: What happens if you delete the.lnk file?