Summary: This post explains how to successfully run NTBackup on Windows 10 and restore data from a .BKF file easily!
There are many users who have got backups done using the NTBackup Tool (also known as “Windows Backup Utility”) in earlier versions of Windows. After upgrading to Windows 10, they find that the NTBackup tool doesn’t exist on Windows 10. Also, Microsoft has taken down the Windows NT Backup Restore Utility (KB974674) from their servers.
Even if you have the NTBackup.msi setup package in hand, installing it and running ntbackup.exe may cause the following errors in Windows 10.
ntbackup.exe - Entry Point Not Found

The procedure entry point SetCatalogState could not be located in the dynamic link library C:\Windows\SysWOW64\ntbackup.exe.
The program can't start because NTMSAPI.dll is missing from your computer. Try reinstalling the program to fix this problem.
The ordinal 3 could not be located in the dynamic link library VSSAPI.DLL.
The good old NTBackup utility runs perfectly fine on Windows 10 if the supporting DLLs (below) are available in the same folder where NTBackup.exe is present. The three DLL files are:
- ntmsapi.dll
- vssapi.dll
- Query.dll
Windows 10 already includes an updated copy of Query.dll, but it doesn’t have the function or entry point named SetCatalogState in it. So, we need to use the Windows 7, Windows 8, or Windows 8.1 version of Query.dll (32-bit) module. The Windows 7/8/8.1 version of the file has the SetCatalogState entry point.
How to Restore NTBackup BKF File in Windows 10
Follow these steps to run the NTBackup tool in Windows 10 and extract the contents of a .BKF file:
- Download ntbackup.zip and extract the contents to a folder — e.g.,
D:\NTBackup. TheD:\NTBackupfolder should have the following files now: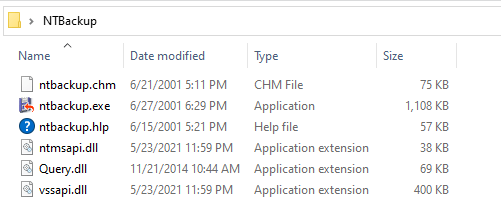
ntbackup.chm - SHA1: e6954cac72e4732d4e0d331df80cc947551c739a
ntbackup.exe - SHA1: 9904bbce6d19b343e879a4d6d02fbe978624265b
ntbackup.hlp - SHA1: 016cb814d9a91575f24668f14c0d2b934b1cd6d1
ntmsapi.dll - SHA1: df897f116f23a1424879d4c44cd064ca27d549e4
Query.dll - SHA1: fc6371f8992b85cec0c782f02a60cad3d5790d21
vssapi.dll - SHA1: 8d597a3765bda18396df0c0e8337e1f33a16c3b6
- Double-click
ntbackup.exeto run it. NTBackup will indicate that the Removable Storage service (removed in Windows Vista & higher) is not running. Never mind. This is required for tape backups. Click OK.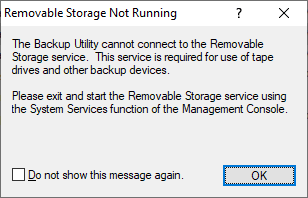
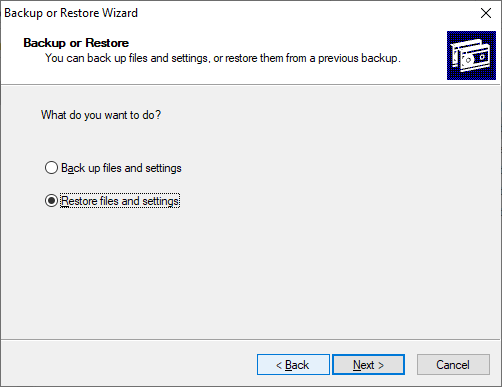
- In the Welcome to Backup or Restore Wizard page, click Next.

- Select “Restore files and settings”, and click Next.
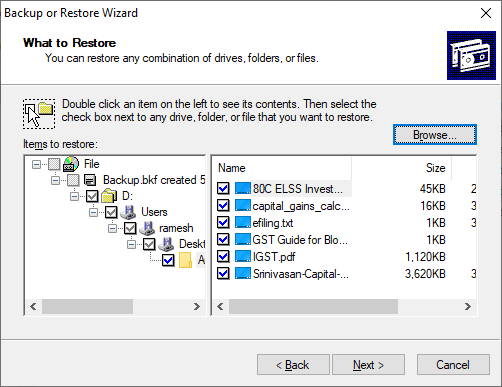
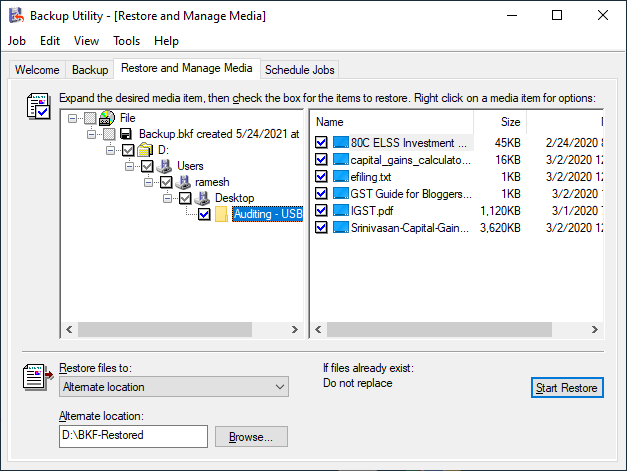
- Click Browse. Locate the .BKF file that you want to restore, and click OK.
- Expand the catalog, select the files/folders you want to restore, and click Next.
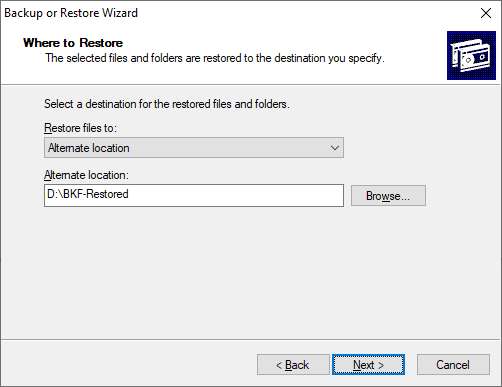
- By default, NTBackup restores the files to the original location. If you need to choose an alternate path or configure advanced restore settings, click Advanced.
- Mention the directory path where you want to restore the files.
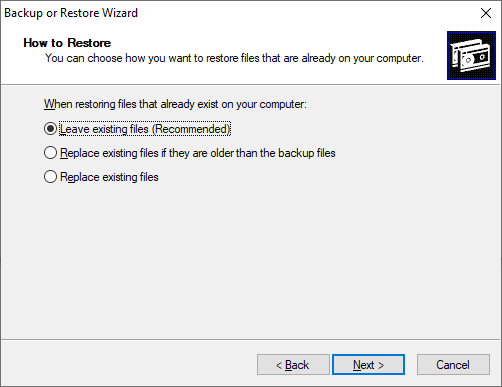
- You can choose one of the three options in this dialog:
- Leave existing files (Recommended)
- Replace existing files if they are older than the backup files
- Replace existing files
- Select the recommended option and click Next.
- On the Advanced Restore Options page, if you don’t want to restore the security settings, uncheck the option.
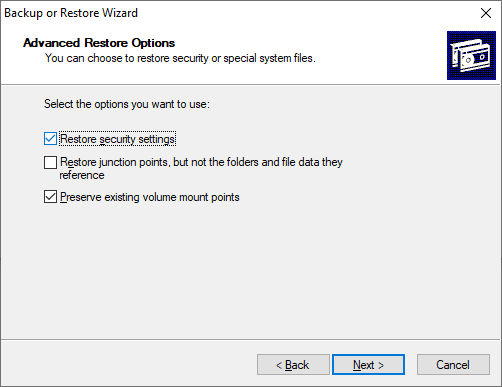
Restore security settings: Restores the access control lists (ACLs) and ownership data on files backed up from an NTFS volume.
Restore junction points, but not the folders and file data they reference: Required for restoring data on mounted drives. Junction points are physical locations that point to the mount point located on another hard disk. If you do not select this check box, the junction points are restored as common folders, and data pointing to these points becomes inaccessible.
Preserve existing volume mount points: Restores empty NTFS folders to which you have mounted volumes.
- Click Next.
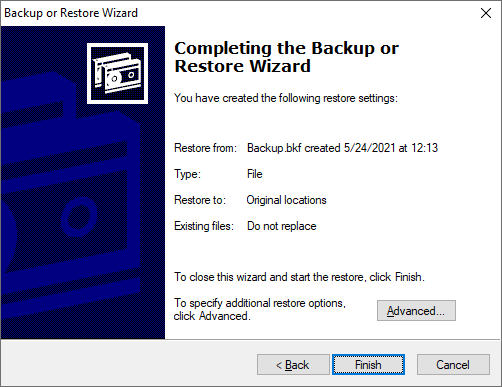
- Click Finish when you see the “Completing the Backup or Restore Wizard”

- You’ll see the Restore Progress window. Once the restore is complete, click on the Report… button to know the detailed status.
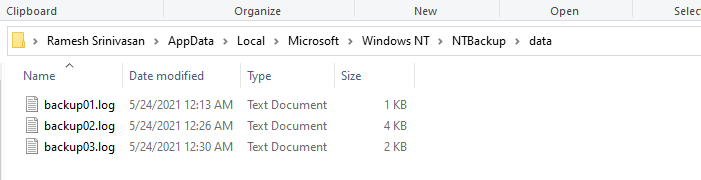
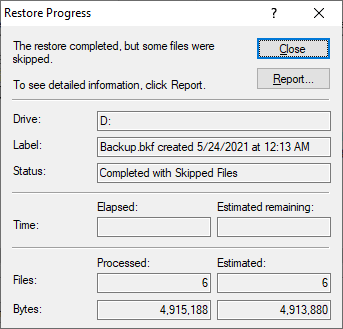 The reports are also stored in the following folder:
C:\Users\%username%\AppData\Local\Microsoft\Windows NT\NTBackup\data
Here’s how the Advanced mode (versus “Wizard mode”) looks like. It presents a unified dialog where you can select the required tab (backup, restore, schedule) and select the output location.
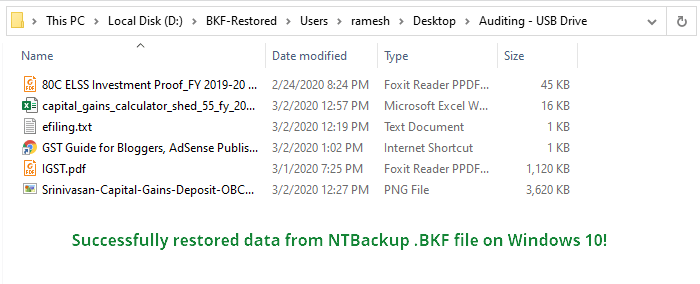
Whew! You’ve now restored the contents of an NTBackup .BKF file in Windows 10.
Issues running NTBackup? Run in compatibility mode
Some users have indicated that they had to use compatibility mode to successfully run ntbackup.exe on their Windows 10 computers. To enable the compatibility mode, right-click ntbackup.exe and click Properties.
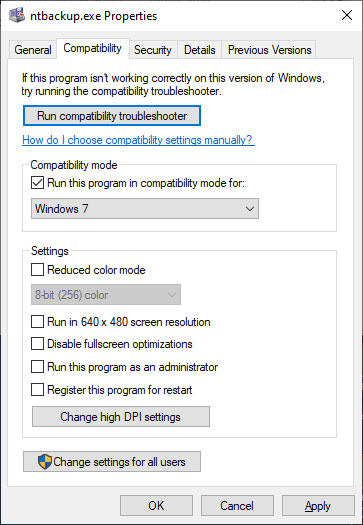
In the Compatibility tab, select Windows XP Service Pack 3, Windows 7 or Windows 8 from the drop-down list, and click OK.
Alternately, you may use your old Windows 7 DVD or ISO and run NTBackup on a virtual environment like Hyper-V or Oracle VM VirtualBox (Free). Once done, you should be able to run NTBackup or the NTBackup Restore tool from the virtual environment running Windows 7 or Vista, on a host computer running Windows 10. Your data inside the .BKF file(s) can be easily recovered.
[This article has been rewritten on May 24, 2021. Tested (and works perfectly) on Windows 10 version 21H1 build 19043.985.]
One small request: If you liked this post, please share this?
One "tiny" share from you would seriously help a lot with the growth of this blog. Some great suggestions:- Pin it!
- Share it to your favorite blog + Facebook, Reddit
- Tweet it!
Thank you. Like so many people, I backed up my files before upgrading as per instructed only to find I couldn’t access my backed up files.
Thanks plenty man – you saved me hours – Howcome MS cannot do this – I wonder
thank you from the bottom of my bruised brain…fabulous
Thanks so much for your workaround. It worked for me, ending several daze of angst! Walt
thank you. you save me a lot of time, it’ will take a while to restore it but works.
gracias again
You, you rock. Worked perfectly on an 8 year old backup! Thanks a lot.
You have saved me from a world of pain! Thank you, thank you for being altruistic enough to post this solution – I was one of the many who thought my XP backup would just work, but for course…
If you’re reading this to see if it’s the right solution – it works!
Many thanks, Andy
Fantaistic – works a treat and I was just starting to worry that I had lost my backup. Thanks again
Much better than all those useless reg fix tools that tell you that you have 100’s of reg errors. I am still in the process of loaing a brand new laptop, with only data and yet I had 577 errors !!
Awesome – this is the best – why does MS make it so hard? 🙁
That was very useful for me thanks a lot and more!!!!
Thank you so much, I thought my backup was lost. I tried to install all those fixes MS provided and it wouln’t do.I set up a virtual machine, but that said, the backup was corrupt. Now I followed your advice and it worked. I am so happy. Thanks a lot.
Camilla
This helped me a lot, thank you.
Nice one mate! You’re a life saver!
Gary – UK
Else you can run ntbackup.exe in the “XP mode” in windows 7, and restore files from there.
Very well done – much appreciated
thanks this worked great. Had to resotre a xp backup on win7. Spent a good few hours until I found this. Apreciate all the detail
THANKS!!! your explanation is excellent!
I spent hours to look for a way to restore my XP data on the new Win7 PC, and to download the original KB974674, and to look for answers why that did not work, and to try and create a “EasyTransfer File” (forget it, that needs days for larger data!). Finally I found this thread and now, after some minutes, my data are rolling from the old to the new PC 🙂
Why does not Microsoft give a link to this thread?
You’re great!, and your instructions are worth clean gold
Excellent – saved me hours
Just what I needed! Thanks for excellent instructions =) Finally some useful help, after wasting time on Microsoft’s sites (including KB974674), among others.
You rock!!! I was at my wits end. Thanks so much.
Thank you sooooooooooo much. Exactly what was needed.
Just fixed a hugh headache for me!!! Great Instructions!
thank you thank you thank you. Worked like a charm. The hardest bit is locating the nt5backup.cab file. A bit of google searching turned up a copy.
Such a simple solution you would think Microsoft would include it by default in their Windows 7 releases. The fact that there is no default way of reading .bkf files from WinXP in Win7 goes to show how much of a toy system Windows really is.
I can still read my old .tar .cpio and backup files from my antique SunOS 4 (showing my age) SS2 box (yes I have one still in service with 64MB of ram!!!). Way to go Unix. Shame on Microsoft.
Isn’t that the truth! I may make my living in the Microsoft world, but having experienced “real” servers before getting dragged into toyland — I have to say Microsoft STILL does not make a real server…
…but they have been headed in the right direction, and I will say what we have today is at least somewhat close to standard features on the real servers outside toyland.
Ramesh, I’m lighting a stick of incense to you tonight. Thank you and aloha!
This is fine except if you have used the time honoured method of backing up to tape! Twhilst my tape drive is listed in the device manager (its a Seagate running under a SCSI interface), NT backup does not recognise or identify the tape in the restore option…only recognises hard drives. dvd, cd or usb type storage cards etc.
Excellent! Just what I needed! Thanks!
I am getting the message when trying to restore from bkf file: the backup file contains unrecognized data and coannot be used.
Wow! I’ve been working on this a good portion of today and portions of several other days and this is the first success I’ve achieved. THANK YOU!!!!!!! PS: 99% of my time was spent before I came across your article. It was a breeze thereafter.
Wow, was a little bit upset after changing to windows 7 an I could not restore afterwards my tax software outside a bkf . So I searched about that stuff and found at microsoft site: ntbackup can be installed on windows 7 enterprise or ultimate edition with laguage package english. Very nice when you are in Germany and you have to pay more than 200$ for backup.
So many many thanks to reuse data outside an bkf file under windwos 7 without paying any “royalities” taxes.
GraaaaaaaaaaaaaaaaaaaaaaaaaaaaaaaaaaaaaaaaaaaaaaaCiiiiiiiiiiiiiiiiiiiiiiIIIaaaaaaaaaaaaaaaaaaaaaaaaaaaaaaaaaaaaaaaaaaaaaaaaaaaaaaaaaaaaaaaaaaaaaaaaaaaaaaaaaaaaaaaaaaaaaaaaaaaaaaaaaaaaaaaaaaaaaaaaaaaaaaaaaaaaaaaaaaaaaaaaaaaaaaaaaaaaaaaaaaaaaaaaaaaaaaaaaaaaaaaaaaaaaaaaaaaaaaaaaaaaaaaaaaaaaaaaaaaaaaaaaaaaaaaaaaaaaaaaaaaaaaaaaaaaaaaaaaaaaaaaaaaaaaaaaaaaaaaaaaaaaaaaaaaaaaaaaaaaaaaaaaaaaaaaaaaaaaaaaaaaaaaaaaaaaaaaaaaaaaaaaaaaaaaaaaaaaaaaaaaaaaaaaaaaaaaaaaaaaaaaaaaaaaaaaaaaaaaaaaaaaaaaaaaaAAAAAAAAAAAAaaaaaaaaaaaaaaaaaaaaaaaaaaSSSSSSSSSSSSSSSSSSSSsssssssssssSSSSSSSSSSSSSSSSSSSSSSSssssssssssssssSSSSSSSSSSSSSSsss
quien iso esto debo decir que le estoy eternamente agradecido 😀
It ran fro 10 minutes but when I checked the report, all of my data files had been “skipped” !!! Nothing got Restored !!
Great help, Information was very useful better than microsoft corp. i have no words to express altide of happy i got after opening BKF.
Thanks a lot guys
10000^10000 of thanks!!!!!!!!!!!!!!!!!!!!!!!!!!!!!!!!!!
Far better than 10000 of Microsoft talking!
The walk through for using NTbackup with Windows 7 was excellent. You saved me It worked!
Starts the process, then stops about a 1/3 of the way through….
Mine continues to as for disk #3…in other words not working as smooth as I wished! Thought there was hope!
Excellent…….the simplest explanation yet, and it worked perfectly thank you so much.
Your site and article are a life saver – much better than Micorsoft – thank a million!!!
The restore froze for me and I found the answer to that at
http://answers.microsoft.com/en-us/windows/forum/windows_7-system/unable-to-restore-xp-backup-files-to-windows-7/aaf5bc5c-721f-4bf0-851e-495ee35ee5ce
Thank you for your article.
Thanks Ramesh! This will work for me. Regards!
As of early 2020 this process no longer works with Windows 10 because it now produces the following error –
ntbackup.exe Entry Point Not Found
The procedure entry point “SetCatalogState” could not be located in the
dynamic link library
C:\Desktop\nt5backup\ntbackup.exe
Based on a previous post I have seen this error could be caused by recent Windows 10 updates pushed by Microsoft – any ideas for a work around?
Any suggestions for a work around?
@jfy: The workaround for error “SetCatalogState” has been posted; article has been updated.
Thanks Ramesh! This is genius!
Thank you, this worked great. Running Windows 10 and I was able to access several old .bkf files.
2/4/2023
Still works well for Win 10
Thanks!
Thanks,man. Year is 2023 and it still rules!
Thank you. You help me very much.