This article describes how to remove or modify the overlay (arrow icon) shown for Shortcuts in Windows.
Remove or Modify the Shortcut Overlay
Method 1
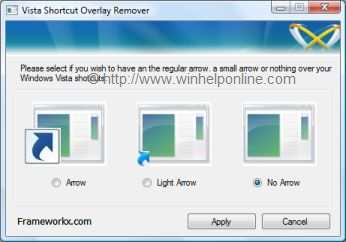
Download FxVisor (Shortcut Overlay Remover for Windows Vista and 7) by frameworkx. FxVisor allows you to either way to modify or remove the shortcut overlay arrow in Windows 7 and Vista.
Method 2 (All Windows versions, including Windows 10 and 11)
Option 1: Removing the shortcut arrow
Download blank_icon.zip and extract the file blank.ico to a folder of your choice. In this example, we use C:\Icons\blank.ico as the path to the icon file you downloaded. And then follow these steps:
- Launch the Registry Editor (
regedit.exe) - Navigate to the following branch:
HKEY_LOCAL_MACHINE\SOFTWARE\Microsoft\Windows\CurrentVersion\explorer\Shell Icons
Note: If the Shell Icons branch does not exist already, you’ll need to create it.
- In the right pane, create a new String value (REG_SZ) named 29
- Double-click 29 and set its data as C:\Icons\blank.ico
- Close Regedit.exe.
- Restart the Explorer shell, or log off and log back into your account.
Option 2: Setting Light arrow overlay

Copy lightarrow.ico to your Icons folder, and set the Value data for 29 accordingly (see Step 4 above). If you’ve copied lightarrow.ico to your C:\Icons folder, the Value data would be C:\Icons\lightarrow.ico
One small request: If you liked this post, please share this?
One "tiny" share from you would seriously help a lot with the growth of this blog. Some great suggestions:- Pin it!
- Share it to your favorite blog + Facebook, Reddit
- Tweet it!