![]() Here is a detailed guide on how to recover your Windows Mail data and custom settings from a corrupted user profile in your Windows Vista computer.
Here is a detailed guide on how to recover your Windows Mail data and custom settings from a corrupted user profile in your Windows Vista computer.
Login to the new user account and configure Windows Explorer to show hidden files. To do so, open (My) Computer, click Organize, click Folder and Search Options. In the View tab, select the option Show hidden files and folders, and click OK.
Note: Throughout this article, OldUser refers to the user account name of the corrupted profile. NewUser refers to the new user account where you’re transferring the files and settings to. You need to substitute the correct user names wherever applicable.
Transferring Mail messages and Accounts
Open Windows Explorer and navigate to the following folder:
Select all files and folders in the above location, and copy them to the following folder:
This transfers all the mail messages and accounts from the old user account.
Transferring Contacts
To transfer the Contacts, copy all the .contact files from the following folder:
to
Transferring Windows Mail settings
Windows Mail settings are stored in the user registry hive. This includes Junk mail options, Message Rules, Signatures, toolbar size, window size, location and other settings. Use these steps to load the registry hive of old user account and export the corresponding branch. Note that recovering the settings is possible only if the user registry hive is still readable.
1. Click Start, type Regedit.exe and press {ENTER}
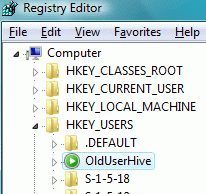
2. Select HKEY_USERS
3. From the File menu, click Load Hive…
4. Browse to C:\Users\OldUser and select the file NTUSER.DAT
5. Name the branch as OldUserHive


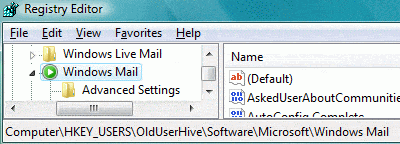
6. Navigate to the following branch:
HKEY_USERS\OldUserHive\Software\Microsoft\Windows Mail

7. From the File menu, choose Export…
8. Select Desktop from the Places Bar on the left
9. Type a file name (e.g. mailsettings.reg) and click Save
10. Select the HKEY_USERS\OldUserHive branch
11. From the File menu, click Unload Hive…
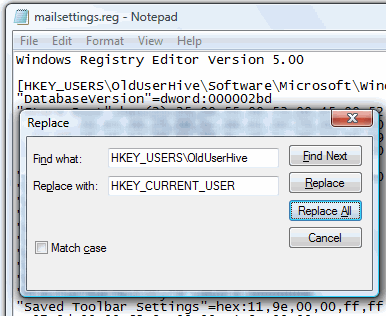
12. Open the file mailsettings.reg using Notepad
13. In Notepad, use the Replace… option under the Edit menu to replace every occurrence of string HKEY_USERS\OldUserHive with HKEY_CURRENT_USER

14. Save the file and close Notepad
15. In the Registry Editor, from the File menu choose Import…
16. In the Browse dialog box, locate the file mailsettings.reg and click Open
Delete the “Signature” registry key
Editor’s note: When importing the Windows Mail registry branch, the Signature is not transferred correctly if it contains blank lines. This causes Windows Mail to crash every time you compose new mail or while replying. To prevent this problem from occurring, delete the Signatures registry key:
HKEY_CURRENT_USER\Software\Microsoft\Windows Mail\signatures
Fix the default attachment save path
The default attachment save path might be pointing to the old user profile. You may fix that setting as well (optional).
HKEY_CURRENT_USER\Software\Microsoft\Windows Mail
Modify the Value data for “Save Attachment Path” string value, in the above location. Alternately, you can manually change the destination folder when saving an attachment. Windows Mail updates the Save Attachment Path value with the last saved path.
Verify the Store folder location
You may need to verify and fix (if necessary) the store folder location. The setting is stored here:
HKEY_CURRENT_USER\Software\Microsoft\Windows Mail
Make sure that the “Store Root” value (of type REG_EXPAND_SZ) is set to:
You’ve now transferred all the data and settings (except Signatures) to the new user account. Open Windows Mail, click Tools, Options… click Signatures tab and add your signature manually.
One small request: If you liked this post, please share this?
One "tiny" share from you would seriously help a lot with the growth of this blog. Some great suggestions:- Pin it!
- Share it to your favorite blog + Facebook, Reddit
- Tweet it!
Thanks for your help. Your step-by-step description worked flawlessly! I was about to give up hope for recovering my email.
Great help steps. Just what I was lookiing for. Thank you very much.
@Moyra Google changing “display hidden files and folders in Windows 7” that should get you or the next hapless NEWBIE closer. 😉
Brilliant help! Thanks.
I followed the steps (6 times) and it all seemed to go fine, except when I run Outlook there is nothing there. No contacts, no email, nothing.