Accidentally deleted an important file? Have you wiped clean your hard drive? Unsure of what to do with corrupted data? Windows File Recovery can help recover your personal data.
Windows File Recovery (WFR) is a command-line app from Microsoft. This app can help you recover lost files that have been deleted from your local storage device (including internal drives, external drives, and USB devices) and can’t be restored from the Recycle Bin.
For photos, documents, videos, and more, Windows File Recovery supports many file types to help ensure that your data is not permanently lost. However, WFR can’t recover files in your network file shares.
WFR can recover data from your hard drive, SSD (*limited by TRIM), USB drive, or memory cards.
Recover Deleted Files Using Windows File Recovery (WFR)
Download and install Windows File Recovery (WFR) from the Microsoft store.
There are two basic modes to recover files: Regular and Extensive.
- Regular mode is the standard recovery option for non-corrupted NTFS drives.
- Extensive mode is a thorough recovery option suitable for all file systems.
Regular mode examples
Example 1: Recover a specific file from your D: drive (e.g., “D:\Media” folder) to the recovery folder on the C: drive.
From an elevated or admin Command Prompt, run:
winfr D: C: /regular /n "\Media\Samsung Galaxy Chromebook Unboxing.mp4"
Note: If the file name or path contains space(s), be sure to enclose it within double quotes as in the above example. The source and destination drives must be different. When recovering from the operating system drive (often C: ), use the /n <filter> switches to specify the user files or folder.
You’ll see the following prompt. Click”y“to continue.
Windows File Recovery
Copyright (c) Microsoft Corporation. All rights reserved
Version: 0.1.20151.0
----------------------------------------------------------

Source drive: D:
Destination folder: C:\Recovery_20211221_124818
Filter: MEDIA\SAMSUNG GALAXY CHROMEBOOK UNBOXING.MP4
Extension filter: *

Sector count: 0x0000000021ce47ff
Cluster size: 0x00001000
Sector size: 0x00000200
Overwrite: Prompt
Mode: Regular


Continue? (y/n)
Pass 1: Scanning and processing disk
Scanning disk: 100%

Pass 2: Recovering files
Files recovered: 1, total files: 1, current filename: C:\Recovery_20211221_124818\Media\Samsung Galaxy Chromebook Unboxing.mp4
Progress: 100%

View recovered files? (y/n)
This tool automatically creates a recovery folder for you called Recovery_<date and time> on the destination drive.
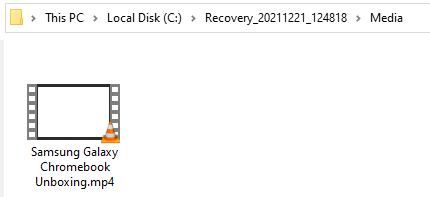
Clicking “y” opens the “Recovery” folder where the file has been restored.
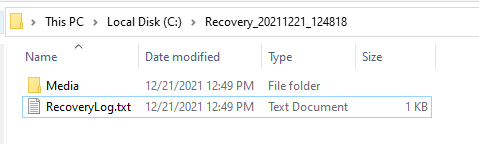
The recovery logfile”RecoveryLog.txt“would contain the list of recovered, damaged, and irrecoverable files pertaining to the last undelete operation.
Windows File Recovery
Copyright (c) Microsoft Corporation. All rights reserved
Version: 0.1.20151.0
----------------------------------------------------------


Recovered files

C:\Recovery_20211221_124818\Media\Samsung Galaxy Chromebook Unboxing.mp4

Total damaged files:
0
Total recovered files:
1
Total irrecoverable files:
0
The recovered video file was available in a subfolder folder named”Media“(the same folder name you gave in the command line).
For more WFR command-line information, run one of these two commands:
- “
winfr /?“– Shows a quick summary of syntax and switches for general users. - “
winfr /!“– Shows a quick summary of syntax and switches for advanced users.
Example 2: Recover your Documents folder from your C: drive to the recovery folder on an E: drive. Don’t forget the backslash (\) at the end of the folder.
Winfr C: E: /regular /n \Users\<username>\Documents\
Example 3: Recover PDF and Word files from your C: drive to the recovery folder on an E: drive.
Winfr C: E: /regular /n *.pdf /n *.docx
Sometimes, you may get the following message when attempting to undelete/recover a file:
No recoverable files were found with this mode. Please check /? for more recovery options
In that case, you may try the extensive mode (previously known as the “Segment mode” and “Signature mode”) for a thorough scan.
Extensive mode examples
Example 1: Recover any file with the string “invoice” in the filename using wildcard characters.
Winfr E: C: /extensive /n *invoice*
Example 2: Recover jpeg and png photos from your Pictures folder to the recovery folder on E: drive.
Winfr C: E: /extensive /n \Users\<username>\Pictures\*.JPEG /n \Users\<username>\Pictures\*.PNG
Example 3: Recover file types having a specific extension
Let’s say you want to recover deleted files that have the extension “.LLC” (e.g. sample-proj.llc). Assuming that the deleted file(s) was present on the D: drive and you want to restore it to a folder on the C: drive.
Run this command:
winfr D: C: /extensive /n *.llc

(or)

winfr D: C: /extensive /n \media\*.llc
(if you remember the directory path of the deleted file)
The source and destination drives must be different.
Note that Microsoft automatically creates a recovery folder for you called, Recovery_<date and time> on the destination drive.
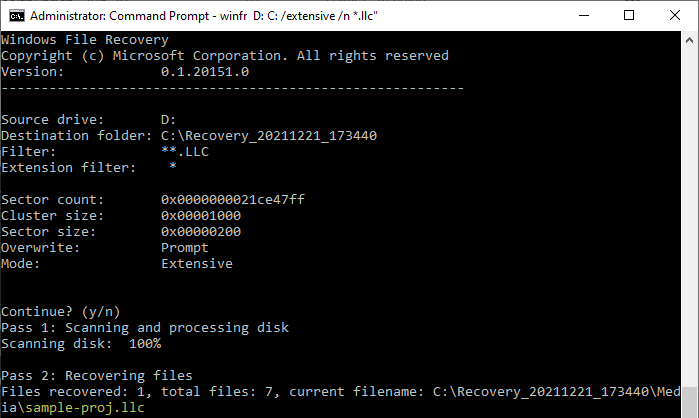
Press “y” when you see the following prompt:
Windows File Recovery
Copyright (c) Microsoft Corporation. All rights reserved
Version: 0.1.20151.0
----------------------------------------------------------

Source drive: D:
Destination folder: C:\Recovery_20211221_173440
Filter: **.LLC
Extension filter: *

Sector count: 0x0000000021ce47ff
Cluster size: 0x00001000
Sector size: 0x00000200
Overwrite: Prompt
Mode: Extensive


Continue? (y/n)
Press”y“to open the folder containing the recovered file(s).

Extensive mode and Disk Usage
When you use the Extensive mode, disk usage shoots up to 100% and remains at the peak throughout the operation. This is something the WFR development team must take note of and fix in the upcoming build.
Depending on the size of your source drive, the extensive mode may take a while. To stop the recovery process, press Ctrl + C.
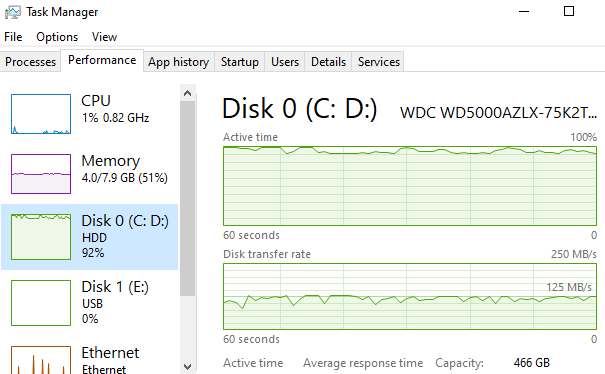
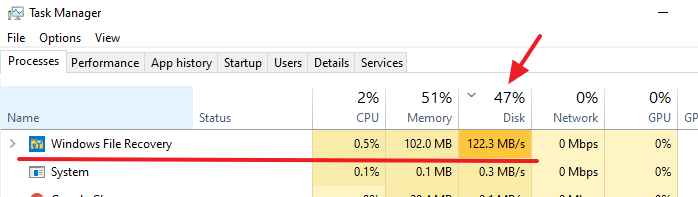
One of the hard disks was fully busy (100% disk usage) when Winfr.exe ran in “Extensive mode.”
Deciding which mode to use
Here are the file systems supported by WFR:
- FAT and exFAT are used by SD cards, flash, or USB drives (< 4GB).
- ReFS is used by Windows Server and Windows Pro for Workstations.
- NTFS is used in computers (HDD, SSD), external hard drives, flash or USB drives (> 4GB)
To recover files from non-NTFS drives, you’ll need to use the Extensive mode. Alternately, you can use the Signature mode specifically (advanced command-line switch.)
Use the following table to help you decide which mode to use. If you’re not sure, start with the default mode.
| File system | Circumstances | Recommended mode |
| NTFS | Deleted recently | Regular |
| NTFS | Deleted it a while ago | Extensive |
| NTFS | After formatting a disk | Extensive |
| NTFS | A corrupted disk | Extensive |
| FAT, exFAT | Any | Extensive |
Command-line Switches
Here are the general/basic command-line switches for WFR.
| Parameter / switch | Description | Supported mode(s) |
|---|---|---|
| Source-drive: | Specifies the storage device where the files were lost. Must be different from the destination drive. | All |
| Destination-drive: | Specifies the storage device and folder on which to put the recovered files. Must be different from the source drive. | All |
| /regular | Regular mode, the standard recovery option for non-corrupted NTFS drives | Regular |
| /extensive | Extensive mode, a thorough recovery option suitable for all file systems | Extensive |
| /n<filter> | Scans for a specific file by using a file name, file path, file type, or wildcards. For example:
|
All |
| /? | Summary of syntax and switches for general users. | All |
| /! | Summary of syntax and switches for advanced users. | All |
winfr /! to see the advanced command-line parameters .supported by WFR. However, for most users, the /regular and /extensive operators would be sufficient.The following is the list of advanced command-line switches supported by WFR:
| Switch | Description | Supported modes |
|---|---|---|
| /ntfs | NTFS mode, a fast recovery option for healthy NTFS drives using the master file table | NTFS |
| /segment | Segment mode, recovery option for NTFS drives using file record segments | Segment |
| /signature | Signature mode, recovery option for all file system types using file headers | Signature |
| /y:<type(s)> | Recover specific extension groups, comma-separated | Signature |
| /# | Signature mode extension groups and supported file types. | Signature |
| /p:<folder> | Saves a log file of the recovery operation in a different location than the default location on the recovery drive (for example, D:\logfile). | All |
| /a | Overrides user prompts, which is useful in a script file. | All |
| /u | Recovers undeleted files, for example, from the Recycle Bin. | NTFS Segment |
| /k | Recovers system files. | NTFS Segment |
| /o:<a|n|b> | Specifies whether to always (a), never (n), or keep both always(b) when choosing whether to overwrite a file. The default action is to prompt to overwrite. | NTFS Segment |
| /g | Recovers files without primary data streams. | NTFS Segment |
| /e | To keep your results manageable and focus on user files, some file types are filtered by default, but this switch removes that filter. For a complete list of these file types, see the information after this table. | NTFS Segment |
| /e:<extension> | Specifies which file types are filtered. For a complete list of these file types, see the information after this table. | NTFS Segment |
| /s:<sectors> | Specifies the number of sectors on the source device. To find sector information, use fsutil. | Segment Signature |
| /b:<bytes> | Specifies the cluster size (allocation unit) on the source device. | Segment Signature |
Notes
The Windows File Recovery app requires Windows 10 build 19041 (v2004) or later. See which version of Windows 10 you have. Visit https://aka.ms/winfrhelp for the user guide.
(Information in this blog post is based on Windows File Recovery version 0.1.20151.0. The existing command-line syntax may change in the future builds/versions of this program. This post was written on 21-Dec-2021.)
One small request: If you liked this post, please share this?
One "tiny" share from you would seriously help a lot with the growth of this blog. Some great suggestions:- Pin it!
- Share it to your favorite blog + Facebook, Reddit
- Tweet it!
I deleted my photos from 20220926 through 20220929 on a Samsung Ultra 22. As you can see, this is quite recent. It happened when transferring them from the smartphone. I saw that I was deleting the DCIM folder. The photos appear as corrupt on the phone. From a folder containing the word “android” and “trash” I was able to find about 10 of about 100. The names are all about 12 digit numeric. The property info still shows when taken.
I can’t find a way to “decorrupt” them from the phone. Also, because the names have no .jpg extension, the winfre recovery commands I have been trying are not working. No recovery folder is created, either.
I appreciate your information above; it helps an inexperienced user and calms the feeling of helplessness.
So that’s my comment, with a long prelude asking you for more. I guess there is a blog community, but those are hard to wade through, and sometimes the solutions are deleted.