After installing a Windows Update — be it a Cumulative Update, Feature Update, or a driver update, internet access may get broken in some configurations. To name a few, the Quality Updates KB4556799, KB4023057, KB4495620, and the 20H2 Feature Update broke network connectivity on some devices. This article provides some troubleshooting steps to restore internet connectivity on a Windows 10 computer.
Fix: No Internet after Installing Windows Updates
1) Restart Windows
Restarting Windows can fix many temporary issues. You need to click Restart so that the next startup will be a completely fresh restart instead of a fast startup. Using the “Shut down” option from the Start menu does not help. It’s an important step!
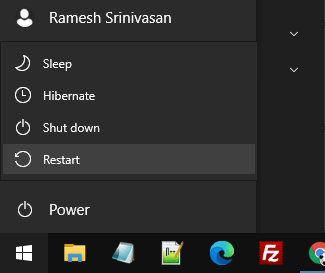
A fast startup is a hybrid combination of a cold startup and a wake-from-hibernation startup. It won’t freshly load the kernel-mode drivers. The Restart option won’t use fast startup.
2) Reset the Network Settings
Windows 10’s “Network Reset” feature in the Settings app fixes many network issues on the computer. This will remove and then reinstall all your network adapters, and set other networking components back to their original settings. You might need to reinstall other networking software afterward, such as VPN client software or virtual switches.
Note that the stored WiFi profiles are wiped out, and you’ll need to configure them later. You may want to backup your WiFi profiles before resetting the network.
- Open Settings, Network & Internet
- Click Status
- Click Network Reset, and click Reset now.
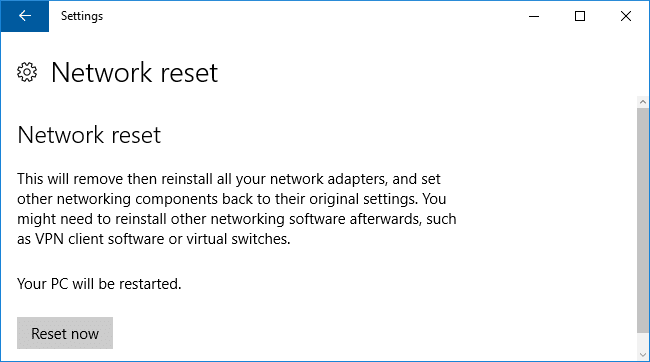
After clicking on Reset now, Windows will restart automatically after 5 minutes.
Manually reset the network settings
If you wish to reset the network settings manually, you can run the following command from an admin Command Prompt window.
ipconfig /flushdns
ipconfig /registerdns
ipconfig /release
ipconfig /renew
The above commands won’t reset your network settings; they only flush the DNS resolver cache and renew the IP address. See if you’re able to access the internet now.
If that doesn’t fix the issue, run the following commands which would reset the TCP IP stack and your network configuration.
netcfg -d
netsh winsock reset
netsh int ip reset %temp%\resetlog.txt
netsh int ipv6 reset %temp%\resetlog_v6.txt
After running the commands, reconnect to your WiFi network. If you’ve backed up the WiFi profiles earlier, you can restore them from backup. And, if you’re using a third-party VPN program, you have to reinstall and reconfigure it.
The network reset tool resets the TCP/IP and network settings on your computer. Network reset might set each one of your known network connections to a public network profile. In a public network profile, your PC is not discoverable to other PCs and devices on the network, which can help make your PC more secure. However, if your PC is part of a local network and is used for file or printer sharing, make your PC discoverable again by setting it to use a private network profile.
To set your Ethernet or WiFi network to Private:
- Click Start, Settings → Network & Internet → Wi-Fi
- Select Manage known networks → the network connection you want to change → Properties.
- Under Network profile, select Private.
- Repeat the same for Ethernet connection if required, via Settings → Network & Internet → Ethernet.
3) Restart the DNS Client service
This solution especially helps after the Windows 10 v20H2 update, but it also applies to any other build of Windows 10.
- Launch the Services console (
services.msc) - Make sure that the DNS Client service is running and set to Automatic start
The DNS Client service (dnscache) caches Domain Name System (DNS) names and registers the full computer name for this computer. If the service is stopped, DNS names will continue to be resolved. However, the results of DNS name queries will not be cached and the computer’s name will not be registered.
If the DNS Client service is not running or disabled, you can set it to Automatic using the following command:
(Note that you’ll need to execute the command from an admin Command Prompt. Restart Windows after running it.)
reg add "HKLM\System\CurrentControlSet\Services\Dnscache" /v "Start" /t REG_DWORD /d "2" /f
4) Use Google Public DNS
Many users have successfully restored internet connectivity using Google Public DNS after Windows 10 feature update v2004 or v20H2 broke internet connectivity on their computer. To use the Google Public DNS on your computer, follow these steps:
- Right-click Start, click Run. Type
ncpa.cpland click OK. This opens the Network Connections window. - Right-click on the connection you are using, and click Properties.
- Choose Internet Protocol Version 4 (TCP/IPv4) from the list, and click Properties.
- Click on the Use the following DNS server address option.
- Type
8.8.8.8into the Preferred DNS server field. - Type
8.8.4.4into the Alternate DNS Server field.
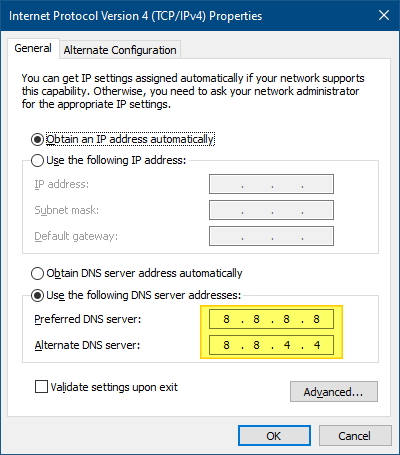
- Click OK to save and exit the TCP/IPv4 window.
- Click OK to exit the Properties dialog.
Your programs will perform all DNS lookups using Google Public DNS addresses 8.8.8.8 and 8.8.4.4 henceforth. Even if your router is configured to use the ISP-supplied DNS servers, the custom DNS server entries in the IPv4 dialog will override your router settings for the local computer.
Once internet access is restored, see if you’re able to switch back to your ISP-supplied DNS addresses without losing connectivity.
5. Rollback the device driver for the Network card
If a recent driver update (via WU) caused the issue, you can uninstall the driver or roll back to the earlier drive via the Device Manager.
To rollback a driver using Device Manager, use these steps:
- Right-click Start, click Device Manager.
- Right-click on the device (Intel or Realtek network adapter), and choose Properties
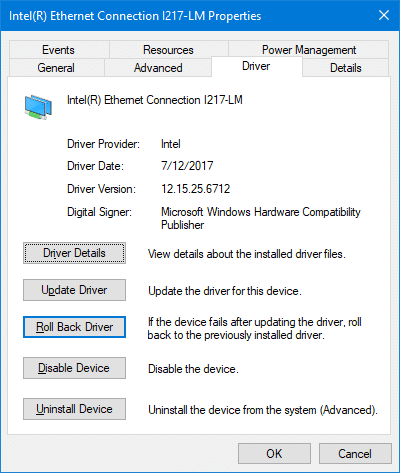
- Click on the Roll Back Driver and complete the rest of the procedure.
For more information, check out the article Prevent Windows Update from Installing Drivers Automatically.
![]() If the rollback option is grayed out for some reason, then backup the existing device drivers using PowerShell. Uninstall the current driver and install the vendor-supplied driver from the installation disk or the manufacturer’s website.
If the rollback option is grayed out for some reason, then backup the existing device drivers using PowerShell. Uninstall the current driver and install the vendor-supplied driver from the installation disk or the manufacturer’s website.
To know which Windows Update was recently installed (which caused the internet connectivity issue), click on the View Update History in the Windows Update page in the Settings app. You may also use the Control Panel → Programs and Features → Installed updates page. Be sure to sort the items by date column to isolate the problematic item.
(You can also get the list of recently installed updates using other methods.)
6. Rollback the computer to the previous build
If none of the above steps help or Microsoft acknowledges a bug in their update that’s yet to be fixed, then uninstall the problematic update.
Regarding feature updates, you can go back to the previous Windows 10 build via Settings → Update & Security → Recovery → Go back to the previous version of Windows 10. When you install a feature update, you have 10 days to rollback to the previous build. Beyond this time, Windows 10 will automatically wipe out the earlier build files.

If the internet connectivity problem surfaced after installing a Cumulative Update (also known as “Quality Update”), you can uninstall the update via Control Panel → Programs and Features → Installed Updates.
If you’re unable to uninstall the update(s), you can uninstall offline via the Windows Recovery Environment.
7. Reinstall the antivirus suite
When installing a feature update, your anti-virus program may be removed if the setup process considers it to be a hurdle when upgrading the version. The setup window would say, “Some apps need to be uninstalled,” and lists out the names of the programs that need to be uninstalled.
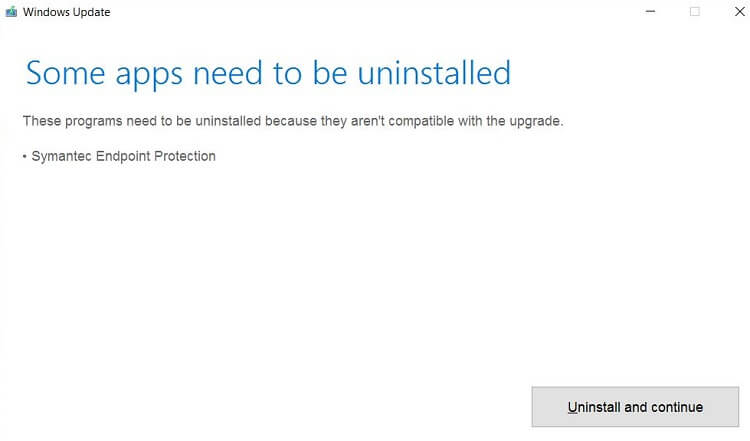
In some cases, a partial uninstallation of an antivirus or internet security suite may prevent you from accessing the internet even though the feature update may install successfully.
After installing the feature update, do one of the following:
- Cleanly uninstall the antivirus program. Some vendors supply specialized uninstaller programs to remove all traces of the software.
- Reinstall the antivirus suite after updating Windows. It’s better to upgrade the antivirus suite so that a “compatibility hold” (or “update block”) doesn’t happen to your device. Microsoft applies a compatibility hold on these devices from installing or being offered a feature update to safeguard the update experience.
I hope you were able to restore the internet connectivity using one of the steps discussed above. If I’ve missed any other potential troubleshooting steps, please let me know.
One small request: If you liked this post, please share this?
One "tiny" share from you would seriously help a lot with the growth of this blog. Some great suggestions:- Pin it!
- Share it to your favorite blog + Facebook, Reddit
- Tweet it!