Hashing means taking an input string of any length and giving out an output of a fixed length. Using the cryptographic hashing algorithm — e.g., MD5, SHA-256, SHA-384, you can verify if two files are identical or not. The checksum is a hash value used for performing data integrity checks on files. It’s a kind of signature for a file.
When you download large files from the internet such as the Windows 10 ISO images, there are chances that the file gets corrupt or a few bits lost due to inconsistent connection or other factors. Hash verification is the best way to compare the two hashes – source file on a website or server versus the downloaded copy.
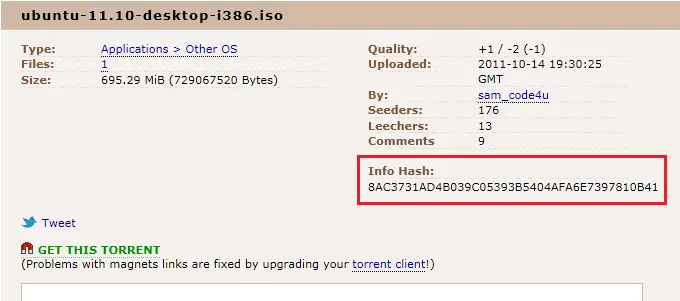
Many software vendors put up the hash for file downloads on their site. You might have seen in torrent sites that a hash value usually accompanies the download link.
Also, the hash checksum comparison is an excellent way to identify duplicate files in a computer or compare two folders.
In this article, let’s see how to get the cryptographic hash using MD5, SHA-256, SHA-384 algorithms using various methods, and how to integrate the functionality into the context menu.
How to get file hash checksum in Windows
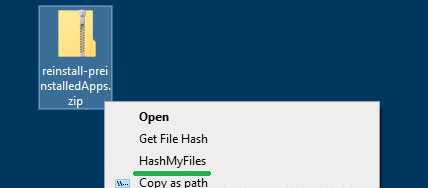
Get File Hash Checksum via the Right-click Menu in Windows
Using PowerShell
Using Windows PowerShell (powershell.exe), you can quickly get the file hash with a single command-line. Here is the command-line example:
get-filehash -path "C:\Users\ramesh\Desktop\reinstall-preinstalledApps.zip" | format-list
This outputs the file hash (by default, it uses the SHA256 algorithm) as shown below:
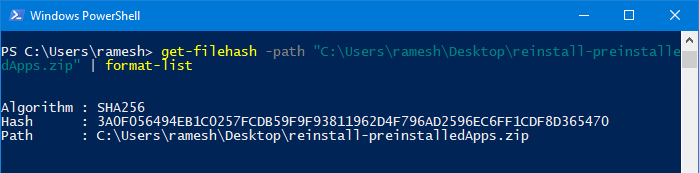
Algorithm : SHA256
Hash      : 3A0F056494EB1C0257FCDB59F9F93811962D4F796AD2596EC6FF1CDF8D365470
Path      : C:\Users\ramesh\Desktop\reinstall-preinstalledApps.zip
To use any other algorithm — e.g., SHA384, you can add the -Algorithm SHA384 parameter to the above command-line.
Example:
get-filehash -path "C:\Users\ramesh\Desktop\reinstall-preinstalledApps.zip" -Algorithm SHA384 | format-list
The acceptable values for the -Algorithm parameter are:
- SHA1
- SHA256
- SHA384
- SHA512
- MD5
Copy to the clipboard
To copy the output to the clipboard, pipe the output to the clip command, as below:
get-filehash -path "C:\Users\ramesh\Desktop\reinstall-preinstalledApps.zip" | format-list | clip
Integrate the command to the right-click menu
To add the PowerShell command to the right-click menu for files, here is a .reg file:
Windows Registry Editor Version 5.00

[HKEY_CURRENT_USER\Software\Classes\*\shell\gethash]
@="Get File Hash"

[HKEY_CURRENT_USER\Software\Classes\*\shell\gethash\command]
@="powershell -WindowStyle Minimized -command get-filehash -literalpath '%1' -algorithm SHA256 | fl | clip"
- Copy the above lines to Notepad and make a .reg file. For more information, see the article How to create and use .reg files.
- Double-click the .reg file to apply the contents to the registry.
- Now, right-click on a file and click Get File Hash command in the context menu.
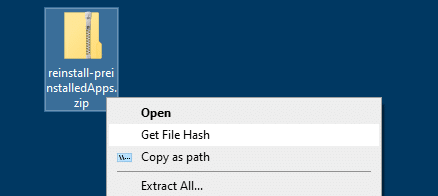
The command launches PowerShell, which in turn generates the file hash and copies it to the clipboard automatically.
To remove the context menu option you added, use this undo .reg file
Windows Registry Editor Version 5.00

[-HKEY_CURRENT_USER\Software\Classes\*\shell\gethash]
Using Certutil.exe with VBScript
Certutil.exe is a built-in command-line program that is installed as part of Certificate Services. You can use Certutil.exe to compute file checksum using various hashing algorithms. The following command-line syntax is to be used to calculate the SHA256 checksum of a file using Certutil.exe from a Command Prompt window.
certutil.exe -hashfile file_name SHA256
If you want to implement Certutil.exe in your right-click menu, here is a VBScript that exactly does it.
- Copy the following VBScript code to Notepad.
- Save the file with .vbs extension – e.g.,
get-hash-certutil.vbsin a permanent folder.'Get File hash via the right-click menu 'SHA256 hash for the file is copied to the clipboard automatically 'Created: June 4, 2019 by Ramesh Srinivasan - winhelponline.com Option Explicit Dim WshShell, sOut, sFileName, sCmd, oExec, strInput Set WshShell = WScript.CreateObject("WScript.Shell") If WScript.Arguments.Count = 0 Then strInput = InputBox("Type ADD to add the Get File Hash context menu item, or REMOVE to remove the item", "ADD") If ucase(strInput) = "ADD" Then sCmd = "wscript.exe " & chr(34) & WScript.ScriptFullName & Chr(34) & " " & """" & "%1" & """" WshShell.RegWrite "HKCU\Software\Classes\*\shell\gethash\", "Get File Hash", "REG_SZ" WshShell.RegWrite "HKCU\Software\Classes\*\shell\gethash\command\", sCmd, "REG_SZ" WScript.Quit ElseIf ucase(strInput) = "REMOVE" Then sCmd = "reg.exe delete HKCU\Software\Classes\*\shell\gethash" & " /f" WshShell.Run sCmd, 0 WScript.Quit End If Else sFileName = """" & WScript.Arguments(0) & """" sCmd = "cmd.exe /c certutil.exe -hashfile " & sFileName & " SHA256" & _ " | findstr /v " & chr(34) & "completed successfully" & Chr(34) & " | clip" WshShell.Run sCmd, 0 End If - Double-click the file to run it.
- In the input box that appears, type
ADDand click OK.
It adds the Get File Hash command in the context menu.
Clicking on the menu item computes the SHA256 hash and copies it to the Clipboard automatically.
Open Notepad and paste the file hash stored in the clipboard.

Note: To remove the context menu entry, double-click the file to run it. Then, type REMOVE and click OK.
The above script uses the built-in certutil.exe to generate file hash, by running the command and redirecting its output to the clipboard using Clip.exe:
certutil -hashfile file_name SHA256
This is how the output will look like when running it from Command Prompt.

Certutil.exe supports the MD2 MD4 MD5 SHA1 SHA256 SHA384 SHA512 hashing algorithms.
Another way to get the file hash via context menu is by using a third-party utility like HashMyFiles.
HashMyFiles utility from NirSoft
HashMyFiles is small utility from Nirsoft that allows you to calculate the MD5 and SHA1 hashes of one or more files in your system. You can easily copy the MD5/SHA1 hashes list into the clipboard, or save them into text/HTML/XML file. HashMyFiles can also be launched from the context menu of Windows Explorer, and display the MD5, SHA256, SHA384, SHA512 hashes of the selected file or folder.
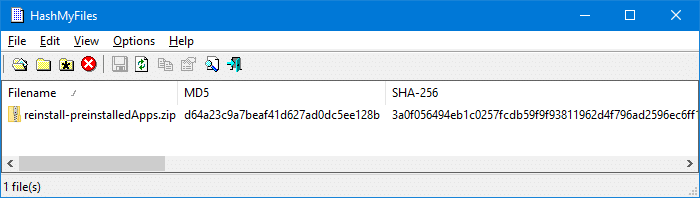
From the Options menu, click Enable Explorer Context Menu option to enable it. It adds the HashMyFiles option to the context menu for files and folders.
Download HashMyFiles from Nirsoft.net
Using 7-Zip
The popular compression utility 7-Zip has a feature that can compute the CRC or SHA checksums via the right-click menu. 7-Zip is a widely used software and it’s most likely that you may have installed it on your computer.
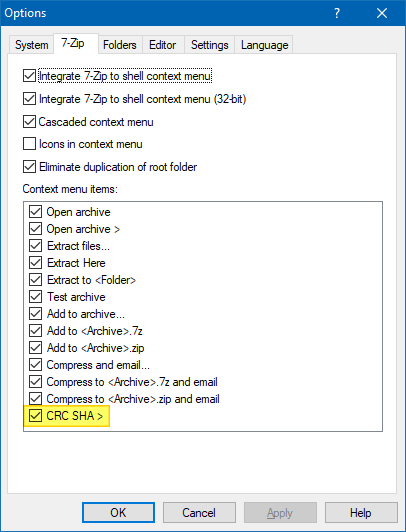
In 7-Zip setup doesn’t enable the option already, you can turn it on by clicking the Tools menu, clicking Options and enabling the CRC SHA > option under the Context menu items: listing. Click OK to save your setting.
Then, all you need to do is right-click on a file, click CRC SHA and then select a hashing algorithm such as CRC-32, CRC-64, SHA-1, SHA-256 from the sub-menu. To select all of the above hashing algorithms (and BLAKE2 algorithm in addition), click the asterisk (*) option.

The checksum information is presented in a separate dialog.
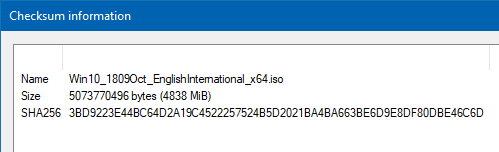
You can select the items and press Ctrl + C on your keyboard to copy it to the clipboard.
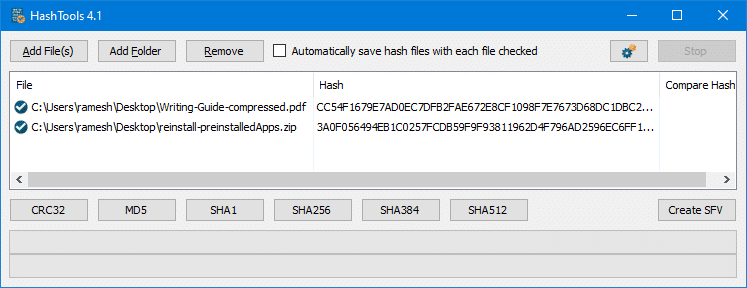
Using HashTools from Binary Fortress
HashTools by Binary Fortress Software computes and checks hashes with just one click! Supports CRC32, MD5, SHA1, SHA256, SHA384, SHA512 and SFV’s, as well as integration into the Windows Explorer context menu for one-click access.
Install HashTools or run the portable edition or the tool. Click on the Options button shown with the gears icon, and click Add to Windows Context Menus.
Right-click on a file or a set of files, and click Hash with HashTools in the context menu.
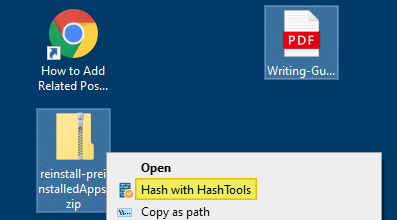
This launches the HashTools program and adds the selected file(s) to the list. Next, click on a hashing algorithm (e.g., CRC, MD5, SHA1, SHA256, etc) to generate the hash checksum for the files.
Do you know any other tool or method to calculate file hash? Let’s know in the Comments section below.
One small request: If you liked this post, please share this?
One "tiny" share from you would seriously help a lot with the growth of this blog. Some great suggestions:- Pin it!
- Share it to your favorite blog + Facebook, Reddit
- Tweet it!
Thank you for adding the registry commands but there’s a huge issue with it. Generating hashes using the right-click context menu from an external phone sends an entire copy of the file to C:\Users\(username)\AppData\Local\Microsoft\Windows\INetCache\IE\IV9BNOJZ and one case even DELETES the file, lol!
I used MD5 in the Registry entry, instead of SHA. Thanks for showing us how.