Every once in a while you may have definitely encountered a problem where one particular application uses 100% disk usage (or CPU, or memory usage). Many users reported “high disk usage” problem on their systems when Google Chrome is launched. Chrome may totally stall your system showing the status “waiting for cache”.
This post tells you how to fix the Google Chrome 100% disk usage problem in Windows.
Fix Google Chrome High Disk Usage Problem
![]() First, make sure that your Google Chrome is up-to-date. The disk usage problem may have been fixed in a recent release. While Chrome updates automatically using Task Scheduler, it’s advisable to do a manual check.
First, make sure that your Google Chrome is up-to-date. The disk usage problem may have been fixed in a recent release. While Chrome updates automatically using Task Scheduler, it’s advisable to do a manual check.
Visit chrome://settings/help to know if you’re running the latest release. If you already have the latest build and yet the problem happens, follow these steps one by one and see if that fixes the 100% disk usage problem.
Step 1: Use Chrome Task Manager
While in Google Chrome, press Shift + Esc to load the Chrome Task Manager. Chrome Task Manager shows the list of open web pages and Chrome Extensions that are running. For each entry, the CPU and memory footprint is displayed.
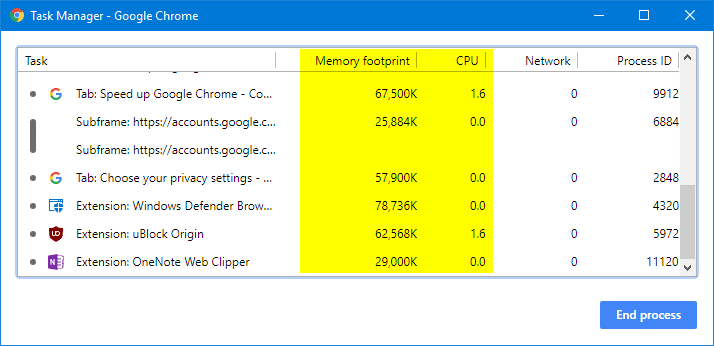
If you find one webpage or pages under a particular website using more CPU or Memory, terminate those pages. It’s possible that those pages may be using heavy javascript files and stylesheets.
Step 2: Turn off Preload pages for faster browsing and searching
While the high disk usage (usually 100%, as reported on Task Manager’s Processes tab) is mostly caused by some bad programming practices, at the same time, the age of the computer hardware is to be blamed equally. Sometimes, newer features may not play well with old hardware. You can turn off a couple of settings (“prefetch” features) to reduce the disk usage by Chrome.
- Start Google Chrome, and open Settings (
chrome://settings/) - Click “Cookies and other site data”
- Disable the toggle button for “Preload pages for faster browsing and searching”. Note that in Chrome versions earlier than v73, this option was called “Use a prediction service to help complete searches and URLs typed in the address bar.”
- Close and reopen Google Chrome.
Here is the explanation for the prefetch settings, by Google.
Preload pages for faster browsing and searching: Browsers use an IP address to load a webpage. When you visit a webpage, Chrome can look up the IP addresses of all the page’s links and load the ones you might navigate to next. If you turn this setting on, websites and any embedded content that are preloaded can set and read their own cookies as if you had visited them, even if you don’t.
While these Page prefetching / Link prefetching or prediction features help you load subsequent linked webpages quickly, they not only consume extra bandwidth but also additional CPU/Disk usage cycles.
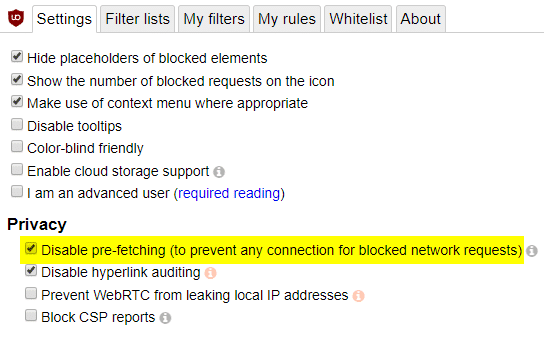
![]() As a side note, you may have observed if you’re using the excellent uBlock Origin Chrome extension, the “Preload pages for faster browsing and searching” or “Use a prediction service to load pages more quickly” will be disabled by default. This setting corresponds to uBlock Origin’s setting named “Disable pre-fetching (to prevent any connection for blocked network requests).”
As a side note, you may have observed if you’re using the excellent uBlock Origin Chrome extension, the “Preload pages for faster browsing and searching” or “Use a prediction service to load pages more quickly” will be disabled by default. This setting corresponds to uBlock Origin’s setting named “Disable pre-fetching (to prevent any connection for blocked network requests).”
Step 3: Turn off address bar autocomplete
- Launch
chrome://settings/syncSetup - Disable the setting “Autocomplete searches and URLs”. In earlier versions of Chrome, this setting was called “Use a prediction service to load pages more quickly”
Step 4: Disable Unwanted Chrome Extensions
See if browsing the same set of websites using Google Incognito (private browsing) mode helps. This mode loads Chrome without extensions and saved cookies are not utilized. If everything works fine in Incognito mode, then open the Extensions settings page (chrome://extensions/) and disable 1st half of the extensions. Close Google Chrome, reopen it, and observe if the problem repeats.
If the problem recurs, disable the 2nd half of the extensions, close and reopen Chrome. In case that solves the problem, you’ll need to narrow down which particular extension in that 2nd half is causing the problem and eliminate the offending extension.
Step 5: Reset Google Chrome
If disabling the prediction services and Chrome Extensions did not help, you may reset Chrome completely in an attempt to fix the disk usage problem. These are three ways you can reset Google Chrome:
- Reset Google Chrome via Settings
- Reset Google Chrome Using Chrome Cleanup Tool
- Reset Google Chrome completely by deleting its data folder
Each method is covered in detail in the article Reset Chrome Browser to the Default Settings.
Note: If you’ve your account data synced with Google servers, the data should be back once you log in to Chrome after resetting. However, it’s prudent to have local backup copies before resetting, just in case.
That’s it! I hope the article helped you resolve the high (100%) disk usage problem in Google Chrome on Windows.
(This article was last revised in October 2020 – Chrome 86.0.4240.75)
One small request: If you liked this post, please share this?
One "tiny" share from you would seriously help a lot with the growth of this blog. Some great suggestions:- Pin it!
- Share it to your favorite blog + Facebook, Reddit
- Tweet it!
Thank you so much! Step 2 solved my problem.
Disabling the prefetching worked for me.
Thank You it did help to speed up my chrome
Please date your articles so we know if they are still relevant. Some of the suggestions you made here no longer apply to Chrome (e.g. prefetch).
My old Win 7 computer continues to serve my needs but yesterday the web was slowing down to a crawl. I traced the problem to Chrome and finally isolated the problem. I had two PDF files open in Chrome. And for some reason this caused Chrome to keep accessing the drive every second or two, even though I wasn’t doing anything with these pages (I was waiting for information from another person before I could complete the task). I closed the PDF files and the problem was resolved.
Thank you so much.
It really clear up space for my disk.
This really helps me.
You’re my saviour.
Privacy and security – Cookies – And then prevent pages from pre loading.
Thanks
Thank a lot!
Nice solution. Thanks for resolving my longstanding problem.
Some tips may help. but real cure is to remove Chrome or any other chromium based browser. They seem to have no limits whatsoever. I understand than one won’t do that I just wrote for understanding. That’s a common trend – user has less and less ways to control anything even software. “They” know better.
Best wishes!
I have visited a number of websites that were not helpful. Your solutions worked. Thank you very much!