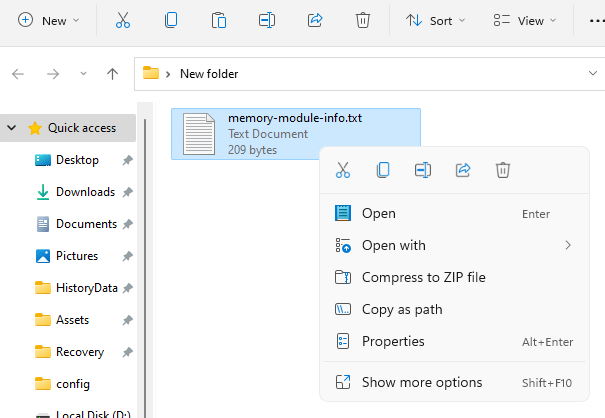
In Windows 11, the context menu appears very quickly, but the menu doesn’t show all the entries by default. To access the menu entries that are not shown in the default listing, you need to click the “Show more options” option every time.
As an alternative, to launch the classic context menu directly, you can also press and hold the Shift key when right-clicking on an item. Or use the keyboard shortcut: Shift+F10.
The Windows 11 default context menu may be slightly inconvenient for those who have been using Windows Operating Systems for a long time. This article explains how to make Windows 11 show the full classic context menu (by default, without having to press Shift) so that all the entries are displayed.
Restore Classic (Full) Context Menu in Windows 11
To restore the full/classic context menu in Windows 11, follow these steps:
- Open a Command Prompt window.
- Type the following command line and press Enter:
reg add HKCU\Software\Classes\CLSID\{86ca1aa0-34aa-4e8b-a509-50c905bae2a2}\InprocServer32 /ve /d "" /f - Exit the Command Prompt window.
- Log off and login back in, or restart Explorer (via Task Manager) for the change to take effect.
INFO: The above command-line creates the following registry key (per-user override) and sets an empty string as the data for the (default) value:
HKEY_CURRENT_USER\SOFTWARE\Classes\CLSID\{86ca1aa0-34aa-4e8b-a509-50c905bae2a2}\InprocServer32
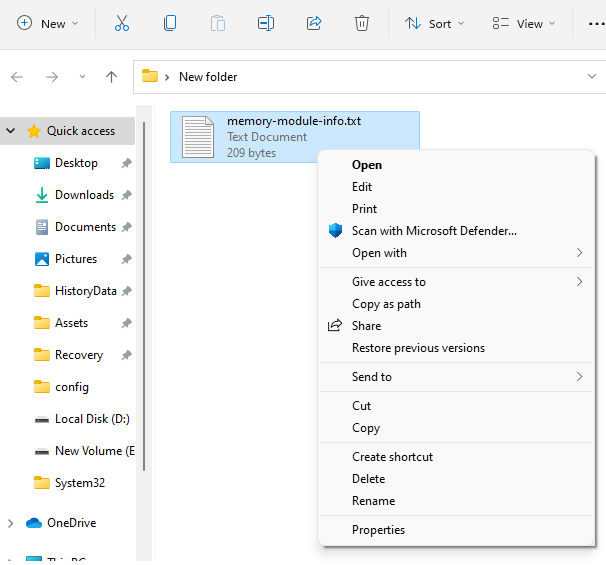
When you right-click an item, you’ll see the full/classic context menu instead of the default condensed menu. The “Show more options” entry is removed.
[Undo Information] Restore the Default Windows 11 Context menu
To restore the default Windows 11 context menu, all you need to do is delete the above registry key. It can be done via the Registry Editor (regedit.exe).
Alternately, you can use the following command from a Command Prompt window:
reg delete HKCU\SOFTWARE\Classes\CLSID\{86ca1aa0-34aa-4e8b-a509-50c905bae2a2} /f
I hope that helps!
One small request: If you liked this post, please share this?
One "tiny" share from you would seriously help a lot with the growth of this blog. Some great suggestions:- Pin it!
- Share it to your favorite blog + Facebook, Reddit
- Tweet it!
Incorrect path, \CLSID\ missing -> HKCU\Software\Classes\CLSID\{86ca1aa0-34aa-4e8b-a509-50c905bae2a2}\InprocServer32
Also easier to kill/restart explorer.exe from the command line since we already are in cmd :
taskkill /im explorer.exe /f & explorer.exe@Zorro: Fixed the path. Thank you for the heads up!
this no longer works
@sean: The method works in Windows 11 22H2 as well. Please log off and log back in after running the command. It certainly works.
Thank you! Thank you! Thank you! I’m always adding new folders and performing other functions that requires the full menu. Having to select the “show more options” is definitely regression and degrades performance. This works beautifully. Thanks again.
I will not apply registry hacks like this. It is just as likely to make Windows stop working, refuse to boot and become a brick. Let’s just paste in an unknown registry key setting and cross our fingers and hope Windows still works afterwards.
Microsoft needs to stop it’s UX computer illiterates from trying to be like Apple. Wave after wave of new college grads trying to differentiate themselves with bright new ideas that are actually ill-thought, incomplete solutions to problems that don’t exist. If you really want to offer a trimmed context menu inside Windows Explorer then make an obvious in-menu choice to opt-out of the simplified menu. But Nooo, the UX people aren’t that smart. That’s why they aren’t programmers. Like a Mall Security Guard that thinks they’re a cop.
Now stop wrecking Windows, or I shall give you another taunting.
Hi Ramesh,
You recently helped me on the answers.microsoft site to fix a problem on my new PC which had a driver incompatible with Win11 Memory Integrity feature. You guided me expertly towards the solution which included changing the registry. I wish I had found THIS webpage ahead of a different one when I tried just now to get the classic full-context menu back. Here was the advice, look under the section “Alternate Route: Via Command Prompt”:
guidingtech.com/how-to-customize-right-click-menu-windows-11/
where they had me type this command which is slightly different than yours at the tail end:
reg add “HKCU\Software\Classes\CLSID\{86ca1aa0-34aa-4e8b-a509-50c905bae2a2}\InprocServer32” /f /ve
Well, it added the {86ca1aa0-34aa-4e8b-a509-50c905bae2a2} to CLSID and a subfolder of InprocServer32, but after ReStart, nothing changed.
(In the command screen, notice the 5th character of the string 86ca1aa0, I can’t tell if I should type the lower case L instead of the number “1” as those characters look nearly the same in the command window.)
I hate to leave a Registry entry in there that does nothing but I don’t know the command to remove it.
Or, can you tell me how to get from where I now am in this Registry to where I should be if I want the classic right-click menu?
If email would be better to share actual screen shots, plz email me.
Thank you.
Thank you
THANK YOU! I have no idea why I’ve been suffering with the ‘new’ menu that REMOVES functionality for so long. Glad to have one of the many poor oversimplified menus of win 11 fixed.
Thank You!
Method works on Windows 11 …
Yes it certainly DOES work on Windows 11. You have to make sure to Log Off Windows and then Log On again and it will work. I just tried it. The key is logging OUT of Windows and then logging IN.
I have a big problem with this command. i did it and now it crashes explorer i tried with
” [Undo Information] Restore the Default Windows 11 Context menu
To restore the default Windows 11 context menu, all you need to do is delete the above registry key. It can be done via the Registry Editor (regedit.exe).
Alternately, you can use the following command from a Command Prompt window:
reg delete HKCU\SOFTWARE\Classes\CLSID\{86ca1aa0-34aa-4e8b-a509-50c905bae2a2} /f”
can you help me?
What happens when you run the Undo command? What was the output message?
Sorry i write again my question. I dont see your anser. I answer now here… When i click right with the mouse my filexplorer go in crash.
when i right click and choose any of the classic menu options it crashes. now it also crashes when i try to copy a folder or right click on a folder from the explorer window
When i go with my right button on the mouse and i choose “other menu” (old menu classic) my shell go in crash. i dont know where found it. you know this problem? i think the problem come after this command reg add HKCU\Software\Classes\CLSID\{86ca1aa0-34aa-4e8b-a509-50c905bae2a2}\InprocServer32 /ve /d “” /f . you can found it online
What happens when you run the Undo command? What was the output message?
Thank you for the command line prompt, the old way is so much better. I really wish they would stop changing things for the worse. The new right click options on Windows 11 are genuinely less efficient and don’t include the most frequently used actions like cut, copy, and paste. They sometimes do but they are icons that don’t even make sense.