The Windows 10/Windows 11 Photos app lets you trim videos and save the selected portion of the video clip to a new file. You don’t have to rely upon a third-party program, as the Photos app does the task perfectly — suitable for quick trims.
Cut/Trim or Split videos using Photos App in Windows 10/11
- Right-click on a video file and click “Open with” and choose Photos.
- Click the Trim button at the top.
 On Windows 11, click on the Video trim icon (Ctrl + E) to launch the trim window.
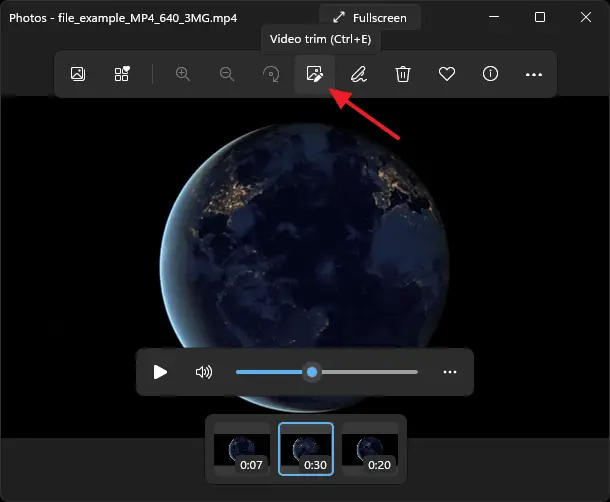
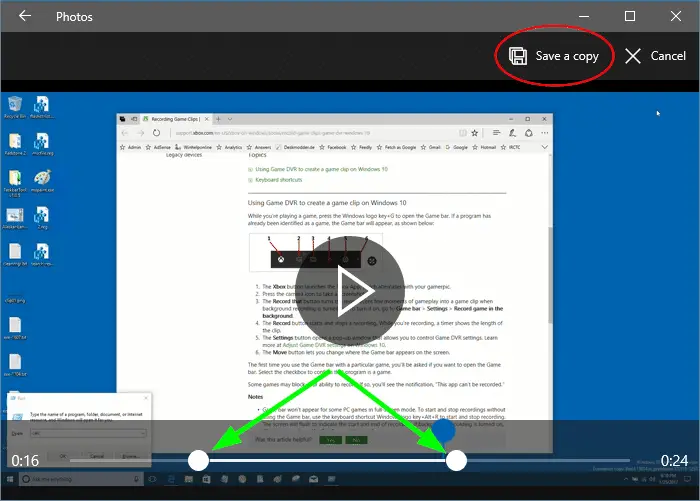
- In the next screen, select the portion of the video you need, by moving the start and end sliders accordingly.
Trim videos using Windows 10/11 Photos app On Windows 11, you’ll see the “Save as” button.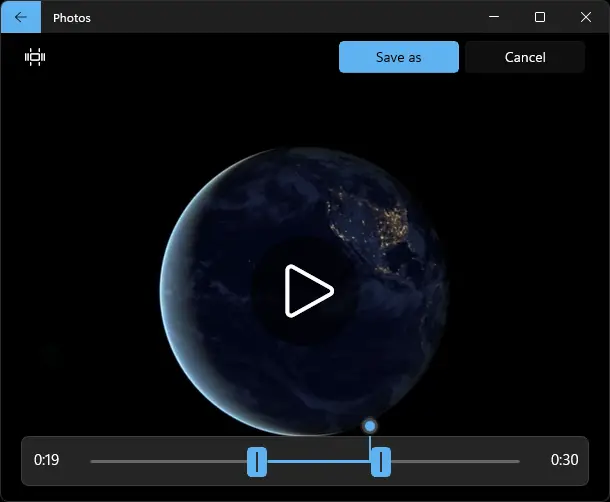
- Save the selected portion of the video to a separate file, by clicking “Save a copy”.
The selected portion is now saved to a video file in the same folder, with the letters “Trim” added to the file name. If the file name of the original video is Remote_Desktop.mp4, the trimmed copy will be named Remote_DesktopTrim.mp4.
Split a video into multiple clips?
You can use the trim tool to split a big video into a number of small video clips if you want. As the Photos app is suitable for quick trims and is not a sophisticated editor, to split a video into multiple parts you’ll need to repeat this sequence:
- Open a video, let’s say
Dogshow.mp4 - Split/trim it and save a copy.
- Rename the trimmed file accordingly. Eg. rename
DogshowTrip.mp4toDogshow (Part-1).mp4. - Reopen the original video
Dogshow.mp4, choose another time segment, and split it — for Part 2. - Repeat the above sequence for subsequent trim or splits — part 3, part 4, and so forth.
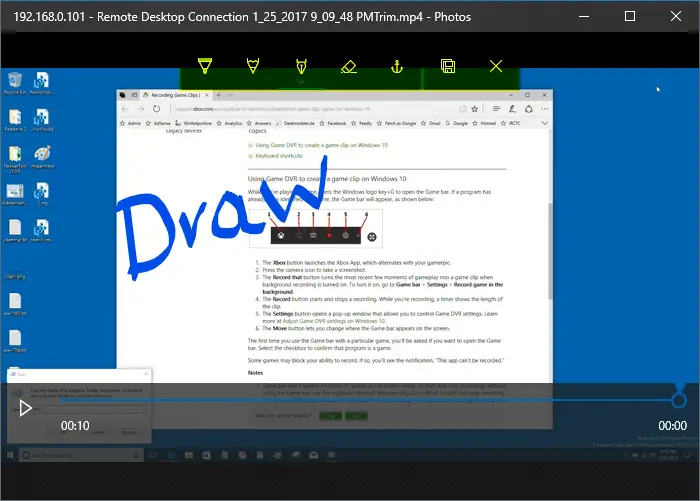
Additional Tip: You can annotate videos using the Draw tool. There is no text tool though which is a big disappointment.
![]() Using the Photos app to split a video into multiple parts is tedious. You can use the FFmpeg command-line tool for this purpose. Check out the article How to Split a Video or Audio (MP3) into Multiple Parts for details. Alternatively, you can use Avidemux or similar freeware programs to cut a segment from an audio or video file.
Using the Photos app to split a video into multiple parts is tedious. You can use the FFmpeg command-line tool for this purpose. Check out the article How to Split a Video or Audio (MP3) into Multiple Parts for details. Alternatively, you can use Avidemux or similar freeware programs to cut a segment from an audio or video file.
One small request: If you liked this post, please share this?
One "tiny" share from you would seriously help a lot with the growth of this blog. Some great suggestions:- Pin it!
- Share it to your favorite blog + Facebook, Reddit
- Tweet it!
Hello, Ramesh. I have a 30 minute video file I want to edit. I will be deleting some footage, copying other footage several times — copying and pasting if the app allows, as i don’t know, and adding slow-motion to some of it. But I haven’t a clue how to do this, as Microsoft doesn’t have demo-videos showing how. And the ones they do have are not adequate to the task. I loved their Windows Movie Maker software, and I never used the story-line feature, but it isn’t available anymore. H E L P. Thank you for taking the time to answer my concerns.
I trimmed a few seconds off a 2 hour video and it’s taking over an hour just saving a copy. Is there a faster way?
it might be you internet its fine for me
So odd. The option to save never comes up for me after I select the parameters to trim. Can’t figure this out at all.
Tried this with an mpg video file; when I right click, it doesn’t give Photos as an option to open it with.
@Cindy: Alternately, you can place the video file in the Pictures folder so that Photos app lists that automatically.
Ramesh, your reply to Cindy doesn’t solve the problem. Even by moving an mpeg file into the Pictures folder, the Windows 10 Photos application will not open the file. How can we trim .mpg files in Windows 10? Please don’t say to use the Photos app unless you’ve tried it to trim .mpg files and know what must be done for the application to recognize that file type.
@Jeff: Today, I’ve tested and played with file associations and Photos app. It appears that the Photos app doesn’t support MPG/MPEG file format. Attempts to force open that file type using Photos leads to the “File system error (-2147219196)” error. Sorry for the confusion.
You may use the freeware Avidemux (or its alternatives) for trimming videos or extracting audio from videos.
Thanks – I’m new at trimming and your info was the most helpful and clear. Feeling like a real editor now! Thanks for the concise explanations!
too slow and complicated. Perhaps in my next life. This is a step back not an advancement
I’ve just opened a video with the Photos App. It gave me a “Trim” option in the edits list but nothing else when I opened my video. The video just played and there was an option to save or delete it but no other choices at all. All I want to do is remove some frames at the start and end and one or two in the middle.
Select the “Trim” function, then adjust the the sliders to limit the duration of video files and then you can save the desired portion. The file should save within the working directory (folder) of the original video file and will contain the original file name with the word “trim” added.
Me too!!!! Only one white dot on a vertical line at beginning of video (it starts playing soon as you open w/photos in [create/edit in photos]. Hit pause but throws u off on exact start point. Again where is the second “stop” symbol/icon whatever? Took me a couple hrs. first time, can’t remember how I trimmed one months ago, too afraid of losing my video and smashing my Windows, pun intended. I’m downloading a real video tool.
@Luna: I do see two white dots (sliders) in Windows 10 v1809. Can you post a screenshot from your system?
It would help if in the instructions, one would say, Save the video’s in the PHOTO’S Folder so that you are able to edit and save a copy of the trimmed videos.
Wording works wonders!
As the same as everyone else on here it doesn’t work.It goes so far and stops.Windows please sort this trivial problem.
Is there a way to remove a segment from the body of a video? I know how to trim from the beginning and end but can we chop out a segment from the middle?
I have trimmed from the start and end. Then split into 2 parts. leaving out a bit in the middle. How do we put them back together to create an edited clip ?
Does anyone have a problem with the first second or two of your trim being black? Having a black square with a play button on it doesn’t work for what I’m doing. It’s frustrating.
I want to do a simple cut of parts of noise video in a long clip.
I want to CUT IT OUT.
Trim doesnt do it and is useless.
Any solutions or alternatives. Now sure how Microsoft can remove Windows Movie Make and replace it with the current junk.
@Frank: Avidemux is what you need. Here is a YT video for you: https://www.youtube.com/watch?v=F7moav_J-rE
I had a 5 minute dash cam video that was 739 MB. I’ve trimmed it down to 14 seconds, and the trimmed file size is 1.22 GB! What the hell is going on?
@Stuart: You may rather use Avidemux to trim audio/video files (using the same codec so that the output file size is not bigger).
I have the same problem as several others here. I have selected a small section of a long video and I only want to cut and save as this small section. The TRIM screen has no Save As option (my version looks different to the one here).
I can select done but it doesn’t seem to do anything. And I can copy a split section but I can’t paste it into a new project.
Very frustrating
@Eve: The built-in Photos app has only minimal features. You may use Avidemux for the task.
I have all these problems and others with this nonsense half implemented solution. More time wasted trying to get Microsoft software to work like it should.
Use the three dots on the right corner to get the option to save.
Have you noticed that recently, with some update, Windows Photos now resizes the cut video many times larger than the original uncut…it did not do this before…not sure what changed.
After selecting a 7-minute portion of my larger MP4 file to save and clicking “Save as copy”, I keep getting the message “Unable to save. There was an error while saving. Please try again later”. This occurs regardless of the target directory or drive. There are no messages in Event Viewer to help diagnose this error.