Windows Operating System upgrades and version updates would leave plenty of files behind in the system drive. This is because Windows keeps the files from the previous versions of Windows in a separate folder in case the user wants to roll back the major update (or OS upgrade).
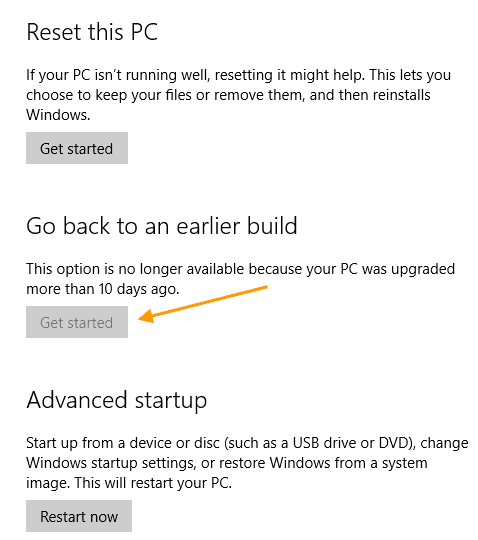
For instance, the Windows 10/11 feature updates give you 10 days to roll back to the previous build or version if needed. After 10 days, the option to go back wouldn’t be available as the respective folders are cleared automatically. If you’ve upgraded to Windows 10 from Windows 7 or 8, the previous Windows installation folder (Windows.old) is retained for 30 days.
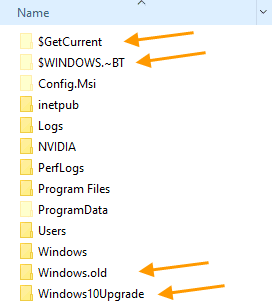
After the stipulated time (10 days), the corresponding folders will be wiped out automatically by Windows. These are the folders that would be emptied automatically:
- $GetCurrent
- $Windows.~BT
- Windows.old
- Windows10Upgrade (this applies if you used the upgrade assistant tool)
If Windows doesn’t automatically clear those folders, you can use Disk Cleanup or Storage Settings to remove Windows.old and the other folders. This article explains how to delete the Windows.old folder using 3 different ways.
Contents
Delete the Windows.old folder (Previous versions of Windows)
After Installing a major update or Feature update, you can immediately free up to 20 GB+ disk space if you don’t plan to roll back the update. Typically, the amount of disk space freed up might be anywhere between 14 GB to 25 GB depending upon the bitness of your Windows installation and the number of programs installed on the system drive.
Using one of the following methods to delete the Windows.old folder on your system drive.
Method 1: Delete Windows.old using Disk Cleanup
To delete the Windows.old folder using Disk Cleanup, follow these steps:
- Start Disk Cleanup by running
cleanmgr.exevia the Run dialog. - Disk Cleanup (cleanmgr.exe) doesn’t list the Previous Windows installation option if you’re not running it as administrator. So, you’ll need to elevate it by clicking Clean up system files button in the Disk Cleanup window.
Or you can start
Cleanmgr.exeas administrator via the Run dialog. Check out the article Start Programs Elevated (as Administrator) from Run Dialog [Ctrl + Shift]Alternatively, you can run it as administrator from the Start menu. To do so, click Start, type Disk Cleanup, right-click Disk Cleanup from the results, and choose Run as administrator. - In the next dialog that appears, select the following checkboxes if available:
- Previous Windows installation(s)
- Temporary Windows installation files
- Windows Upgrade log files.
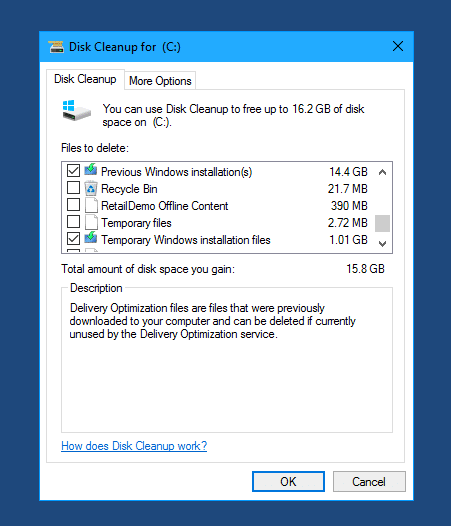
- Click OK. You may uncheck the other items if you don’t want to clear them.
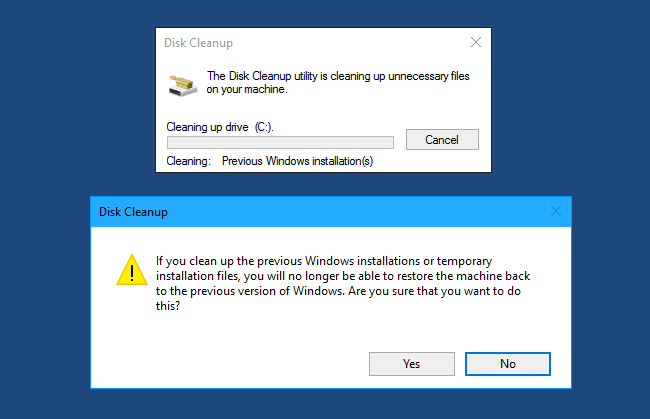
- Disk cleanup would now warn you that if you clean up the previous Windows installations or temporary installation files, you will no longer be able to restore the machine back to the previous version of Windows. Click Yes to continue.
After installing the Fall Creators Update, I could free up 27.4 GB of disk space by clearing the Previous Windows installation(s) files using Disk Cleanup.
If Disk Cleanup doesn’t list the Previous Windows installation(s) entry, or it throws up an error when cleaning up, use Storage Settings (as in Method 2 below) as an alternative.
Method 2: Delete Windows.old using Storage Settings
Storage Settings (or Storage Sense) helps you clean up temporary files and empty the recycle bin and the Downloads folder at regular intervals. Other than that, Storage Sense also lets you delete the Previous Windows installation (“Previous versions of Windows” files) easily.
- Click Start → Settings → System → Storage
- Click Configure Storage Sense or run it now
- Scroll down to the Free up space now section.
- Select the Delete previous versions of Windows checkbox, and click Clean now.
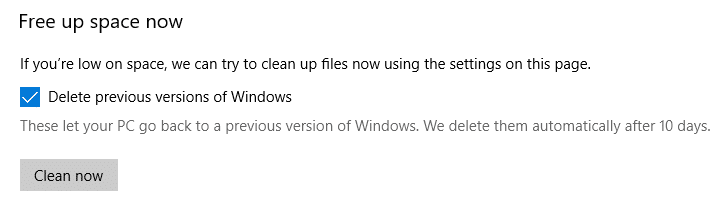
Description: These let your PC go back to a previous version of Windows. We delete them automatically in 10 days. The clean-up starts immediately. You won’t be asked for confirmation.
Method 3: Delete Windows.old via Command Prompt
Deleting Windows.old using Disk Cleanup or Storage Settings sounds very easy, but they fail to clear the folder in some situations. If they don’t work in your case, you should be able to delete the Windows.old folder manually with the required folder permissions.
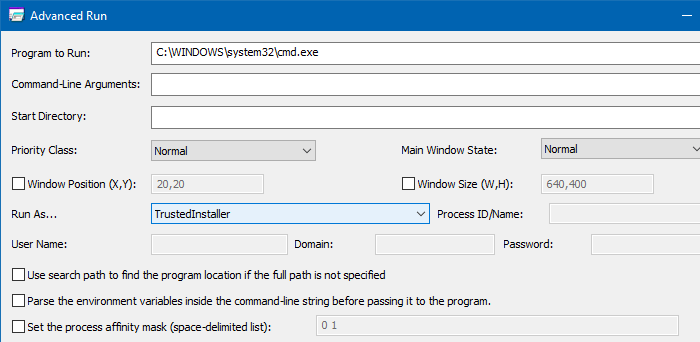
Option 1: Using the TrustedInstaller Command Prompt
Start a Command Prompt window (cmd.exe) as TrustedInstaller, using AdvancedRun. See this page for instructions.
From the TrustedInstaller Command Prompt, run the following command to delete the Windows.old folder:
RD /S C:\Windows.old
If you get the “Location is not available” error during the process, run the following command instead:
RD /S \\?\C:\Windows.old
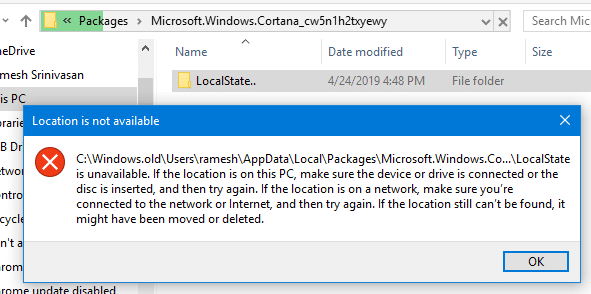
“Location is not available”?
If you get the “Location is not available” error when deleting the Windows.old folder, then it could be caused by the Cortana\LocalState.. folder having invalid characters in the file name. The folder remains inaccessible or undeletable.
To wipe out the Windows.old folder along with the Cortana\LocalState.. sub-folder successfully, you have two options:
- Use the DOS device path — i.e., with the
\\?\prefix. For example, to delete Windows.old using the DOS device path, use the following command from an administrator Command Prompt.RD /S \\?\C:\Windows.old
- Use Unlocker as described in the article How to Delete a Stubborn Undeletable File or Folder
Option 2: Using the Admin Command Prompt
If you don’t prefer the first option, you can open an admin Command Prompt, take ownership of the Windows.old folder recursively, and then delete the folder. However, Option 1 is the preferred method.
- Right-click Start, click Command Prompt (Admin)
- Type the following commands and press ENTER after each command:
TAKEOWN /F C:\Windows.old  /R /D  Y

icacls C:\Windows.old /grant administrators:F /T
The above command is to take ownership of
Windows.old, its subfolders, and all the files recursively. It also assigns full control Permissions for theAdministratorsgroup. So, the process might take some time to complete. - Then, run the following command to remove the
Windows.oldfolder completely:RD /S C:\Windows.old
In case the third command fails to accomplish the task (due to Cortana’s
LocalState..folder issue or similar), use the following command instead, which uses the DOS device path:RD /S \\?\C:\Windows.old
Now, the option to Go back to an earlier build should be dimmed out.
I hope you’ve reclaimed disk space by removing the Windows.old folder on your Windows 10 or 11 computer using one of the above methods in this article.
One small request: If you liked this post, please share this?
One "tiny" share from you would seriously help a lot with the growth of this blog. Some great suggestions:- Pin it!
- Share it to your favorite blog + Facebook, Reddit
- Tweet it!
Worked, thanks.