Install FruitNinja Theme for All Users
This post and the demonstration comes from a Windows 10 computer, just to show you that the common themes work in Windows 10 as well.
Download Fruit Ninja Theme from Microsoft Themes, and save it to desktop. Rename the downloaded theme pack’s file extension to .cab, that is FruitNinja.themepack to FruitNinja.themepack.cab.
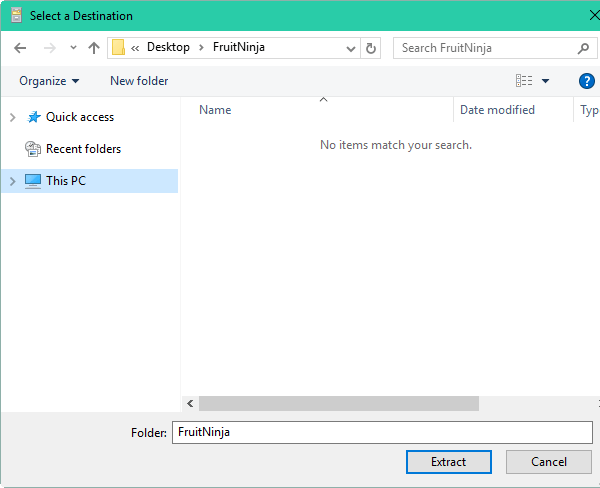
Create a folder named FruitNinja on your desktop.
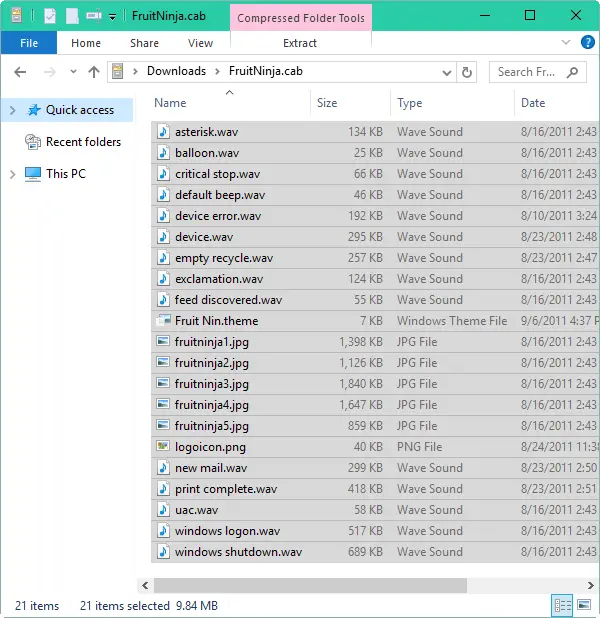
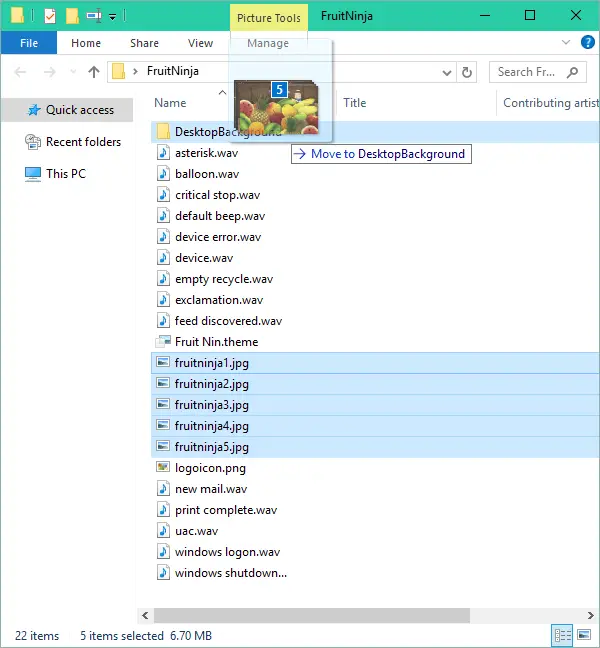
Double-click FruitNinja.themepack.cab to open it. This theme pack comes with 5 desktop wallpapers and 14 .wav files for Sound Events. Select all files in the cab file.
Right-click on the selection…you’ll get the following warning..
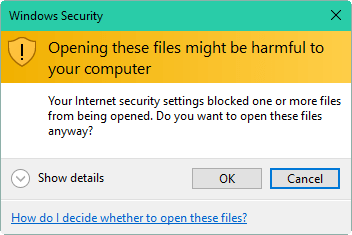
.. click OK, and click Extract… in the right-click menu.
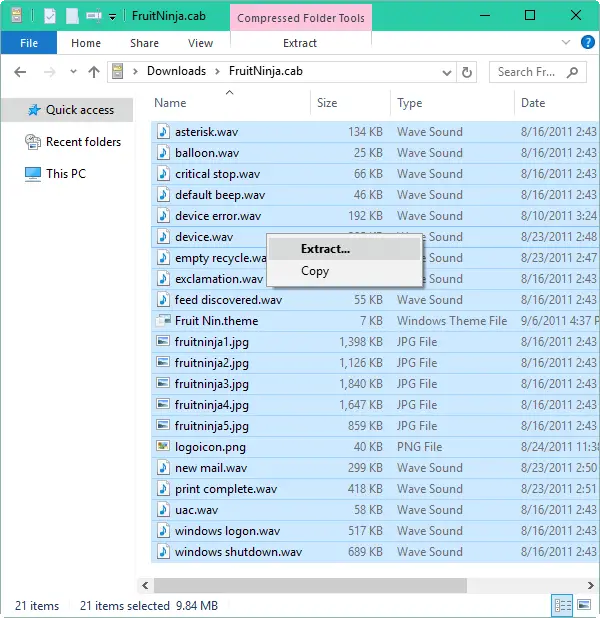
Extract the files to the FruitNinja folder that you created earlier.
In the FruitNinja folder, create a subfolder named DesktopBackground, and move all the .JPG images into the DesktopBackground folder.
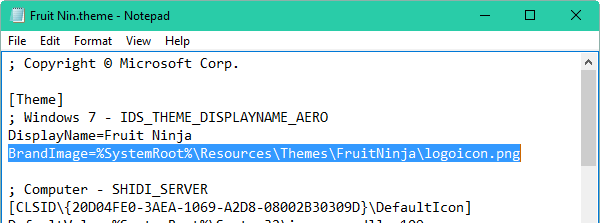
Next, open the file Fruit Nin.theme file using Notepad. We need to change the image and sound file paths mentioned in the file, to absolute paths.
Change the BrandImage line in the .theme file from:
BrandImage=logoicon.png
to
BrandImage=%SystemRoot%\Resources\Themes\FruitNinja\logoicon.png
Note: You’ll need to update the Paths for each and every file that comes with the .theme pack. However, do not update the lines that already contain the full or absolute path format.
Likewise, update the Wallpaper path accordingly.

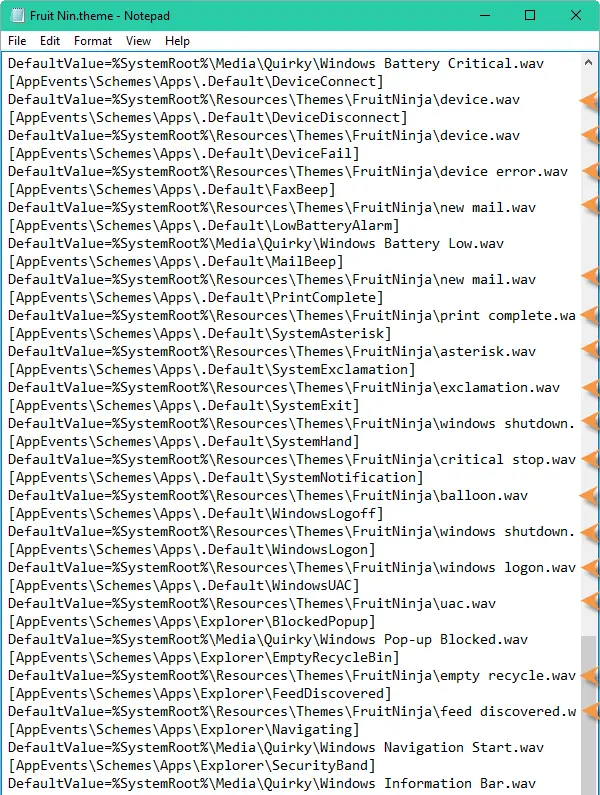
This themepack comes with many .wav files. Scroll down to to the .theme file until you see the lines containing text "AppEvents" that reference the .wav files.
Note that there is a lot of whitespace before the AppEvents part, and you need to scroll down a page or so.
Update the paths as shown below, to full paths. I’ve marked the modified lines using the orange arrow symbol.
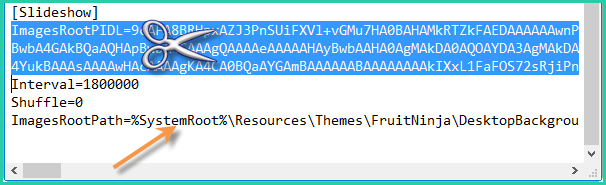
Under [Slideshow] section, Select the ImagesRootPIDL (the 3 lines) and delete it.
Update the ImagesRootPath value to full path, from…
ImagesRootPath=DesktopBackground
to
ImagesRootPath=%SystemRoot%\Resources\Themes\FruitNinja\DesktopBackground
Save the .theme file, and close Notepad.
Now copy the FruitNinja folder to C:\Windows\Resources\Themes folder.
Open C:\Windows\Resources\Themes\FruitNinja, and move the .theme file alone (Fruit Nin.theme) to it’s parent folder, that is C:\Windows\Resources\Themes.
It’s all set now. This lists Fruit Ninja Theme under Installed Themes, for all user accounts. I’ve tested it and every aspect of the theme — slideshow, sounds and colors work correctly!

(I hope you found this article useful. If you need to know more about creating/editing .theme files, read the MSDN documentation on Creating and Installing Theme Files.)
One small request: If you liked this post, please share this?
One "tiny" share from you would seriously help a lot with the growth of this blog. Some great suggestions:- Pin it!
- Share it to your favorite blog + Facebook, Reddit
- Tweet it!
OR simply put the theme in %windir%\Resources\Themes. That makes it appear under “Installed themes”. 🙂
@anon: If the theme file contains relative paths, simply copying the theme files/folder to the Resources\Themes folder would just do it. But that doesn’t simply work if the source .theme file already contains *absolute* paths. Also, this article is intended to provide some background info on customizing/applying themes, but just takes the Coke theme as an example 🙂
Hmmm… Good article. The process, however, seems complicated.
Perhaps I could use Visual C# Express 2008 to develop an application for handling ThemePack files … properly!
Thanks for this, very useful. One thing I have noticed though is that the theme doesn’t appear as a slideshow, it only shows the static wallpaper that’s set in the [Control Panel\Desktop] section. Until I click on Desktop Background under Personalize, and then it suddenly becomes a slideshow – but it also becomes a customised theme. Any way around this?
I found that to make the slideshow function you will need to add a section to the .theme file as follows
[Slideshow]
Interval=1800000
Shuffle=0
ImagesRootPath=%SystemRoot%\Resources\Themes\Arctic\DesktopBackground
Change the ImagesRootPath to point to the folder containing the images you want as part of the slide show. Change the Intreval value to change the speed of the slide show. This worked for me.
Does anyone know how I can upload my themepacks to the Microsoft website?
http://windows.microsoft.com/en-us/windows/downloads/personalize/themes
Great article. What does the BrandImage do?
Hello, Whats the correct path for sounds? The theme works great but no sound. thanks for the cool article
Thanks for this great guide. 🙂
But what should I do to have the same result in windows 8.1 with deskthemepack?
Thanks in advance
Tony
said this on Friday, August 6th 2010 7:19 am
Thanks for this, very useful. One thing I have noticed though is that the theme doesn’t appear as a slideshow, it only shows the static wallpaper that’s set in the [Control Panel\Desktop] section. Until I click on Desktop Background under Personalize, and then it suddenly becomes a slideshow – but it also becomes a customised theme. Any way around this?
Tony, I know this very late, but I had the same problem. The issue was I had used GPO to set Wallpaper. I removed this settings and the theme is now a slide show.
For users who commented in this page, please check Page 2 for a new write-up using another sample, the colorful Fruit Ninja theme 🙂 https://www.winhelponline.com/blog/share-desktop-theme-common-all-users/2/