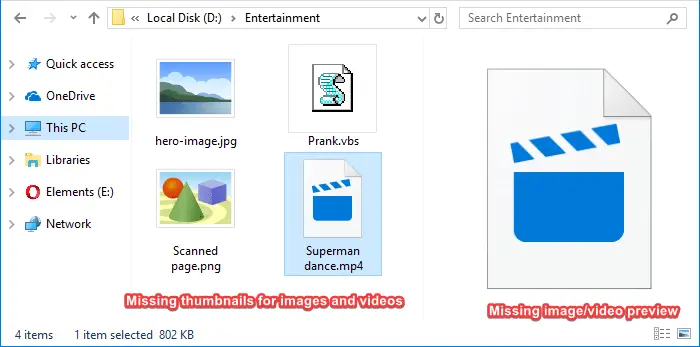
Are your image files showing up with a generic mountain and lake scene instead of the miniature or thumbnail display in File Explorer? And video files may show up with a generic icon/thumbnail.
This article tells you how to enable thumbnails in File Explorer on Windows 10/11 and earlier.
Fix: Thumbnails Not Showing up in File Explorer
To view the thumbnails for your images, media, or other file types, choose one of the following folder views from the ribbon toolbar:
- Medium Icons
- Large Icons
- Extra Large Icons
If thumbnail previews are not still not displayed, follow the steps below.
Enable thumbnails via Folder Options
- Right-click Start, and click Run.
- Type control folders and click OK. This opens the Folder Options dialog.
- In the View tab of Folder Options, uncheck the following option:
Always show icons, never thumbnails
- Click OK.
Alternatively, you can also enable thumbnails via the Performance Options dialog. Launch
sysdm.cplvia the Run dialog → Advanced tab → Performance → Settings → Show thumbnails instead of icons → OK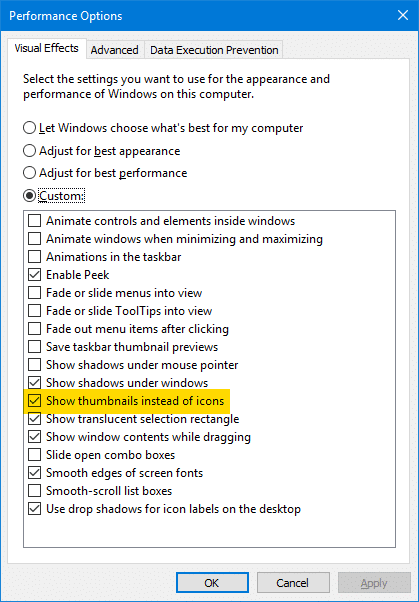
This restores the thumbnail images for your pictures, media, and all other file types.
See also
- Fix “No Preview Available” and No Thumbnails for Videos
- [Fix] PDF Thumbnail and Preview Not Showing Up in File Explorer
[Tweak] Enable or disable thumbnail view via the right-click menu
To toggle the display of thumbnail previews without going into Folder Options every time, here is a Windows Script solution for you that adds the Enable/Disable Thumbnails in the right-click menu.
- Download togglethumbs.zip and save it to the Desktop. The archive contains a registry file and a VBScript — both are plain-text files.
- Unzip the archive and extract the contents to a folder.
- Move the file
togglethumbs.vbsto theC:\Windowsdirectory. - Double-click
togglethumbs.regto merge the contents to the registry.
The Enable/Disable Thumbnails option is now added to the context menu, which will be seen when you right-click on the Desktop and when right-clicking on an empty area in a folder.
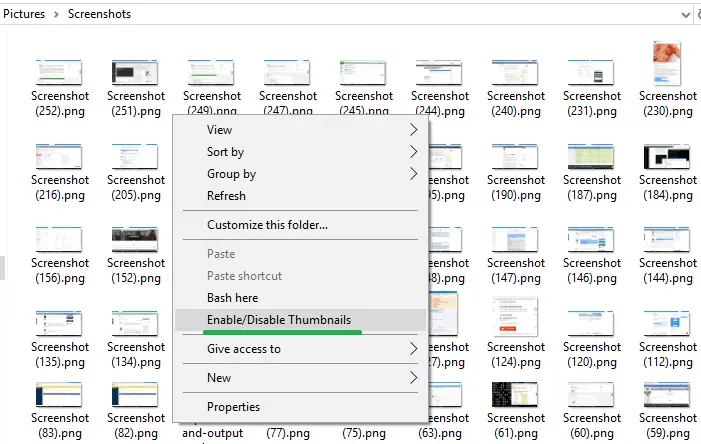
This adds the Enable/Disable Thumbnails option to the right-click menu. This script works in Windows Vista, 7, 8 and 10.
And here is a small YouTube video — togglethumbs.avi
Clear the thumbnail cache
If the thumbnails still don’t appear in File Explorer, see if clearing the thumbnail cache using Disk Cleanup helps.

See also
- How to Clear the Thumbnail Cache Using Disk Cleanup
- [Fix] Thumbnail Cache Auto Deletion Problem in Windows
Are thumbnails missing in OneDrive folders?
In some systems, the thumbnail previews don’t show up in the OneDrive Documents or Pictures folders, even though the files are available offline.
To work around the problem, disable the Files On-Demand feature in OneDrive.
- Launch OneDrive, and open settings.
- On the “Sync and backup” tab, disable the “Files On-Demand” toggle button.
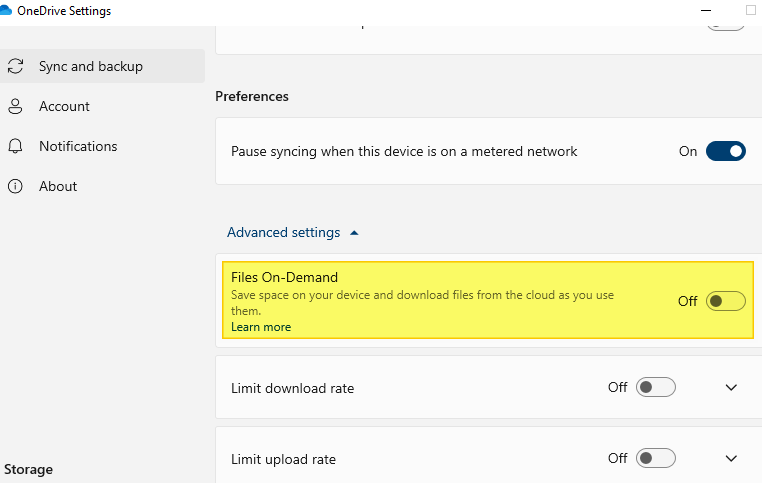
This should bring back the thumbnails in OneDrive folders.
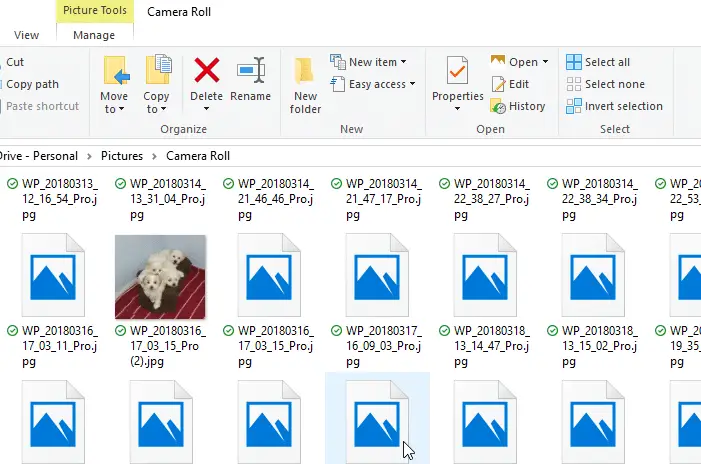
Check your Thumbnail registry settings
In some cases, none of the above steps work, and the thumbnails may appear blank, as in the image below:
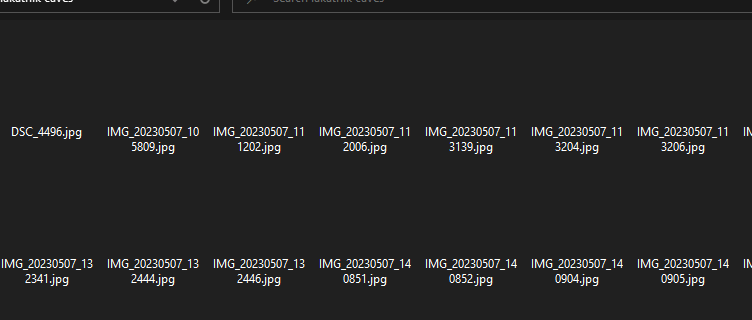
In that case, a registry setting may need to be fixed.
- Launch the Registry Editor by running
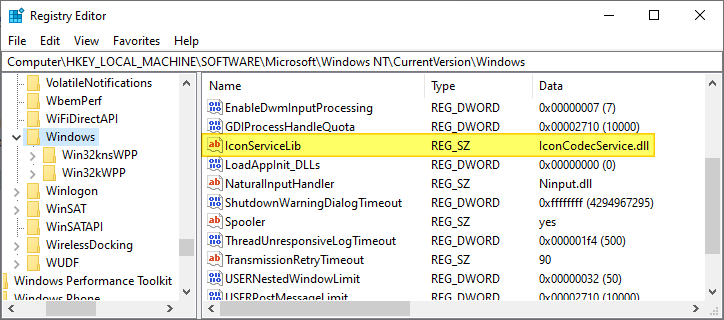
regedit.exe - In the Registry Editor, go to the following keys one by one:
HKEY_LOCAL_MACHINE\SOFTWARE\Microsoft\Windows NT\CurrentVersion\Windows

HKEY_LOCAL_MACHINE\SOFTWARE\Wow6432Node\Microsoft\Windows NT\CurrentVersion\Windows
- In each of the above keys, ensure the IconServiceLib REG_SZ value exists and points to IconCodecService.dll.
If the value is missing, create it manually and set its data as above.
- Exit the Registry Editor.
- Restart Windows.
Is the Preview Pane not working?
If the preview pane on the right shows the generic image instead of the actual image preview or video mini-player control, you’ll need to enable the Show preview handlers in preview pane option in the Folder Options dialog.
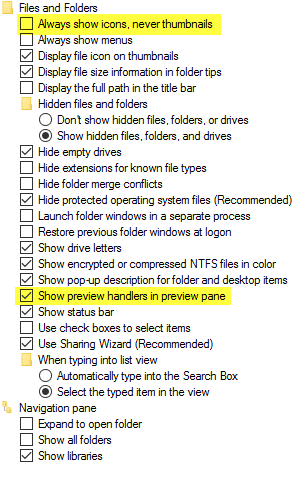
The thumbnails, as well as the preview pane functionality, should be restored.
One small request: If you liked this post, please share this?
One "tiny" share from you would seriously help a lot with the growth of this blog. Some great suggestions:- Pin it!
- Share it to your favorite blog + Facebook, Reddit
- Tweet it!
Thanks, this is excellent. Perfect instructions too – as usual.
This is a nice trick but can you please make it appear in the context menus of libraries (when browing pictures or videos libraries)?
Thank you so much for this. Days of searching came to an end when someone on a forum pointed me to this.
unchecking “always show icons, never thumbnails” worked for me thanks soo much.
excellent. What a rediculous oversight by windows, many thanks for this…
Thank you worked like a charm
thank you so much, it’s been along time I am looking for this to fix…thanks…
Is it anybody know where can I free download nvidia nforce system management driver? thanks
Thanks, I have been trying to fix this for years. Never thought it was such an easy fix.
Something that simple, i have been looking for days, thanks alot!!!!
Thanks so much! Such an easy fix and I have been missing my preview for so long now.
thank you very much! it works! 🙂
Perfect – thank you !
Thank you. I have been looking for two weeks for this answer (not very hard but still two weeks w/o being able to preview a jpg file w/o opening it 1st)
God Bless you
thanks, this was killing me
Now I can see the miniature image of my pic. You are the man!
The enable/disable option is open on the desktop but not in any other folder. What did I do wrong?
Thanks
Clear the Thumbnail Cache
worked for me. thanks
How to make this context menu option appear in the Pictures Library’s context menu?
Okay. Adding it to HKCR\LibraryFolder\Background\Shell makes it appear in Libraries.
You are the BEST!! I ve been going crazy. Thank YOU!!
thank you… I forgot that I set “Always show icons, never thumbnails” myself 😀
Freakin love it!!!
Works like a charm …. Thanx!!!
Thank you!!! clearing the cache works for me! 🙂
…wonderful!
Using Classic Shell you can put an icon on menu bar to toggle it 1 click directly. ->Settings for Classic Explorer (3.6.5 or later) > Toolbar buttons> Avail. commands:> Custom commands. Just target the button to the togglethumbs.vbs on Windows directory. You can choose any icon, i.e. System32\imageres.dll, 71 or other ”pictures images”.
If you want to install Classic Shell and disable start menu modifications:
“On Vista and Windows 7 the classic start menu is started using the
HKLM\Software\Microsoft\Windows\CurrentVersion\Run registry key,
which is shared by all users.” Remove the Classic Start Menu value:
C:\Program Files\Classic Shell\ClassicStartMenu.exe
The control folders directions worked for me. Thank you! I haven’t been able to see previews for over a year now and had no idea how that even happened.
yay!!!! thank you, thank you, thank you!!
This was real help. Instant thumbnails, not a lot of B.S. You deserve a raise.
Great! just the ting i was looking for, it’s been bugging me for a long time! your the best!
Some people just come to this world to help…
Thank You Sir…….
Tnx a lot…It was very useful to me.
Thank you very much it was really helpful
This did the trick.
Thanks!
you’re a damn genius, all other websites give the basic “did you check off always show icons?” Finally, something useful!!
thns a lot. solve the problem.
It solved the problem. Thanks.
Thank you very much for this post. it worked for me.
Fantastic! A great annoyance that had been a lingering pain like a splinter in my toes has been lifted 🙂
THANK YOU SIR!!!
It did not still worked for me. Please help.
Im feeling dumb on searching the cause.
Thanks. It works for me.
Exactly what I have been looking for. Thank you!!
This didn’t fix the Dropbox app. Still shows mountains.
excellent… back to normal now my pictures preview thumbnails, thanks Dan your good mate. Cheers
Great, simple, to the point and working! Thanks a million for sharing, highly appreciated. Solved a problem I was dealing with for 3 hours in 5 secs.
#############################################
Simplest Way!
Copy the below lines into any text editor and save with .reg extension. Double click to import into registry. Viola! the issue is fixed.
#############################################
Fantastic 🙂 Thank you!
I have tried eight disk cleanups. I have performed six hard and soft reboots to the computer. I have tried deleting the cache several times. I have checked and unchecked the show thumbnails not icons and show icons not thumbnails about eighteen times. Hell, I even tried the fixes that require Command Prompt! Yet, nothing works and I am still getting generic icons for most of my files and folders!
I am having the same issue. I don’t see dates on any of the replies here so I have no idea when you wrote this, but since the last Windows update (I dunno, about a week ago? It’s now 10.25.2021) this problem rose and now I’ve been searching for days, literally, for a fix.
I’ve googled my fingers off, I’ve done just about everything but dance a jig and I still do not have all my picture thumbnails showing. Desktop icons are fine. File folders in Explorer are fine. But images… mostly jpg I’ve noticed, but even some of them show. It’s bizarre and I’ve now been studying Linux to see if I wanna make the move. SOOO tired of Winblows.
Hopefully someone will know what is going on because the dozen or so fixes I’ve tried have done nothing.
I have nearly given up trying to resolve the thumbnail issue which was brought on by a Windows 10 update. Obtaining assistance from m$ is futile. Have tried many many suggestions but nothing works. Therefore, since the vbs script was something new, thought I would try it. However, there is no way for me to move, copy or cut the vbs script to the windows folder. Do you have any suggestions? Thanx!
@Dan: Open C:\Windows and drag the VBScript to that folder. Click Yes when you see the UAC prompt.
Thank you! It worked
I started having problems with this after I had installed Adobe Photoshop Premiere and asked it to search all files.
Sometimes my PC will display the thumbnails, sometimes it won’t. Today, for instance, it’s displaying some thumbs along with some icons in all the photo folders.
I could probably resolve it by resetting the PC but it’s a lot of hassle. I’ll wait until the next crash and reset.
First fix worked! Thank you!
How do you get thumbnails in Details view and List view in Windows Vista and later? Some screenshots show them; others do not.