Many of us, especially laptop users, have more than one Wi-Fi network profile set up on our systems. You might use a Wi-Fi network connection when at a coffee shop where you frequent, and connect to another network when at home or office.
This post explains how to backup and restore Wi-Fi network profiles in Windows 7, 8, and Windows 10.
Saving Wi-Fi profile passwords helps you connect to networks automatically when in the range, without having to type the SSID and password every time. It’s even more helpful when connecting to hidden networks.
Hidden networks are hotspots with SSID broadcast turned off — which means you’ll need to type in the SSID (if you know the name) in addition to its PSK to connect to the network.
Additionally, you may want to backup all the saved Wi-Fi profiles with their passwords by exporting the configuration to XML files.
Backup Wi-Fi Profiles by exporting them to XML files
- Create a folder where you want to save your Wi-Fi profiles.
- Open the folder.
- In the Explorer address bar, type
cmd.exeand press Enter to open a Command Prompt window. - In the console window, type the following and press Enter:
netsh wlan export profile
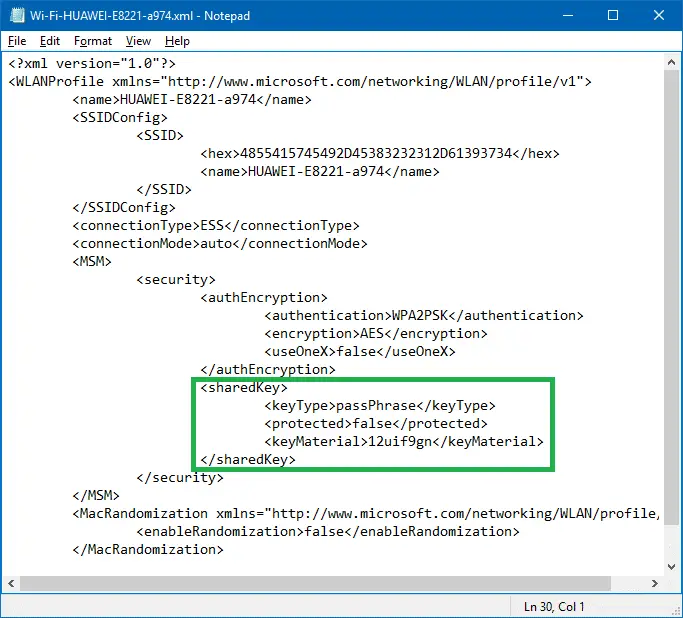
The passphrase or the Pre-Shared Key (PSK) is encrypted in the XML file. If you need to export the profile with the passphrase in plain text you’ll use the following command:netsh wlan export profile key=clear
You should see the following output — telling you that the export was successful, for each Wi-Fi profile.
Interface profile "XT1068 4219" is saved in file ".\Wi-Fi-XT1068 4219.xml" successfully.

Interface profile "Ramesh" is saved in file ".\Wi-Fi-Ramesh.xml" successfully.

Interface profile "HUAWEI-E8221-a974" is saved in file ".\Wi-Fi-HUAWEI-E8221-a974.xml" successfully.
The files are created in the same directory where you’re currently in. The XML files contain information about the Wi-Fi profiles, such as the SSID, Security and Encryption type, passphrase, auto-connect preference, MAC address randomization choice, etc.
Netsh Command-line help – “Export” parameter
netsh wlan export profile /?

Usage: export profile [name=] [folder=] [[interface=]] [key=]

Parameters:

    Tag             Value
    name          - Name of the profile to export.
    folder        - Name of the folder in which the profile XML files
                    will be saved.
    interface     - Name of the interface which has this profile configured.
    key           - To display the key in plain text, set key=clear.

Remarks:

    Saves the selected profiles into XML files in the specified folder.
    For each exported profile, the output file will be named as
    "Interface Name-Profile Name.xml".

    Parameters folder, name and interface are all optional. If profile
    name is given then the specified profile will be saved. Otherwise
    profiles on any interface will be saved.

    If the folder parameter is provided it must specify an existing folder
    accessible from the local computer. It can either be an absolute path,
    or a relative path to the current working directory. In addition, "."
    refers to the current working directory, and ".." refers to the parent
    directory of the current working directory. The folder name cannot be
    a UNC (Universal Naming Convention) path. By default profiles will be
    saved in the current working directory.

    If interface name is given, only the specified profile on the given
    interface will be saved. Otherwise all profiles with the given name
    on the system will be saved.

    If a key in plain text is required and the caller is local administrator,
    output XML file will include the key in plain text.
    Otherwise, the output XML file will include encrypted key.

Examples:

    export profile name="profile 1" folder=c:\profiles
        interface="Wireless Network Connection"
    export profile name="profile 2" folder=.
    export profile name="profile 3" folder=. key=clear
As you can see above, you can export individual Wi-Fi profiles by specifying their name and the interface (if there are multiple Wi-Fi interfaces in the system). Also, you can mention the output folder path.
The Name, Interface, and Folder parameters are optional, though. If those parameters aren’t specified, by default, all Wi-Fi profiles are exported to the current folder location.
Quick Tip: You can view the list of Wi-Fi interfaces and connections by running the command: "netsh wlan show profiles".

Import Wi-Fi Profile from an XML file
The backed-up XML file(s) can be restored when needed — especially when you remove a Wi-Fi profile accidentally by clicking the “Forget” button and you don’t remember the SSID of a hidden network and its password. The XML files also come in handy after clean installing windows or if you want to import them into other systems.
To import the XML file to re-add the profile, use this command:
netsh wlan add profile "xmlfilename"
Example
netsh wlan add profile "d:\wlan profiles\Wi-Fi-XT1068 4219.xml"

The following output is shown:
Profile XT1068 4219 is added on interface Wi-Fi.
That’s it. The profile is now recreated. Repeat the same for each Wi-Fi profile you want to add.
One small request: If you liked this post, please share this?
One "tiny" share from you would seriously help a lot with the growth of this blog. Some great suggestions:- Pin it!
- Share it to your favorite blog + Facebook, Reddit
- Tweet it!